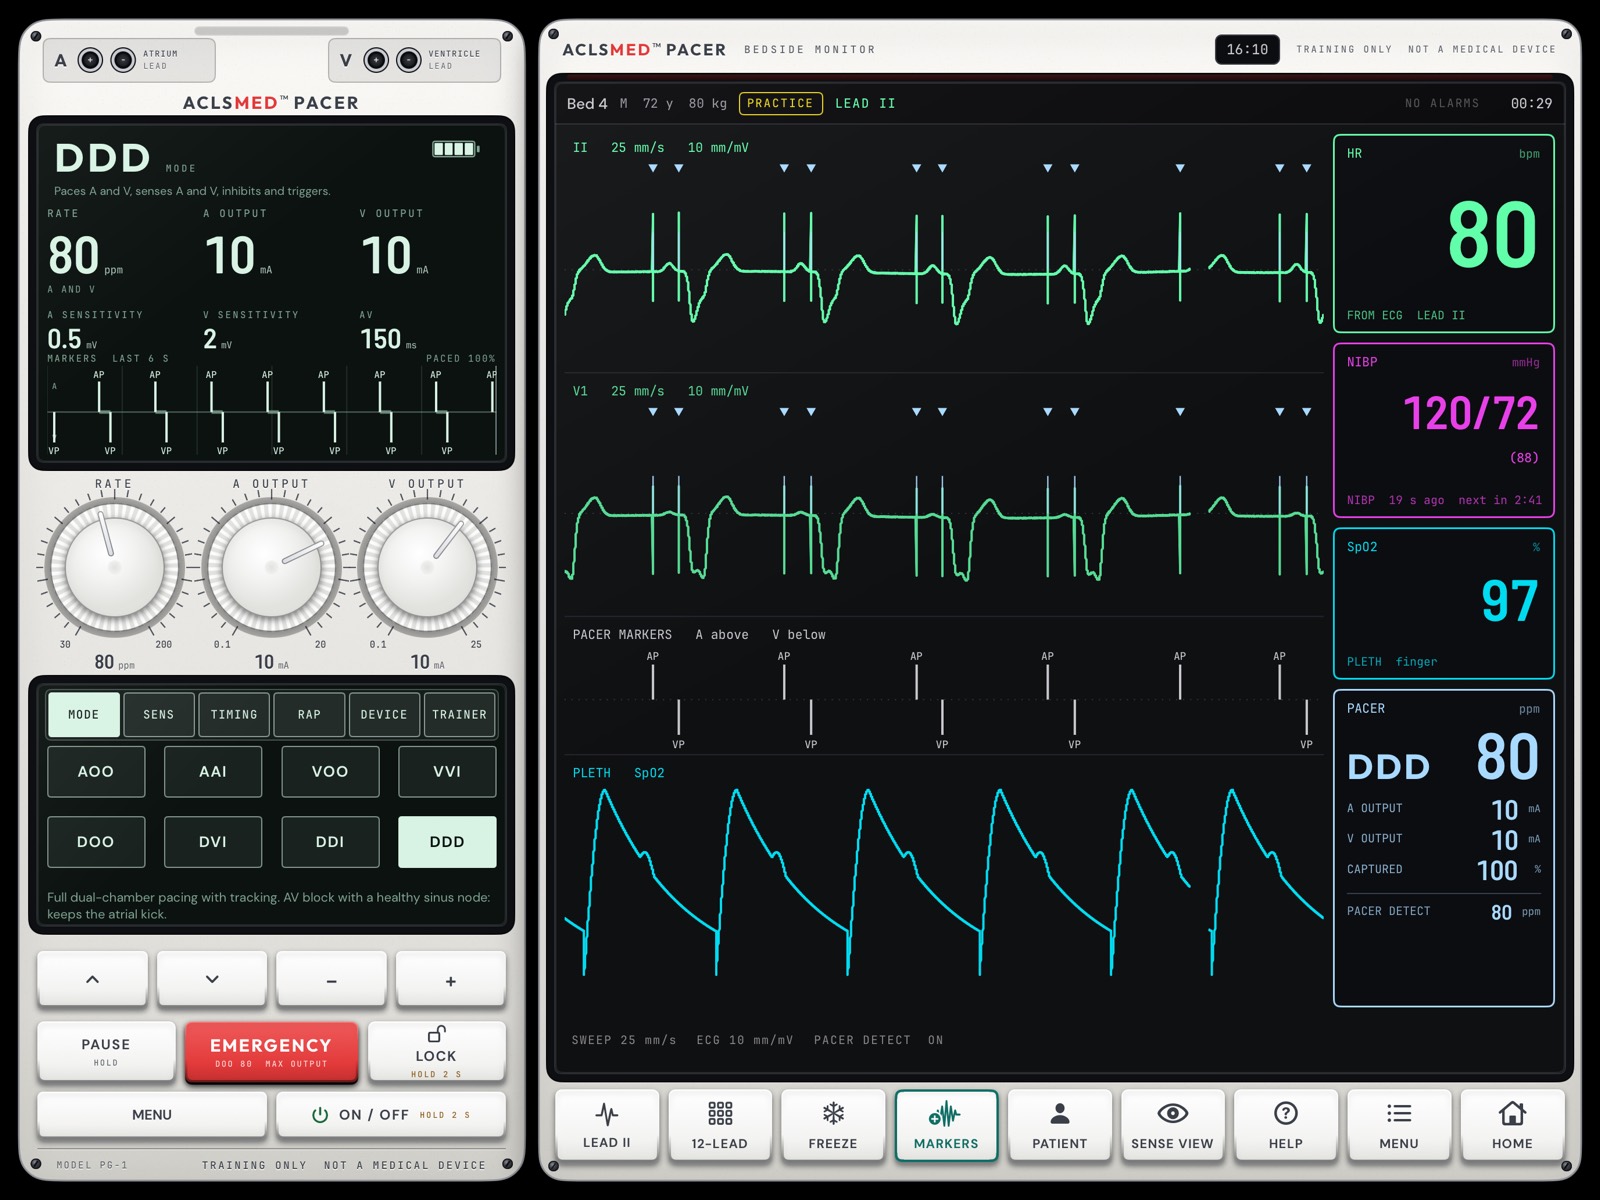
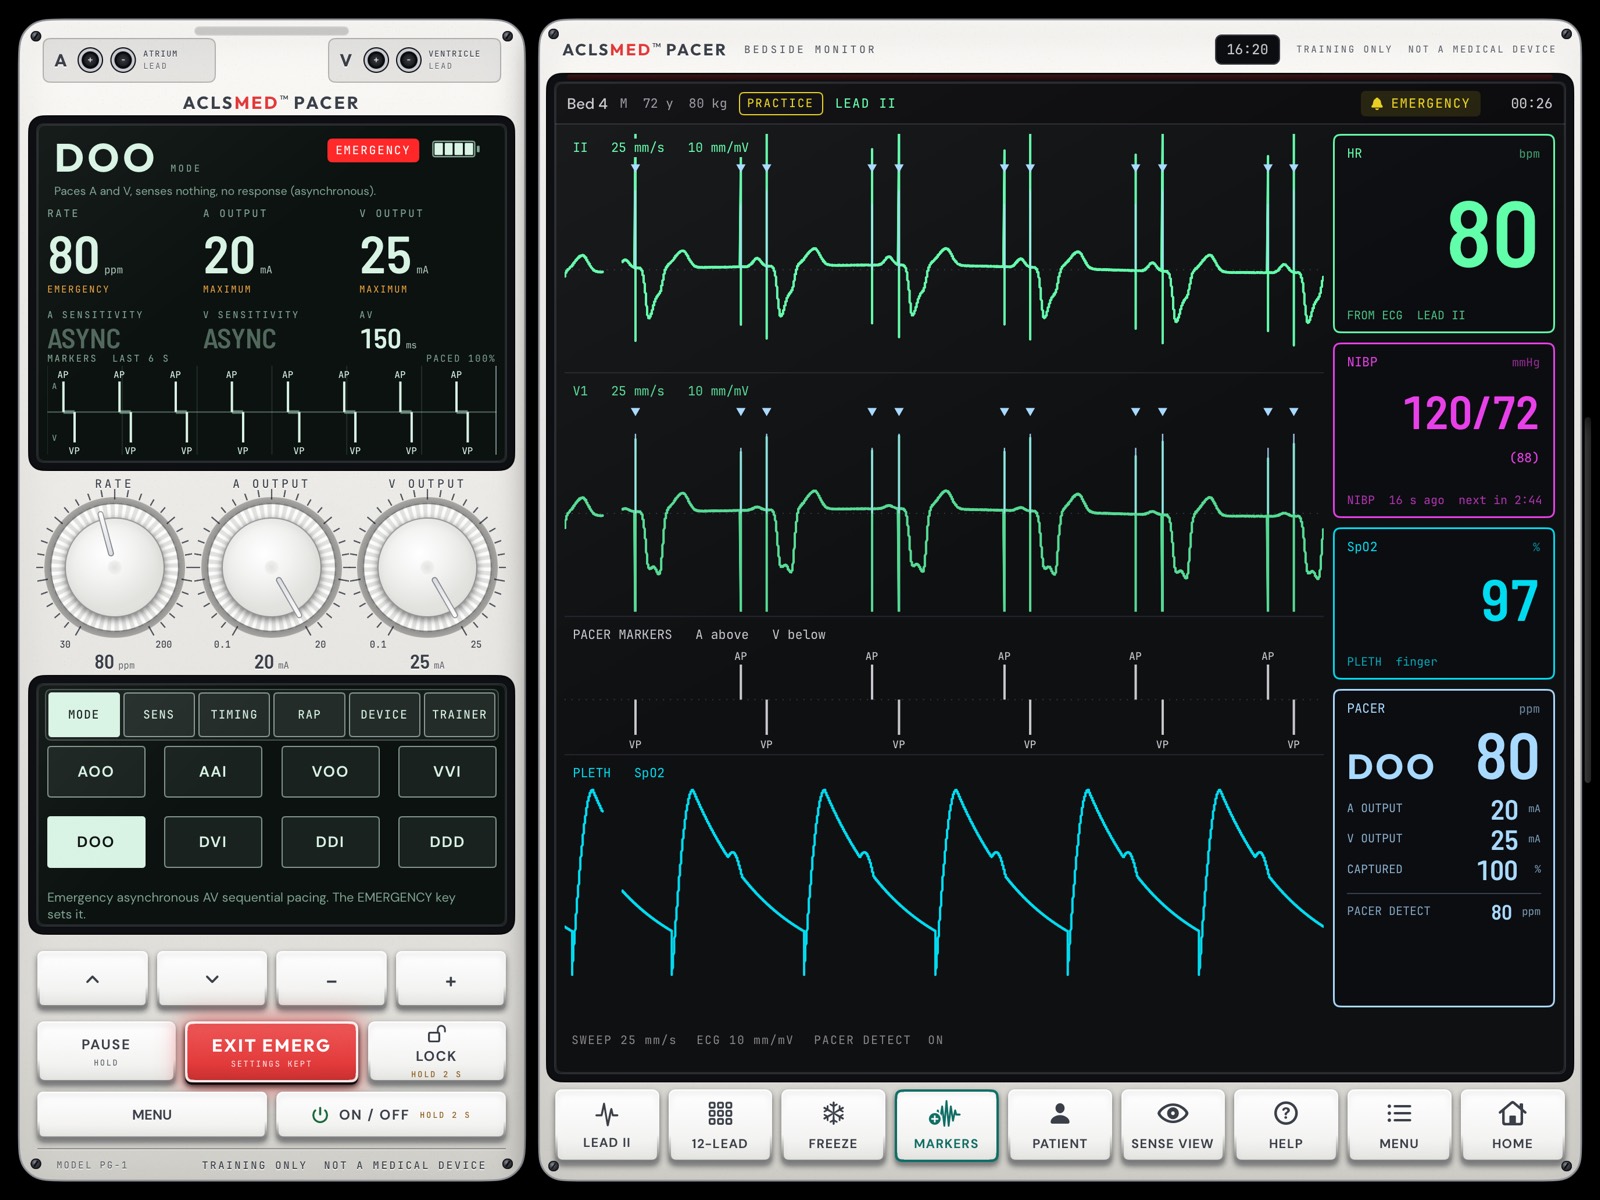
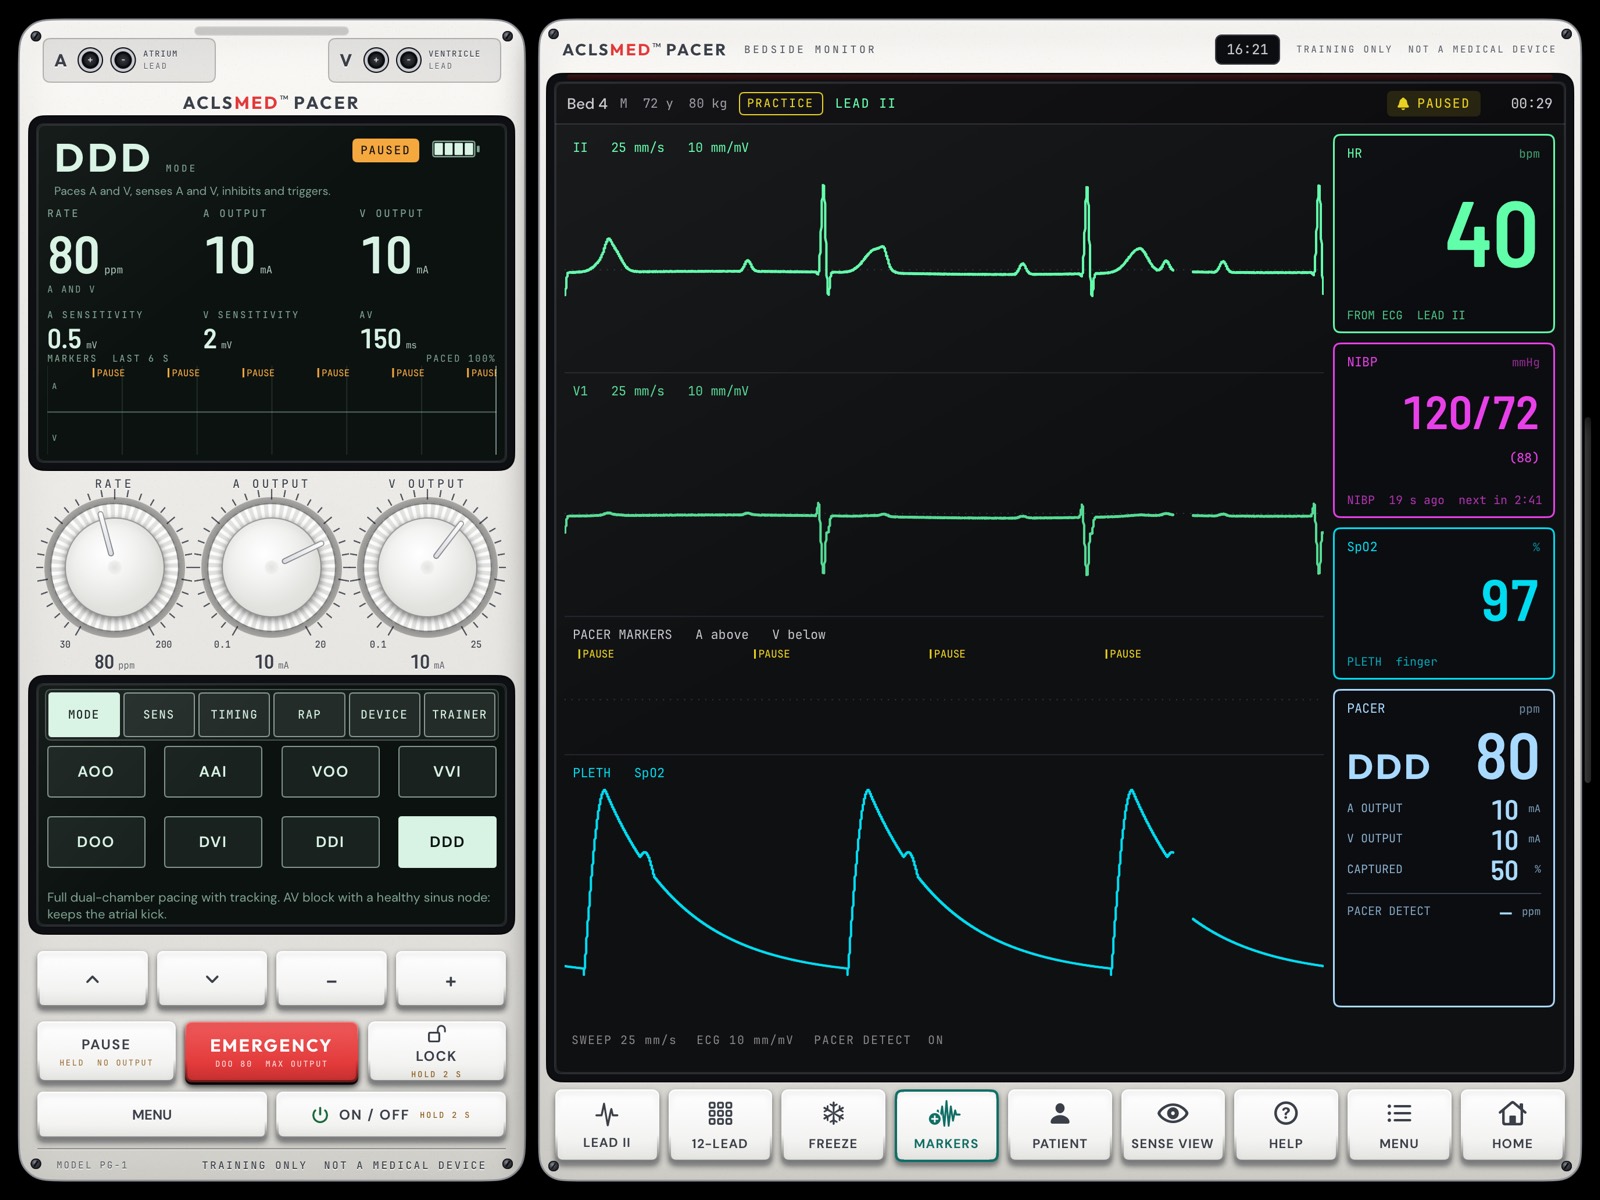
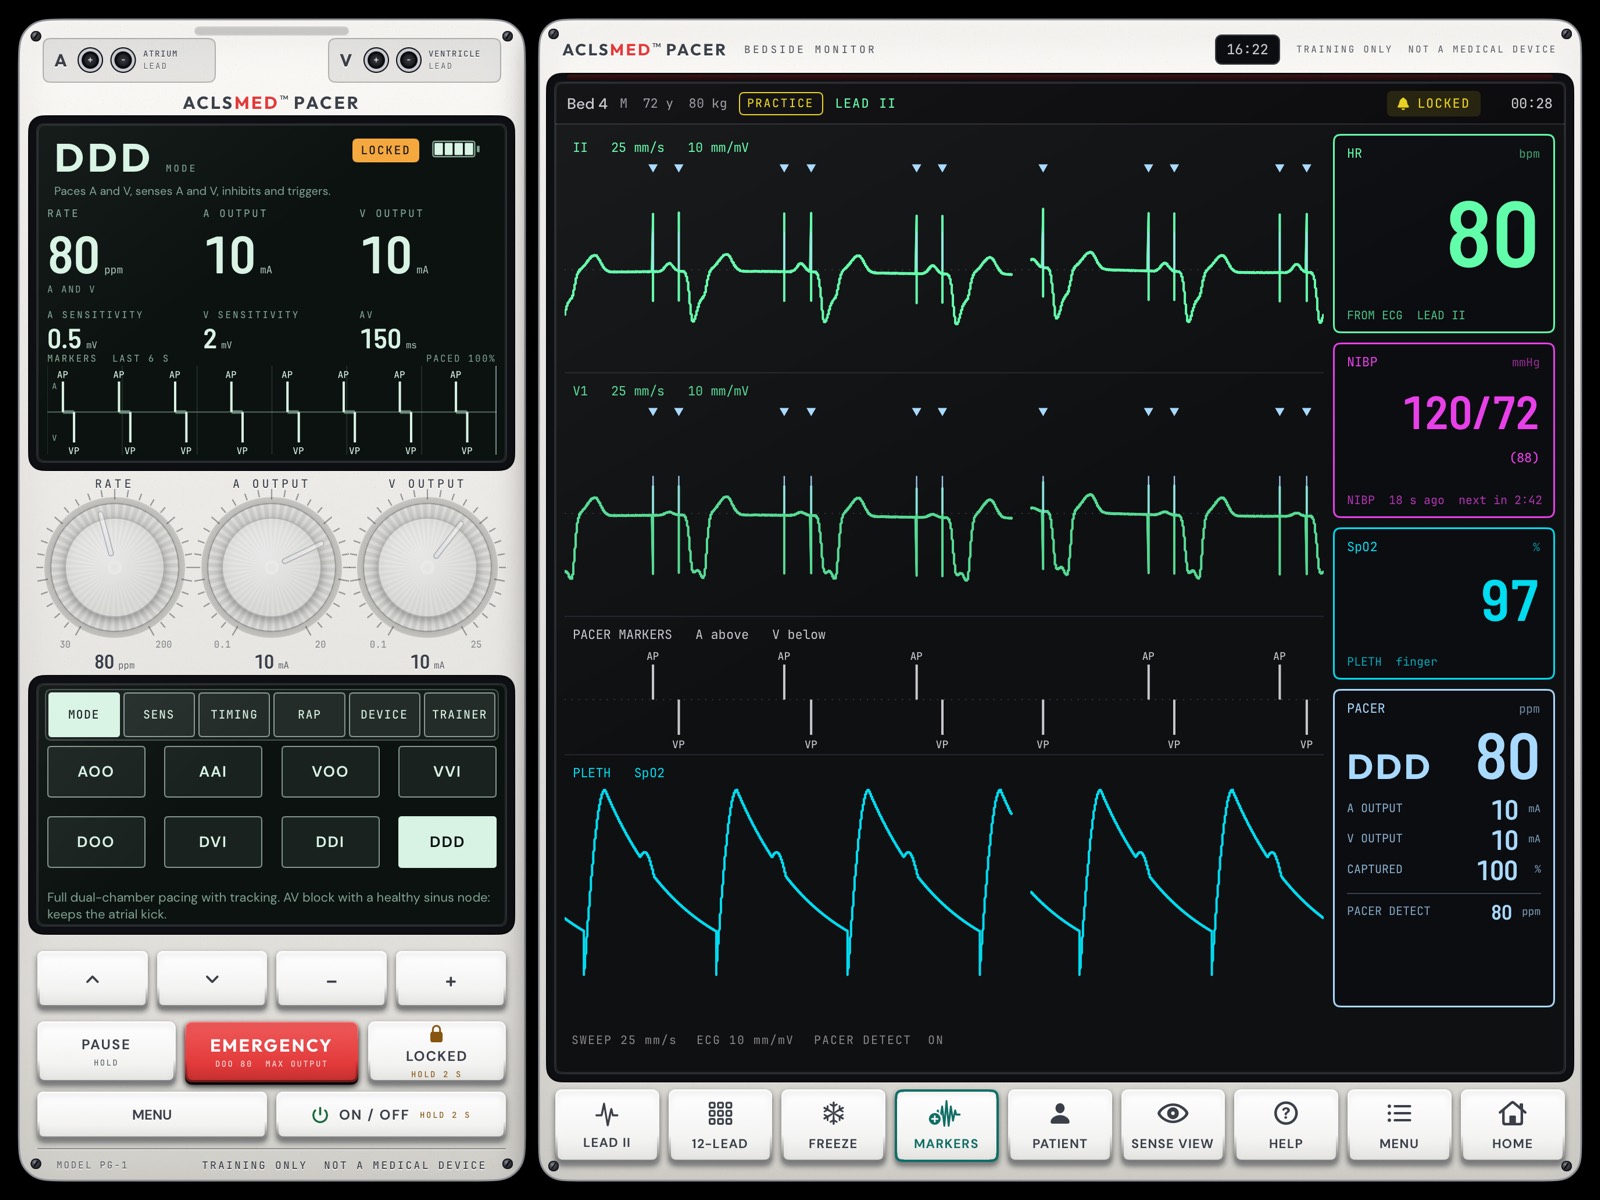
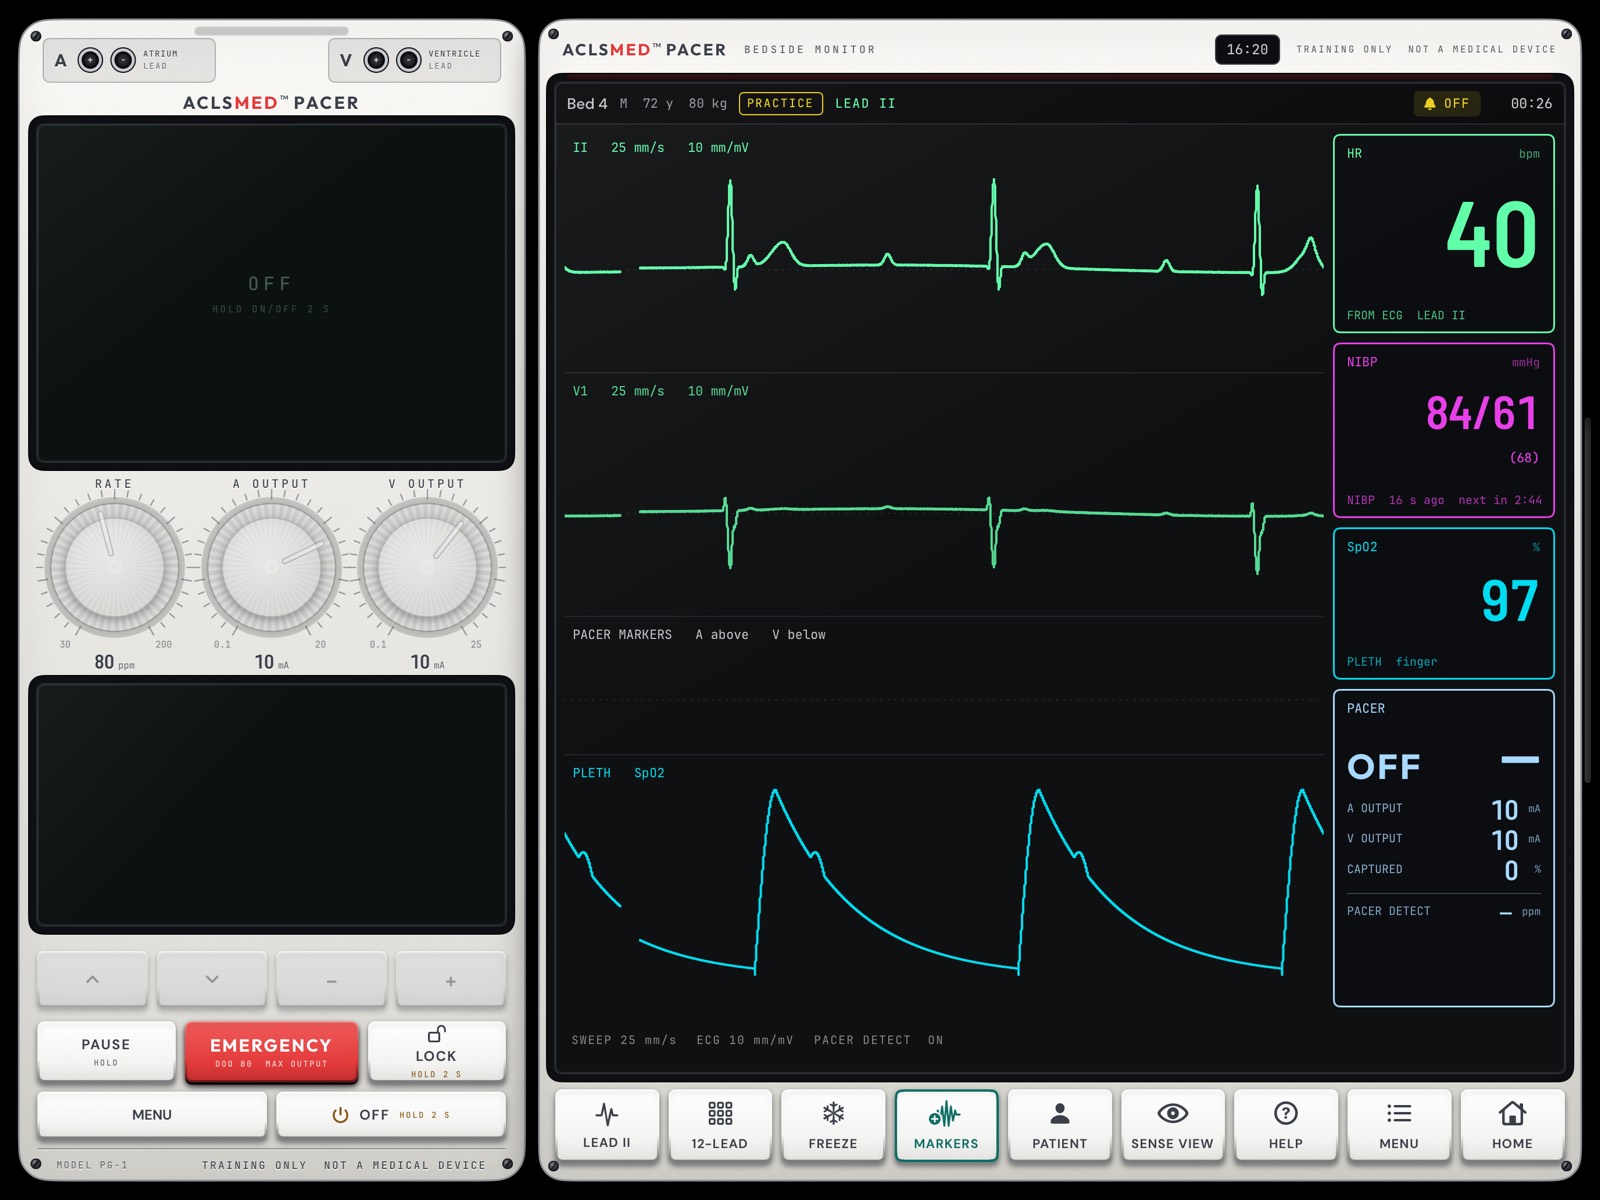
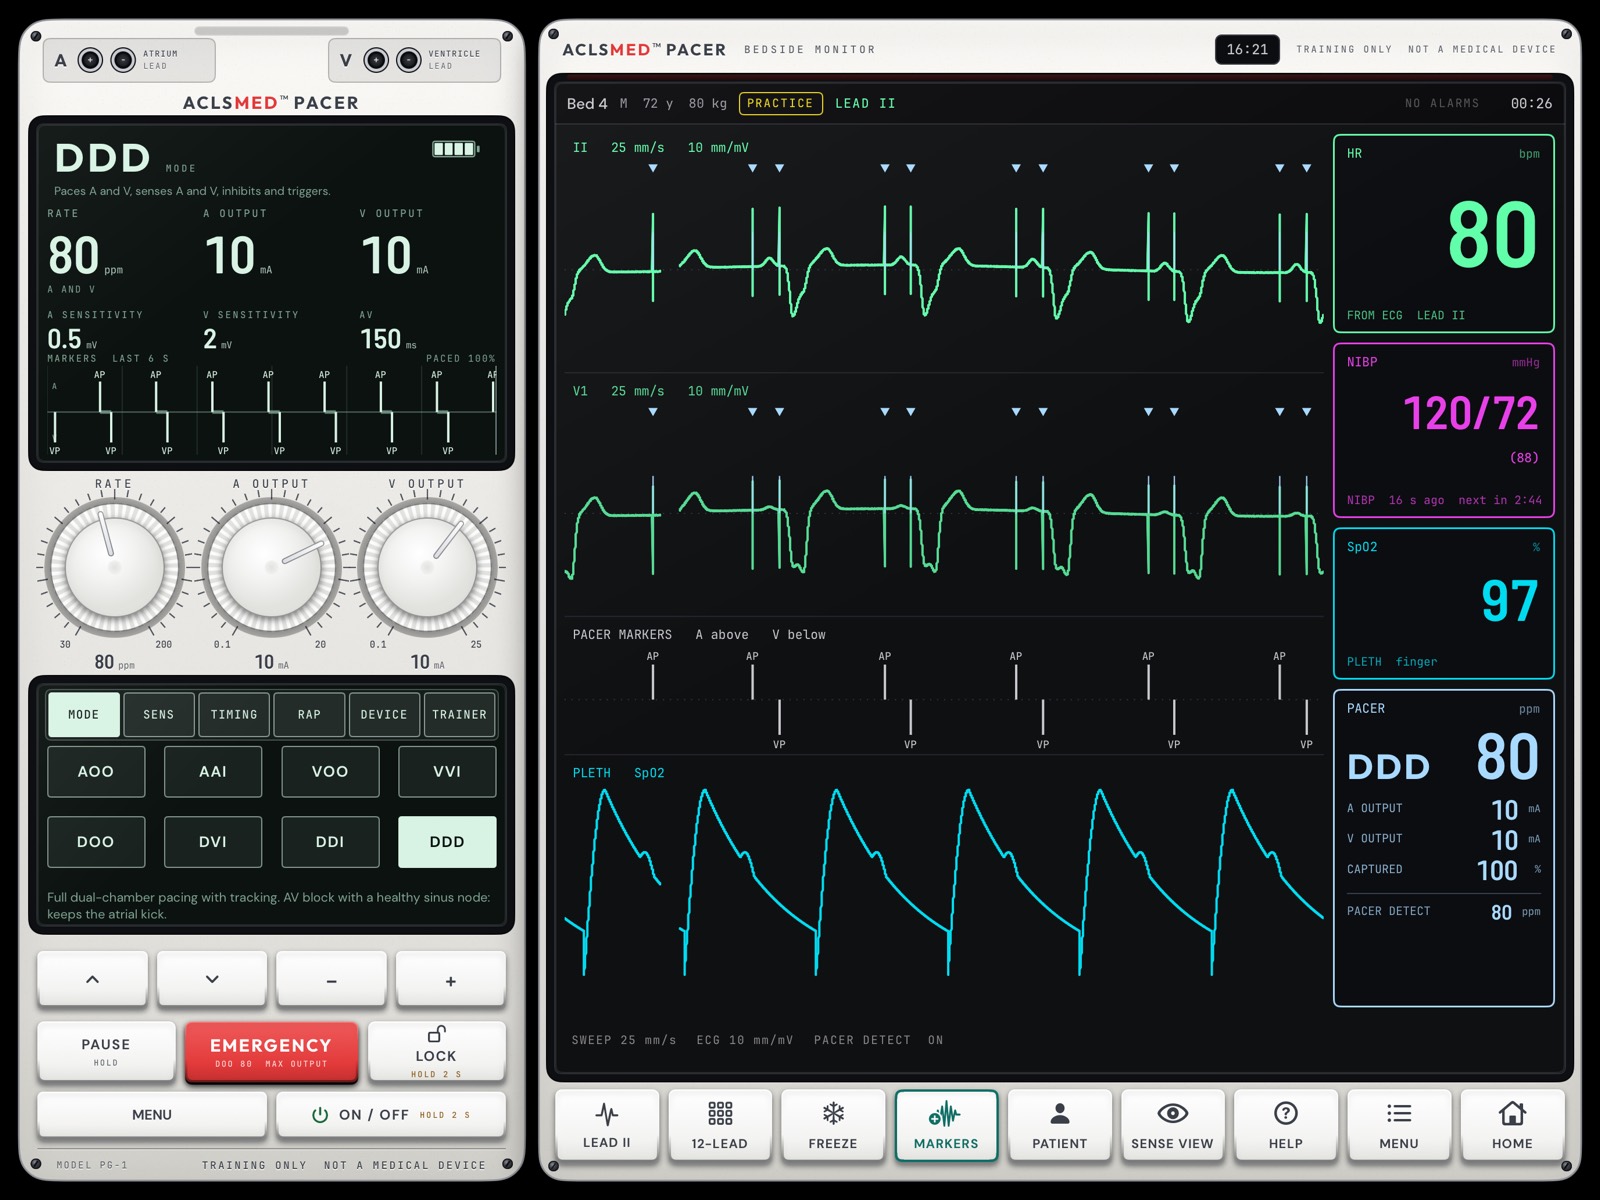
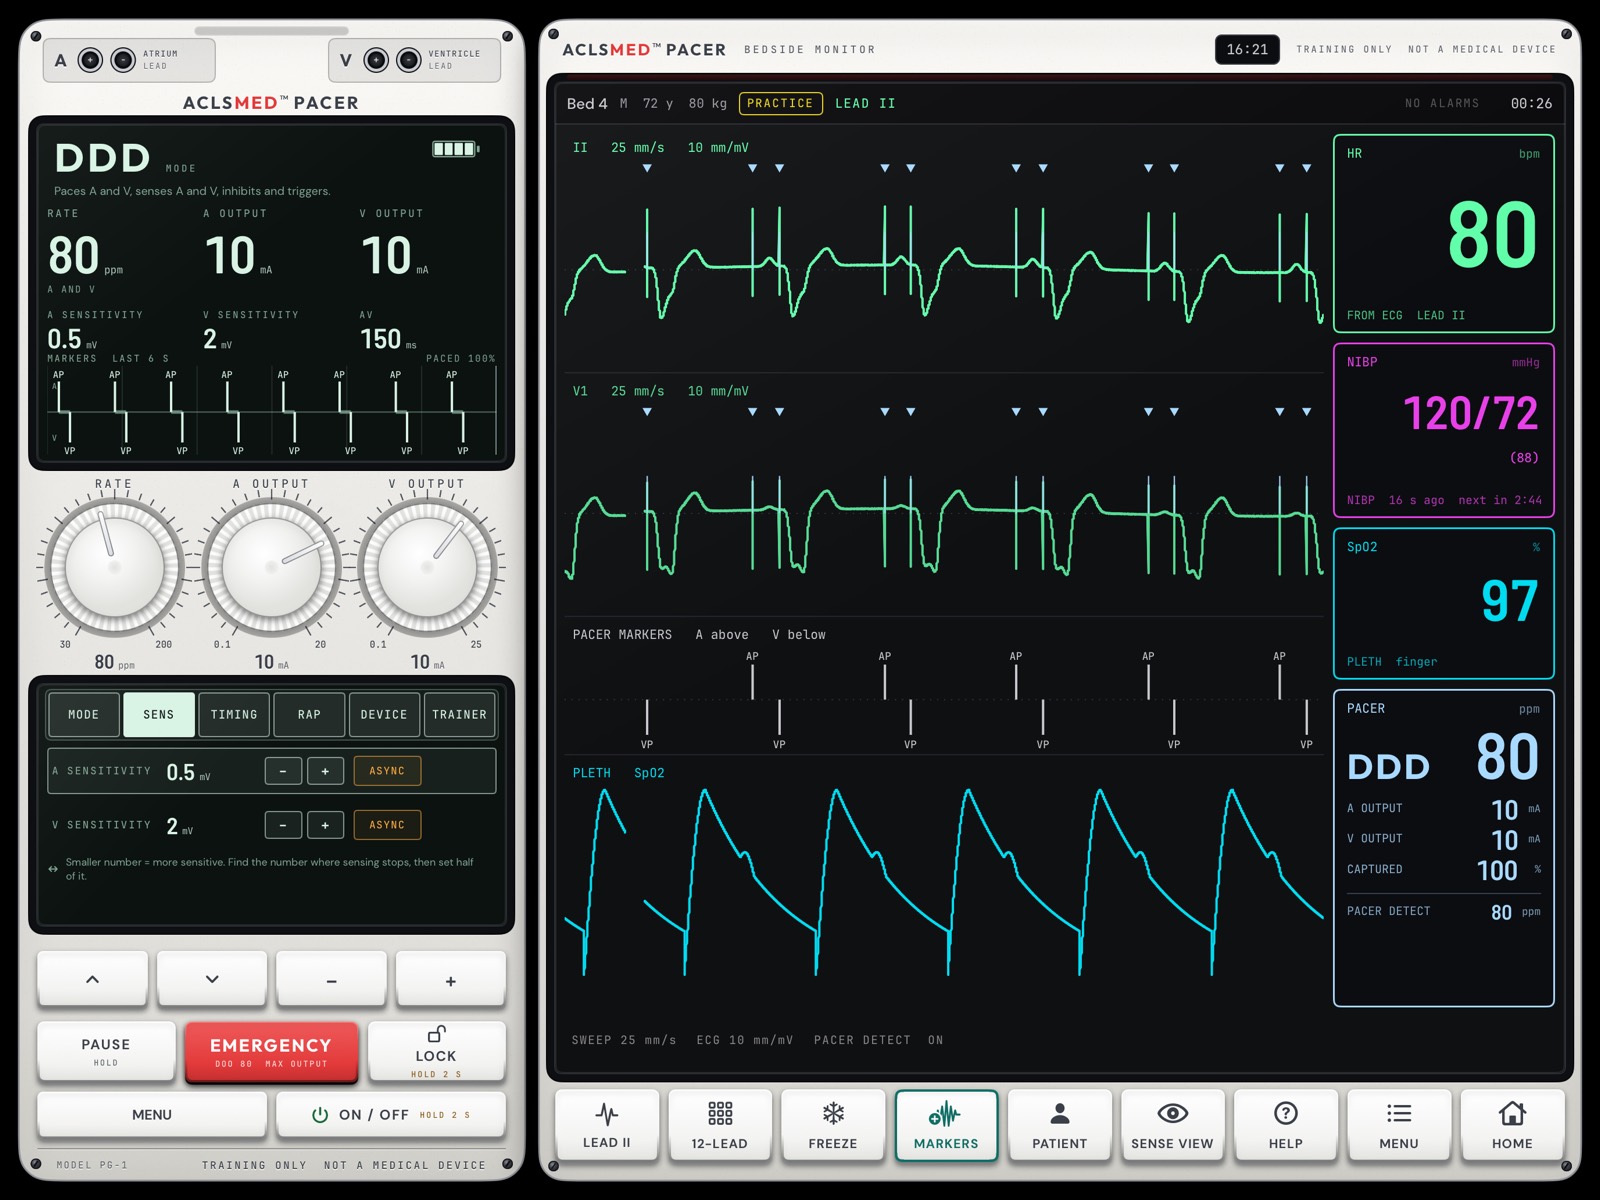
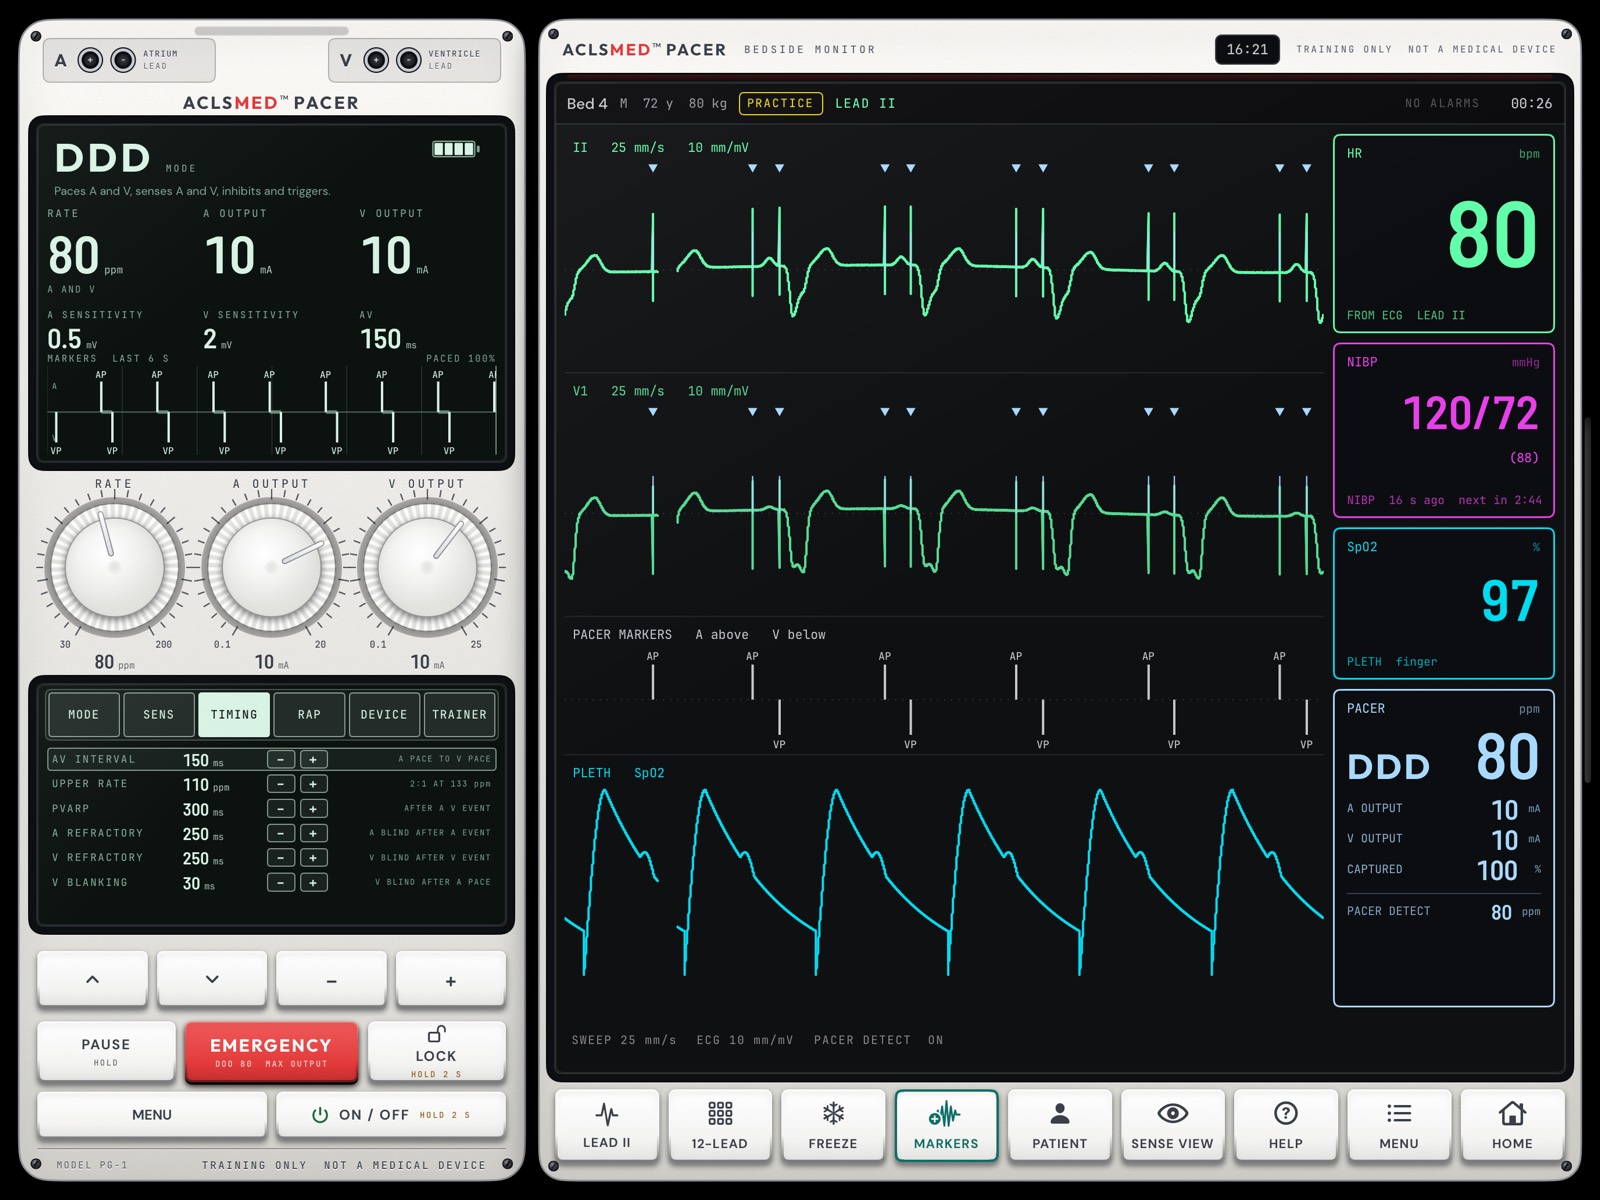
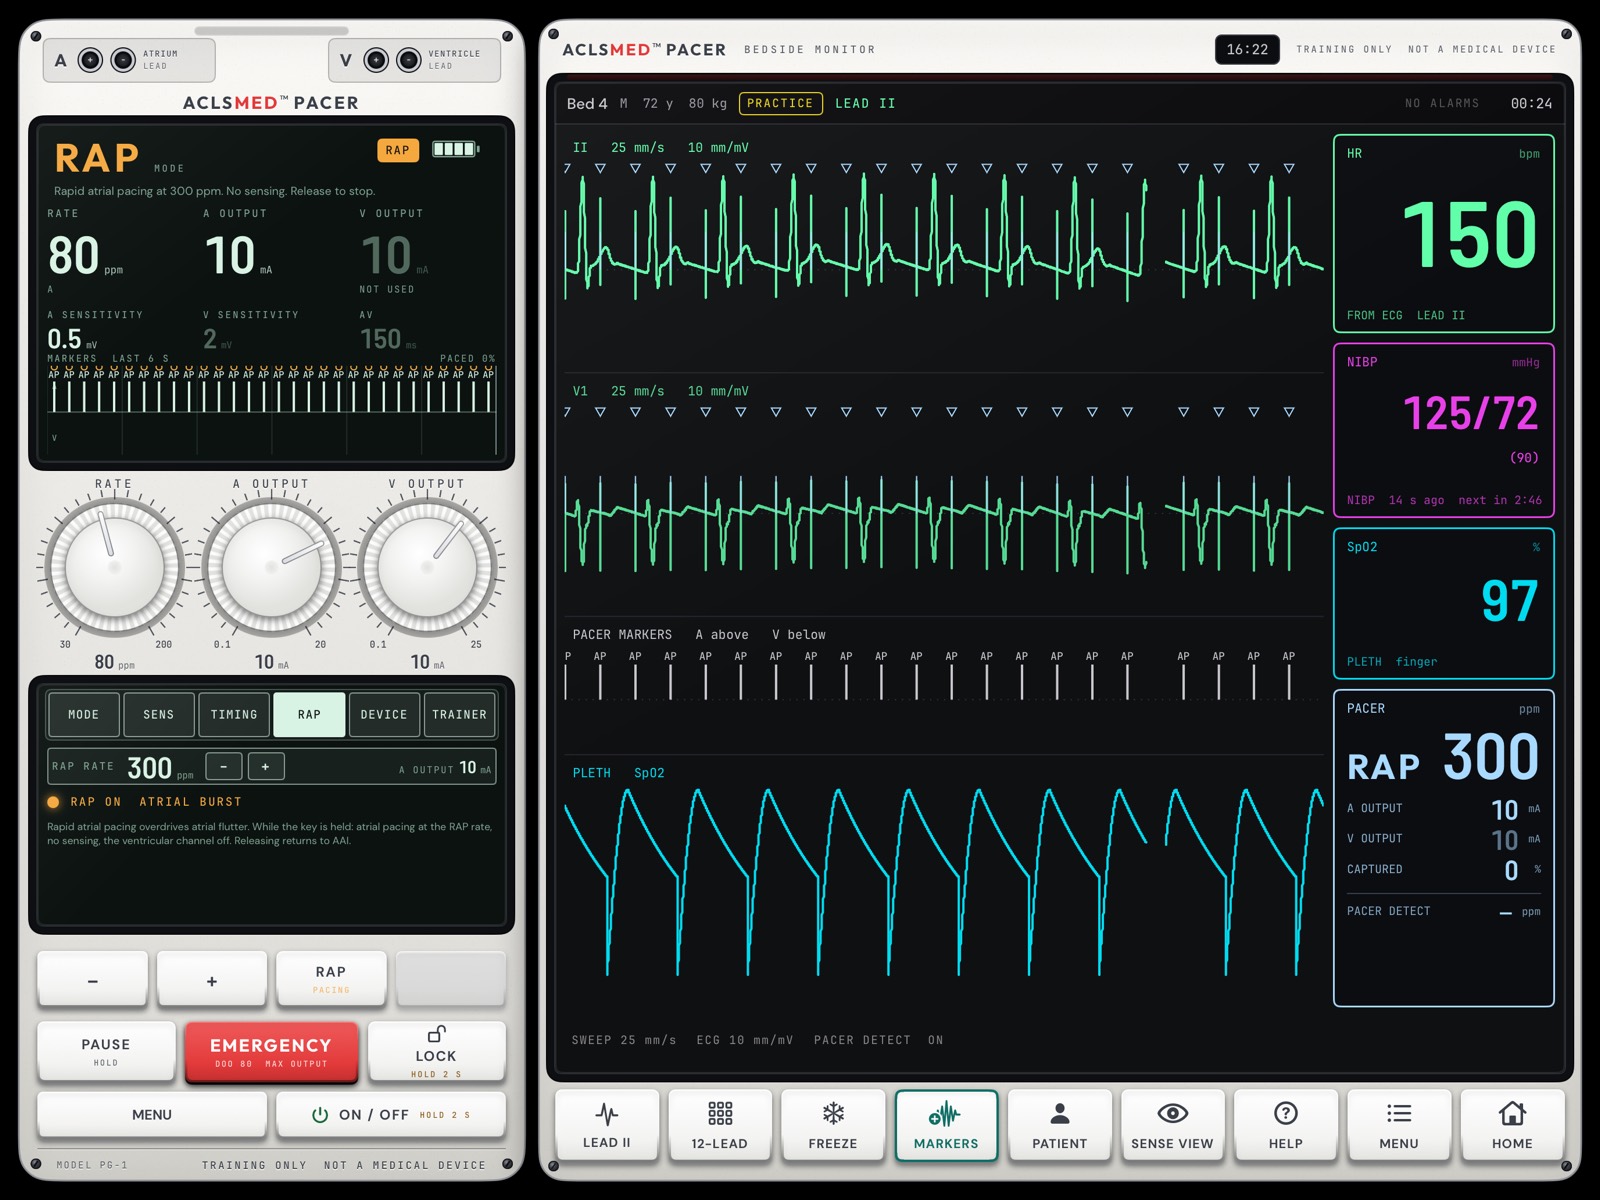
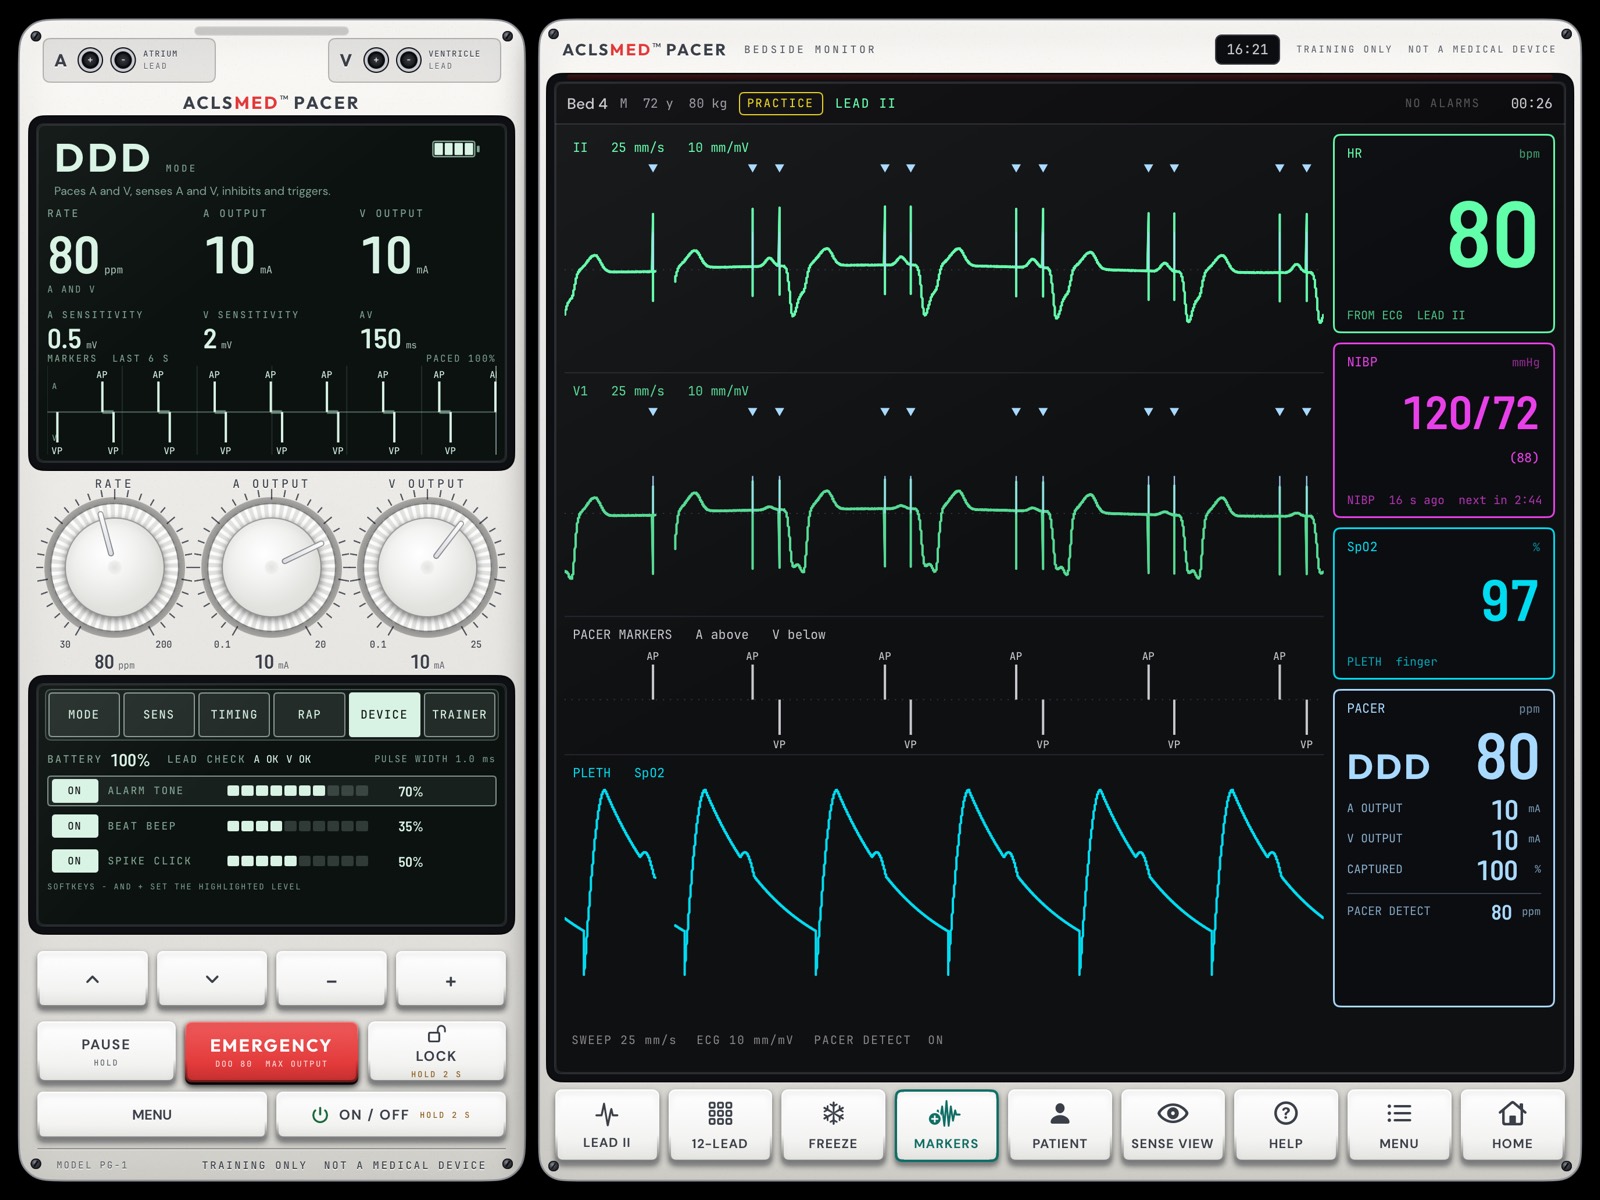
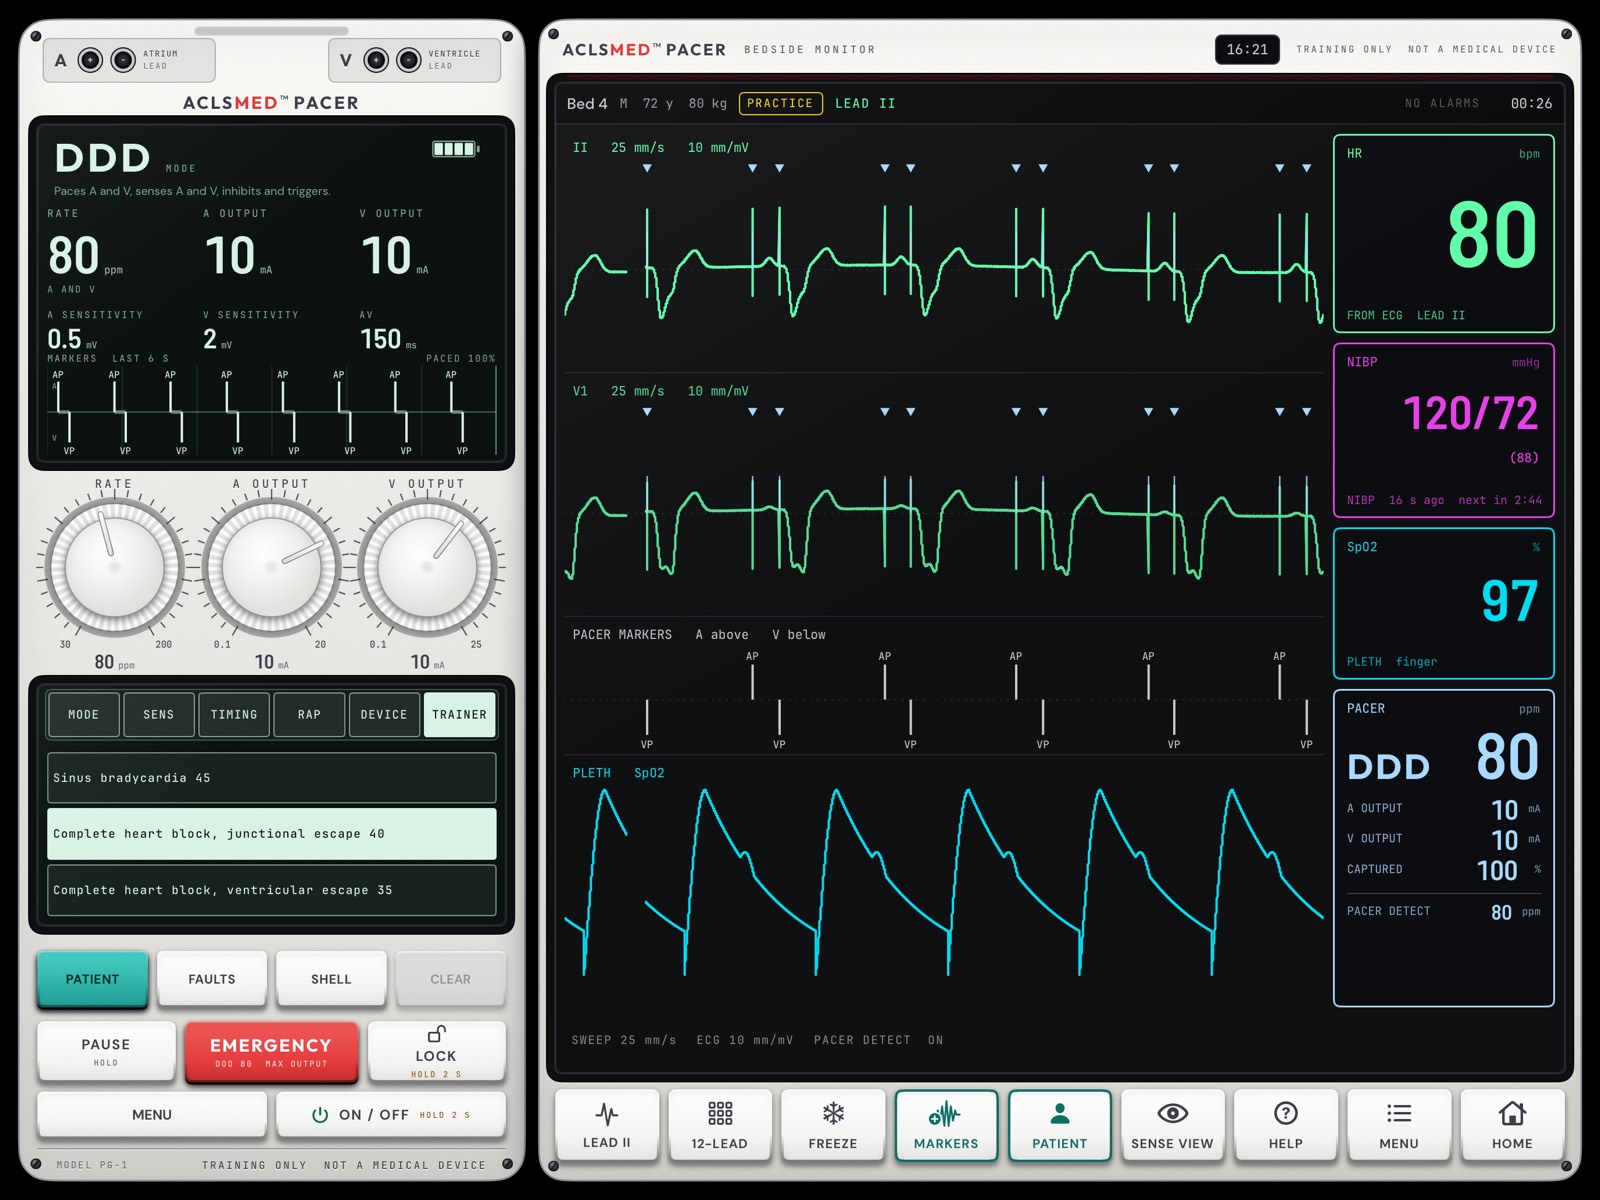
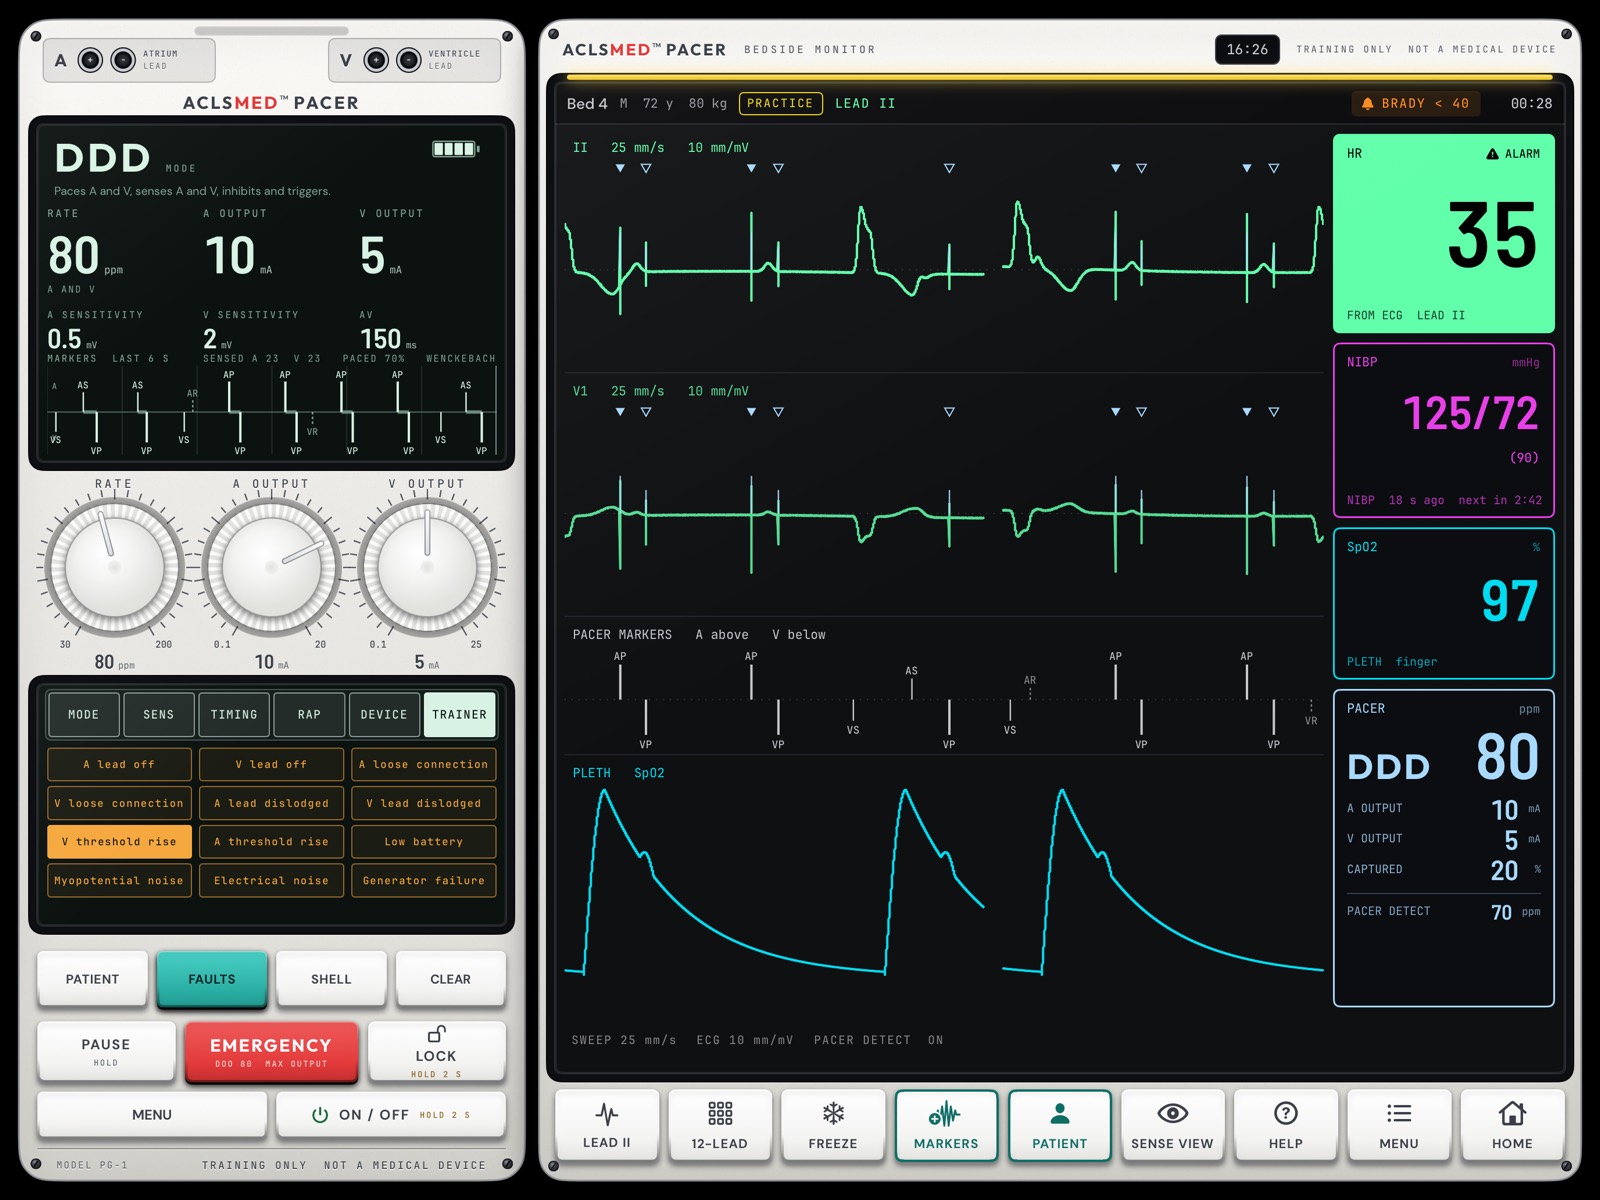
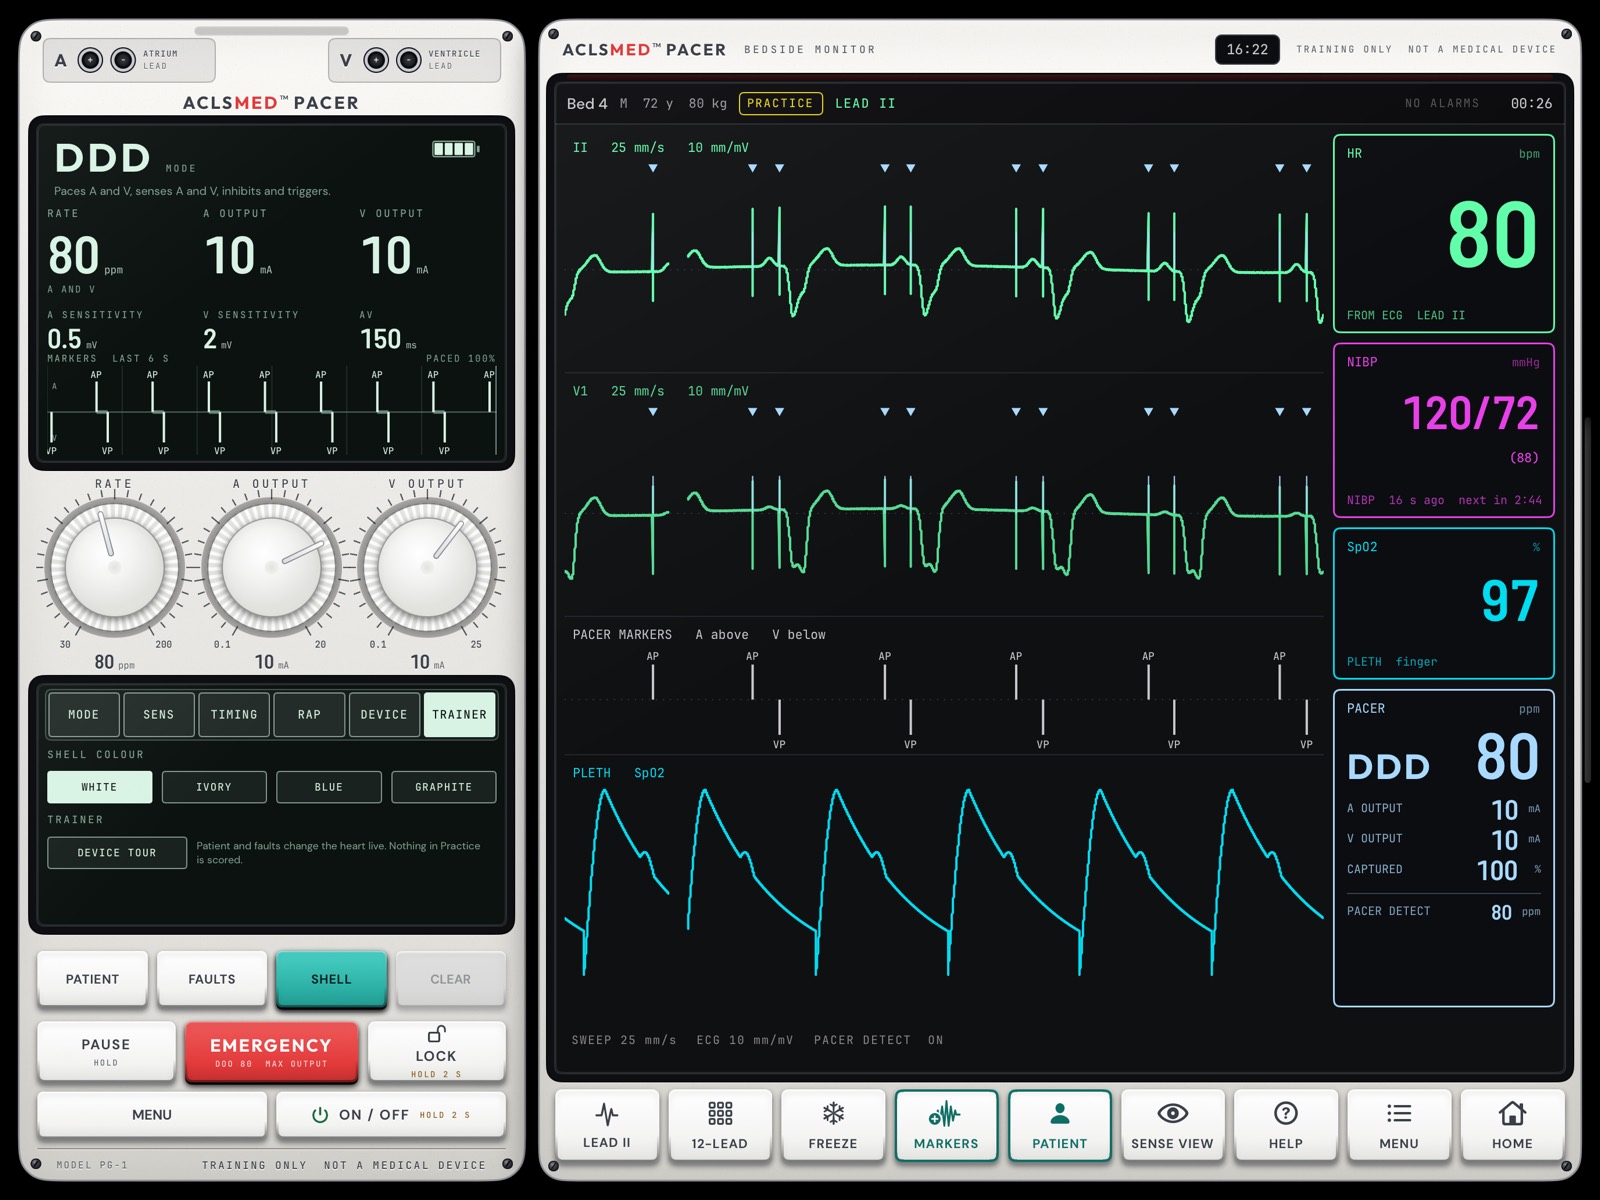
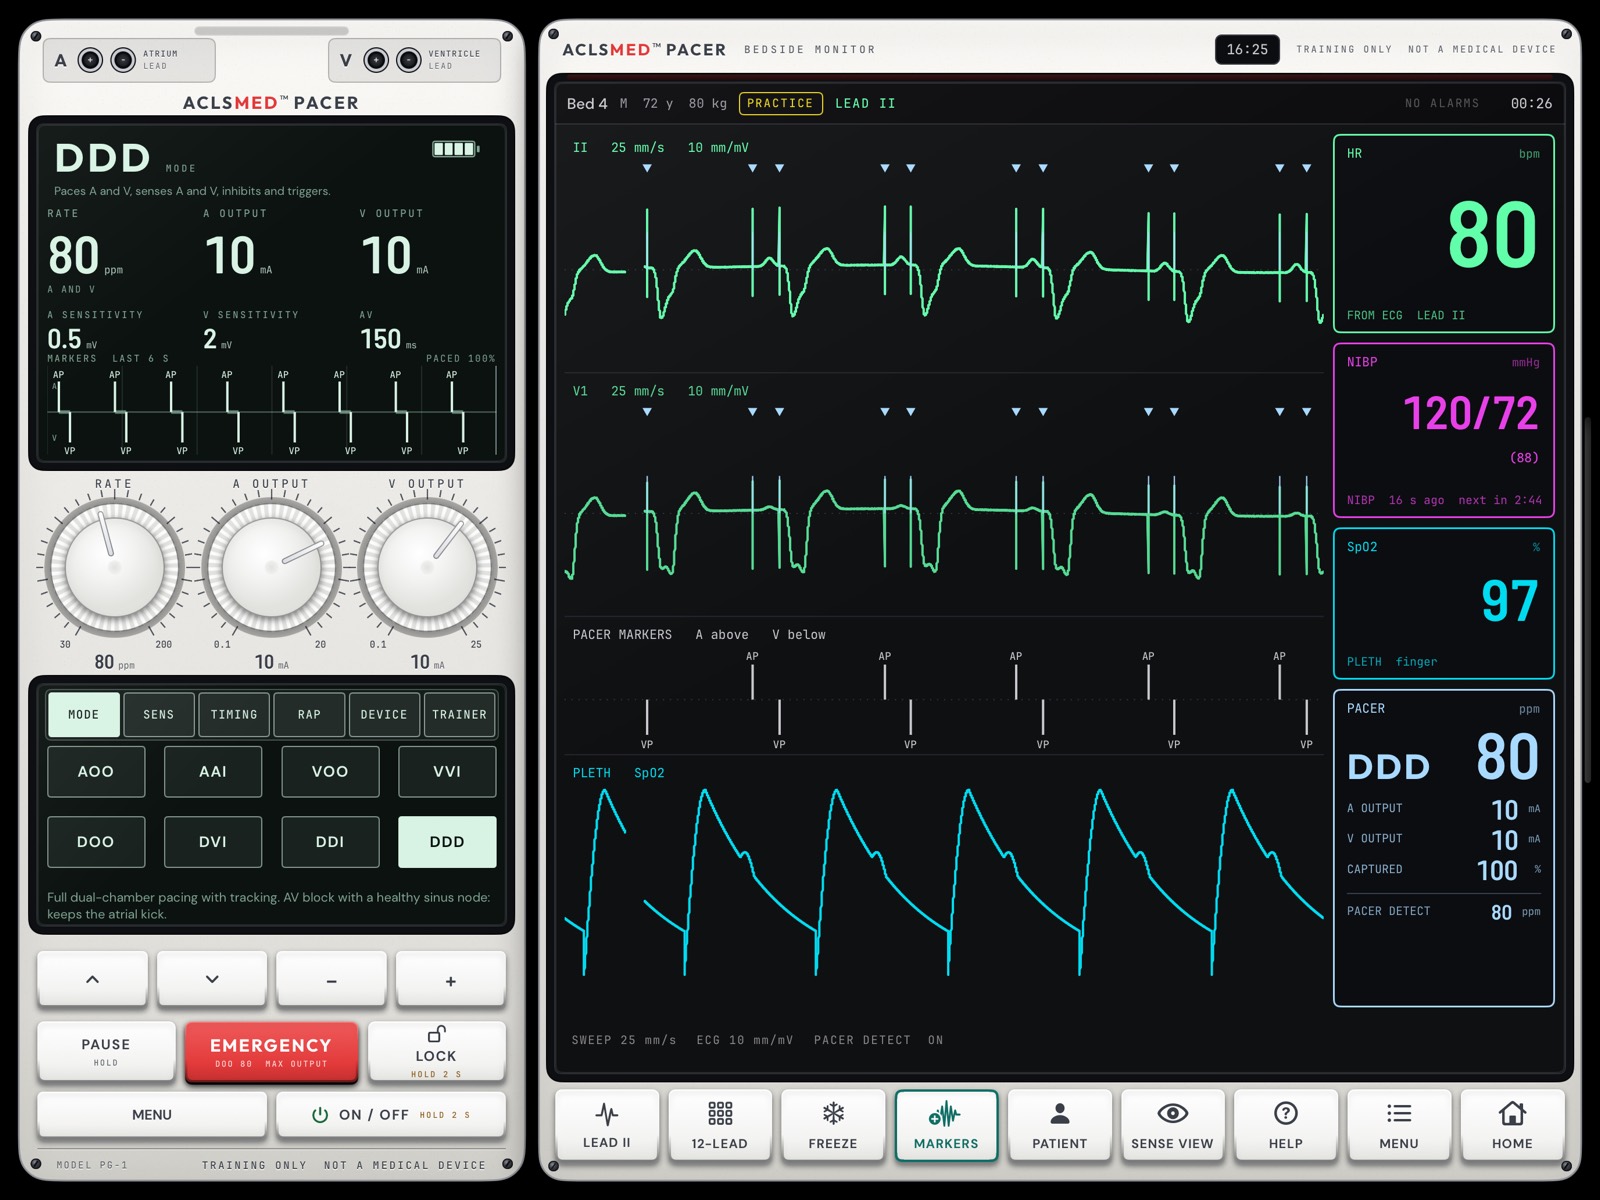
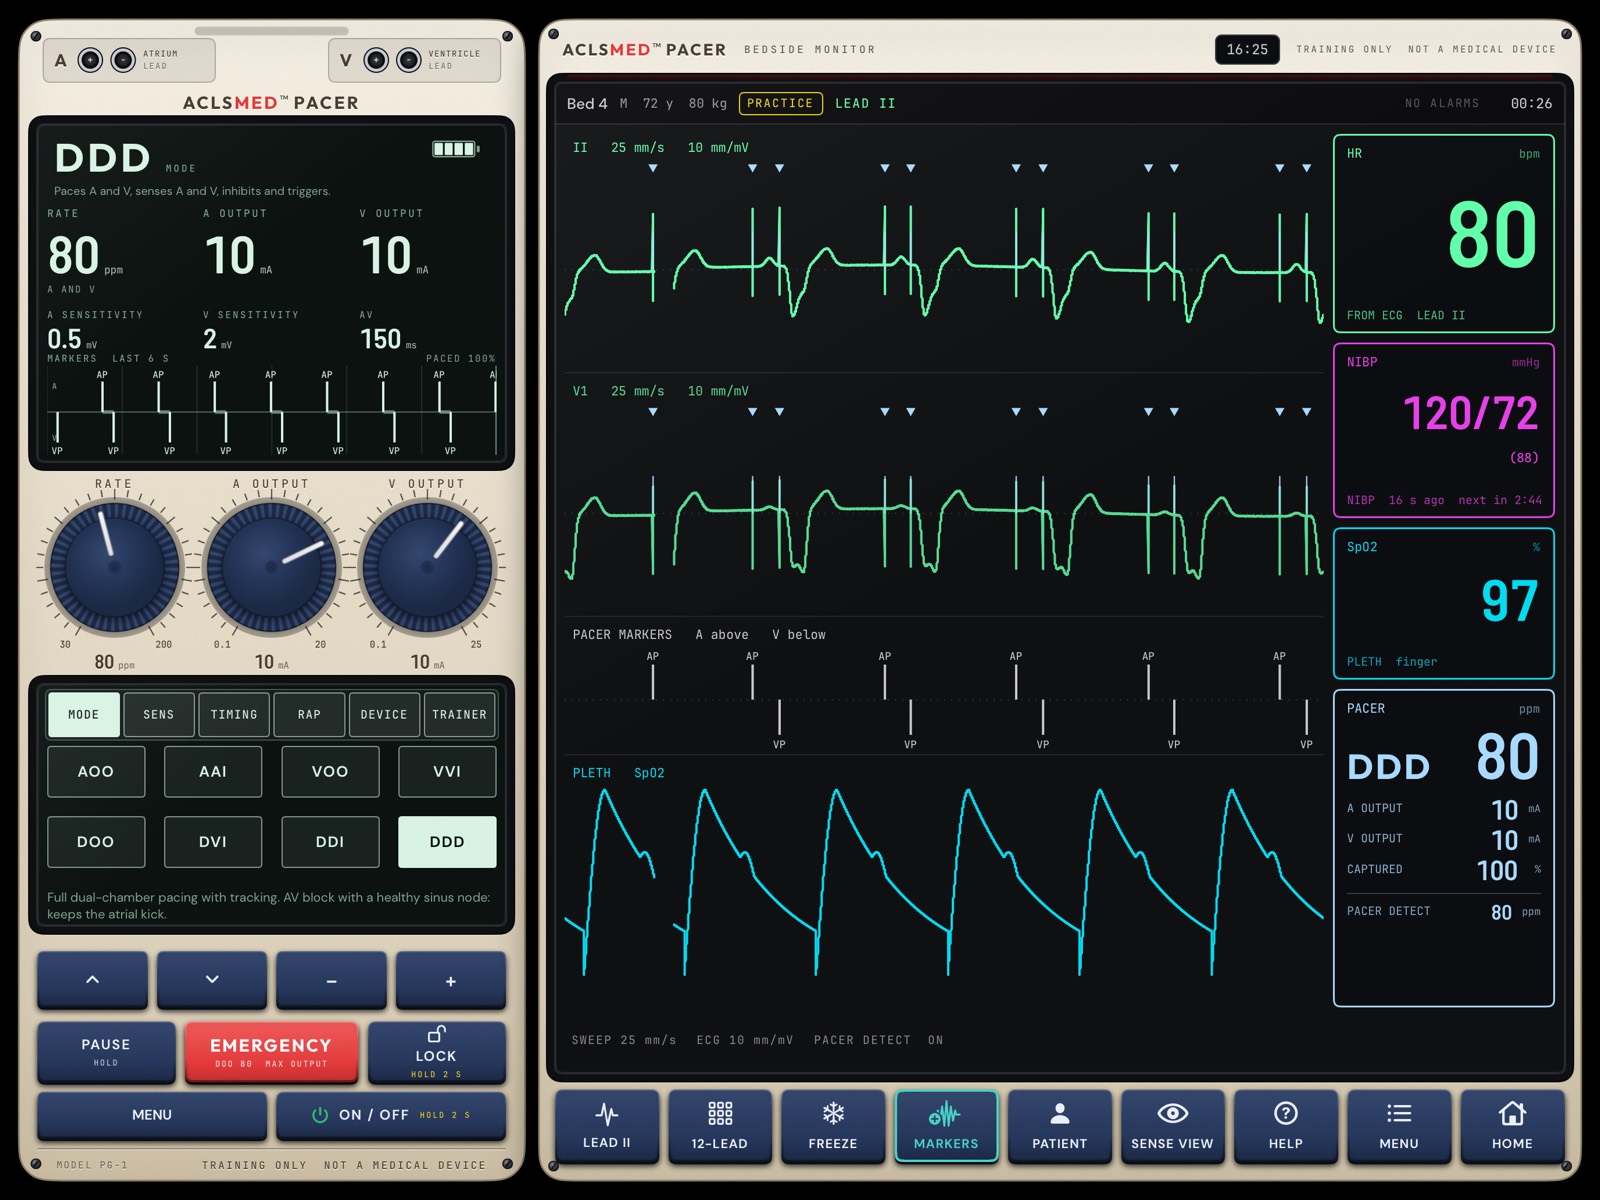
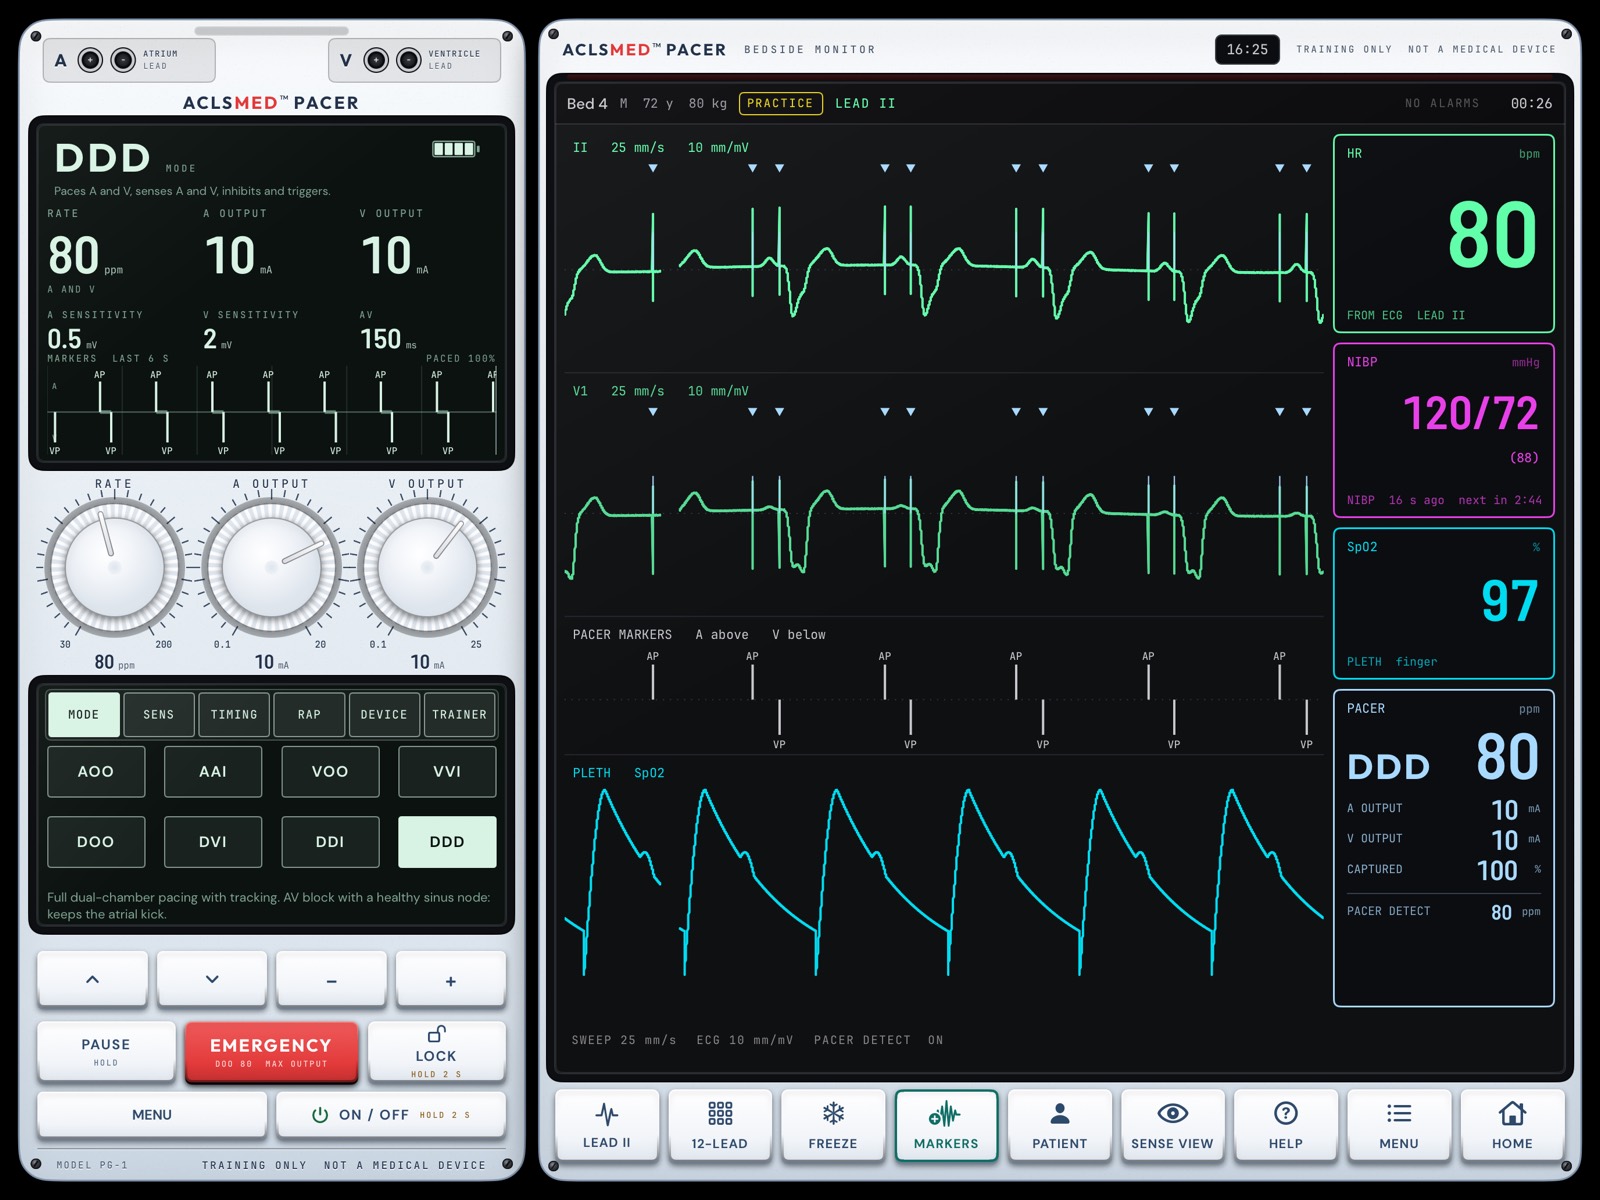
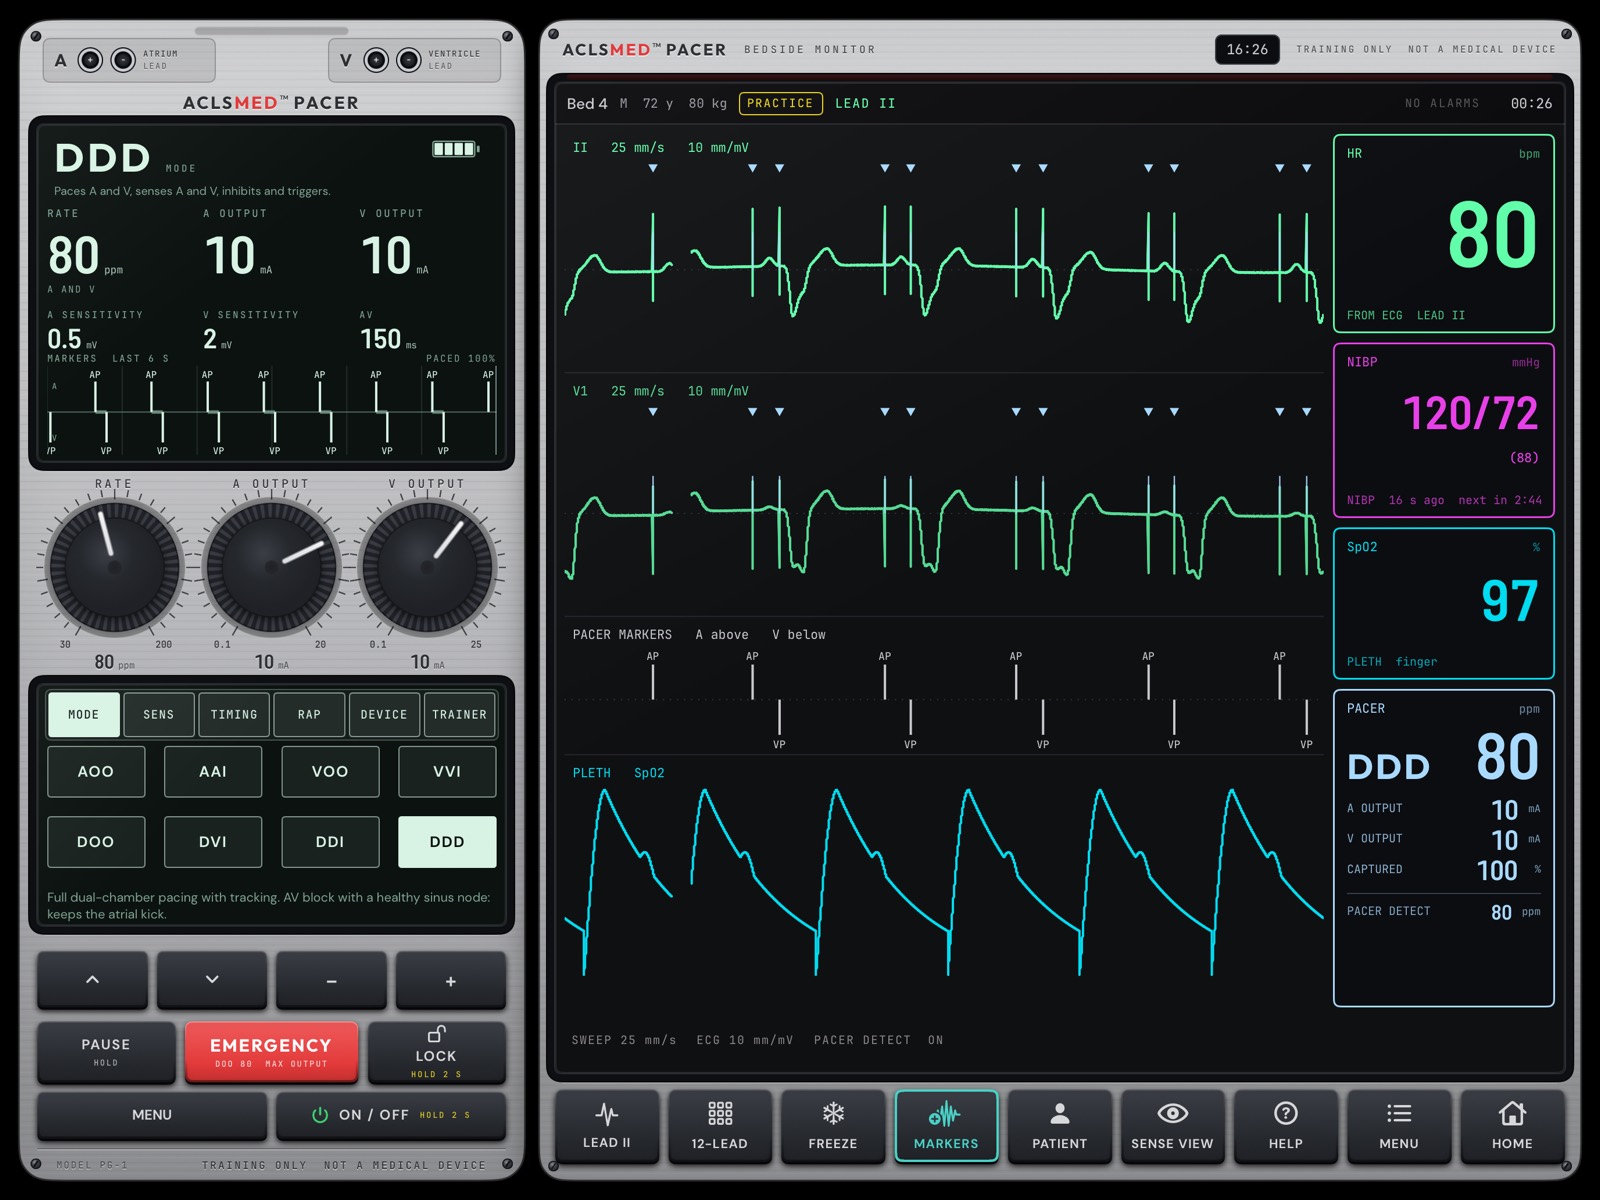
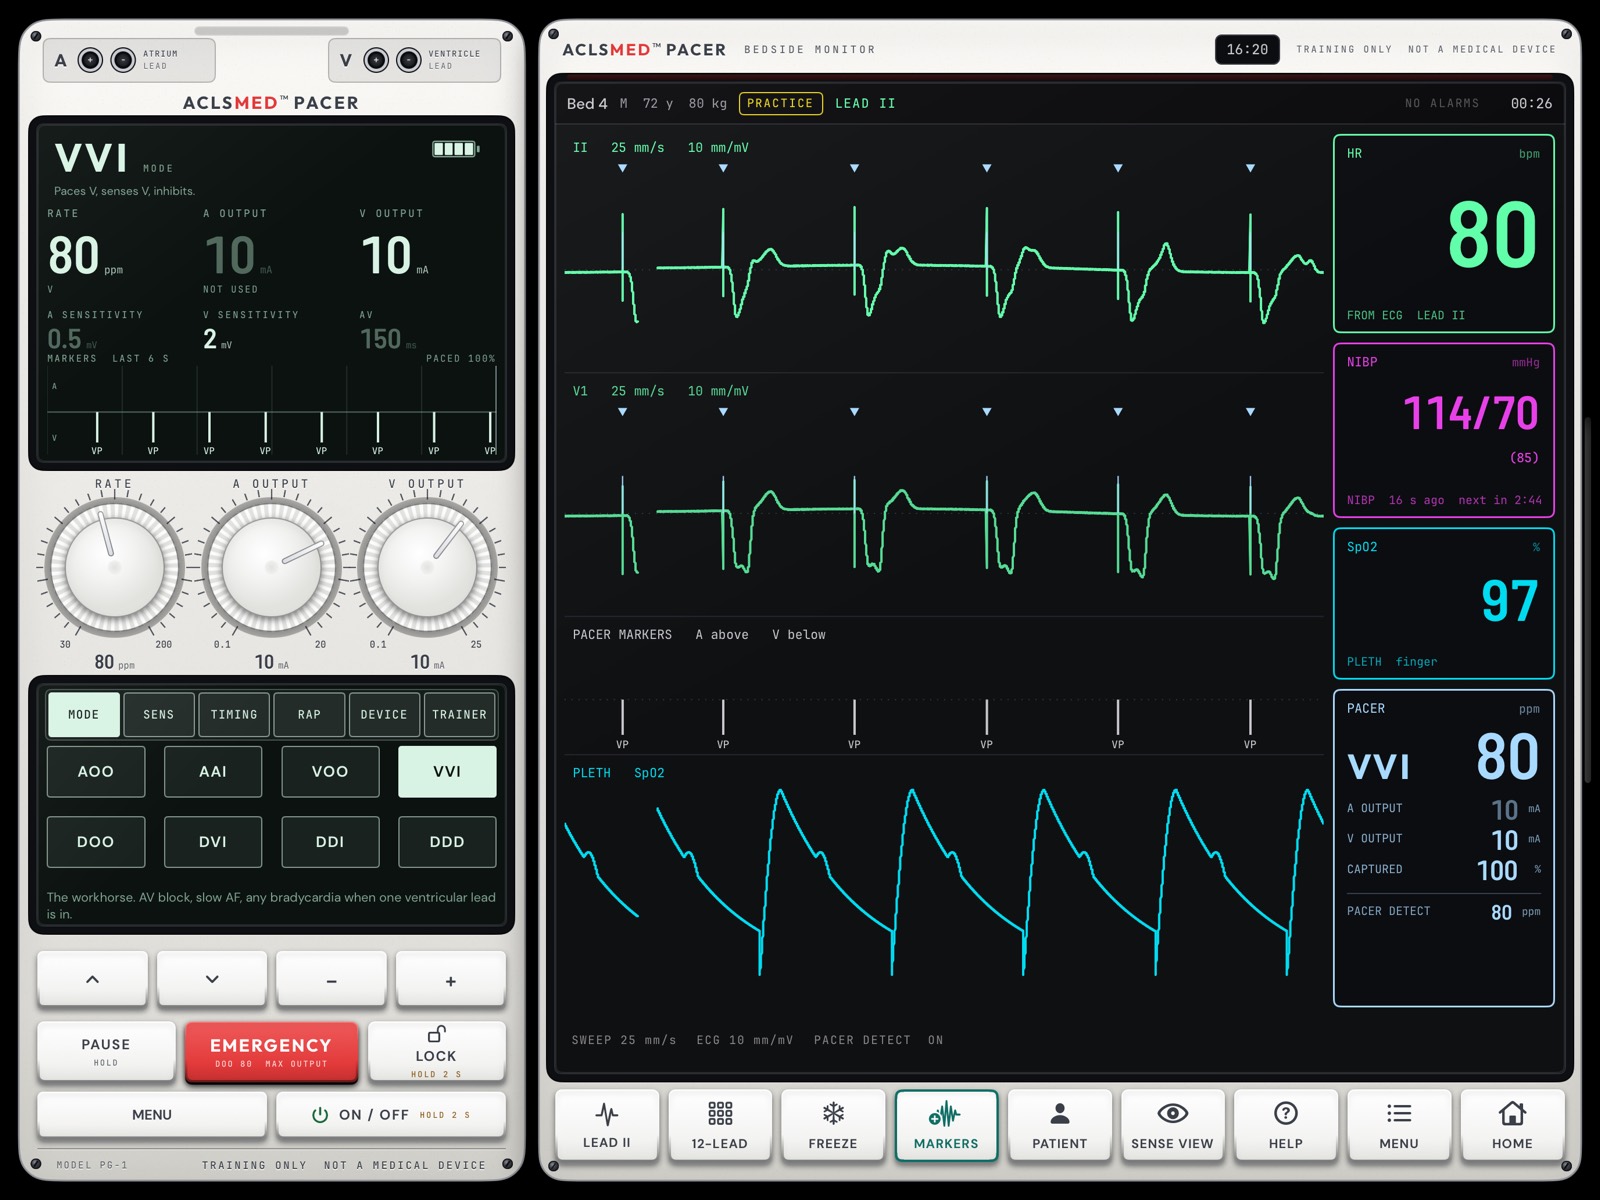
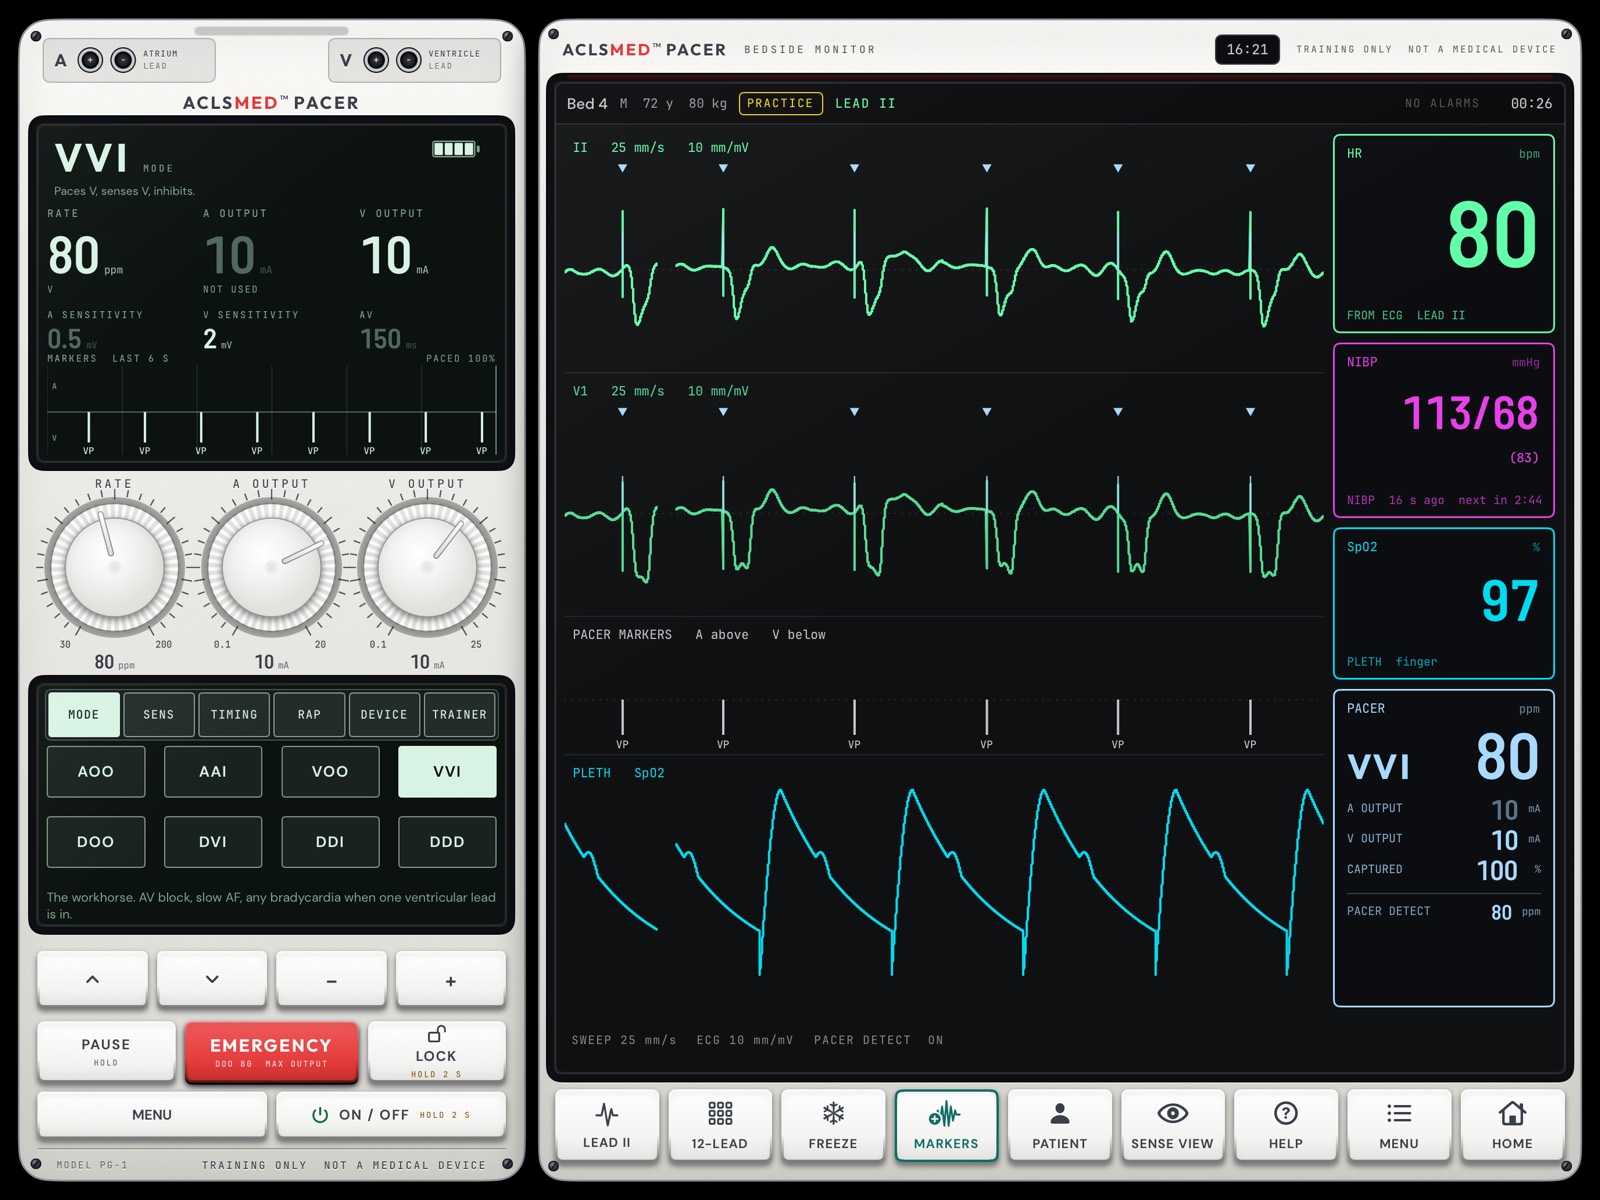
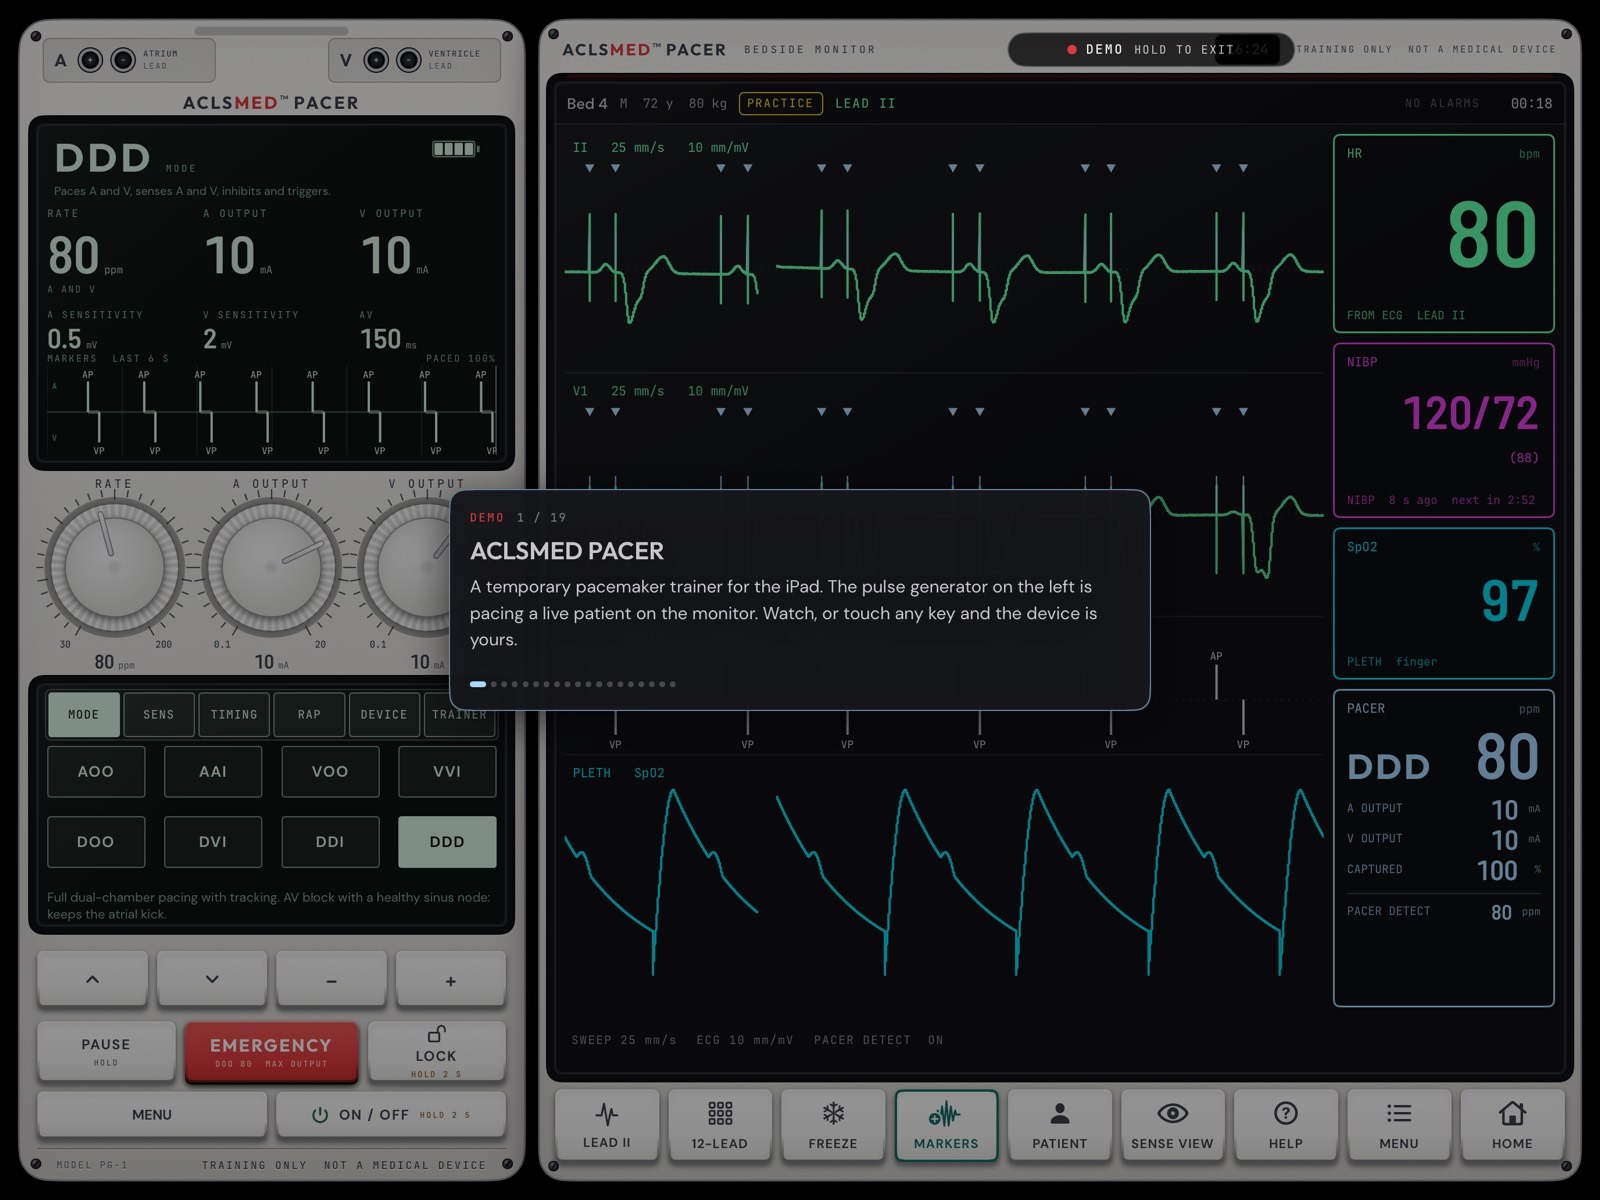
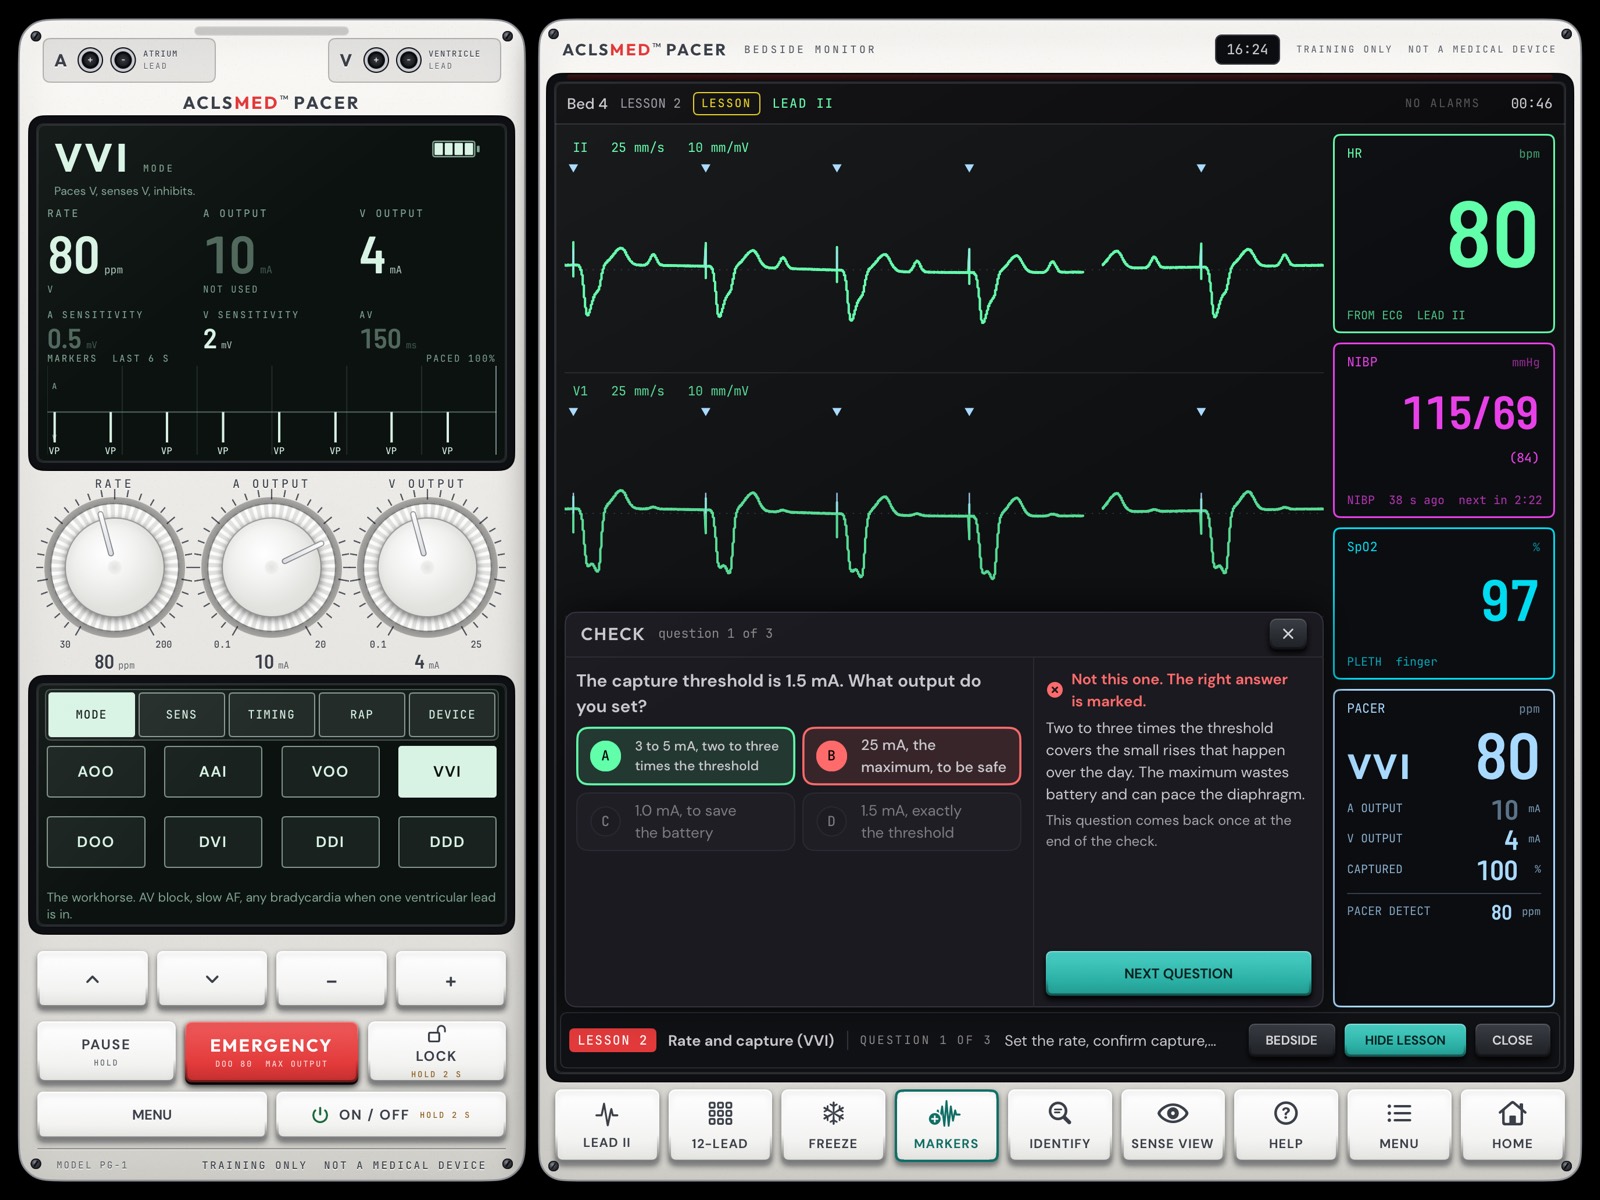
The instructor guide to ACLSMED™ PACER, the temporary pacemaker trainer: a pulse generator and a bedside monitor on one tablet, driven by a live heart model. Every dial, key and page, the lessons, the scored cases, and TEACH mode, where the class watches the monitor while students hold the generator.
A self-paced trainer for temporary transvenous and epicardial pacing with an external pulse generator. The learner sets the generator while watching a bedside monitor, and the heart answers beat by beat.
Recognize capture and loss of capture, in each chamber.
Find the capture threshold and the sensing threshold, and set a safety margin.
Recognize undersensing, oversensing and failure to output, and know what to check.
Know every mode, AOO to DDD, and rapid atrial pacing.
Read a paced rhythm on any lead and on the 12-lead.
What it is not
Training only. Not a medical device. It does not connect to any pacemaker, generator or patient, and must not be used for any decision about a real patient. It gives no medical advice.
A generic generator
The generator and monitor are our own design. Their keys, menus, alarm names and numbers match no manufacturer's device. Real generators differ: your unit's policy and the operator's manual for your generator always come first.
No account
No sign-in, no server, nothing collected. It works offline.
ACLSMED™ PACER Instructor ManualStart here
Start here · Features
Five ways to use one trainer
Practice
Free run, nothing scored. Change the patient and add faults from the generator's TRAINER page.
§ 04
Learn: 8 lessons
Stepped lessons on the real dials, with SHOW ME and check questions. All free.
§ 05
Scenarios and the strip drill
20 scored cases in four tiers with a full debrief, and ten-strip drill rounds: name it, then fix it.
§ 06 · § 07
TEACH: two devices
The monitor at the front of the room, the generator in a student's hand. Every dial turn is applied on the monitor.
§ 08
ACLSMED™ PACER Instructor ManualFeatures
Start here
How this manual is built
§
Chapter
Read it when
01
Devices, plans & privacy
Choosing hardware, Free or Pro
02
The generator
Every dial, key, screen and page
03
The monitor
Leads, 12-lead, markers, SENSE VIEW, MENU, sound
04
Practice
Free run, patients and faults, the tour and DEMO
05
Learn
The 8 lessons
06
Scenarios
Running a case, scoring, the debrief, all 20 cases
07
Strip drill
Ten strips a round
08
TEACH mode
Two devices for a class
09
Running a class
Checklist and a session plan
10
Reference
Troubleshooting, FAQ, ranges, glossary
Reading on screen
←→ or space to move · Home / End · P prints · F fullscreen. Add #n to the address to open slide n. The PDF is the same deck, one slide per page.
Every figure is real
Each picture is a capture of the app on an iPad or an iPhone, not a mockup. Numbered markers on a figure match the numbered list beside it.
What is not here
Medical advice. The numbers in the lessons and cases are this trainer's teaching defaults. Follow your unit's policy.
ACLSMED™ PACER Instructor ManualHow to read
Start here
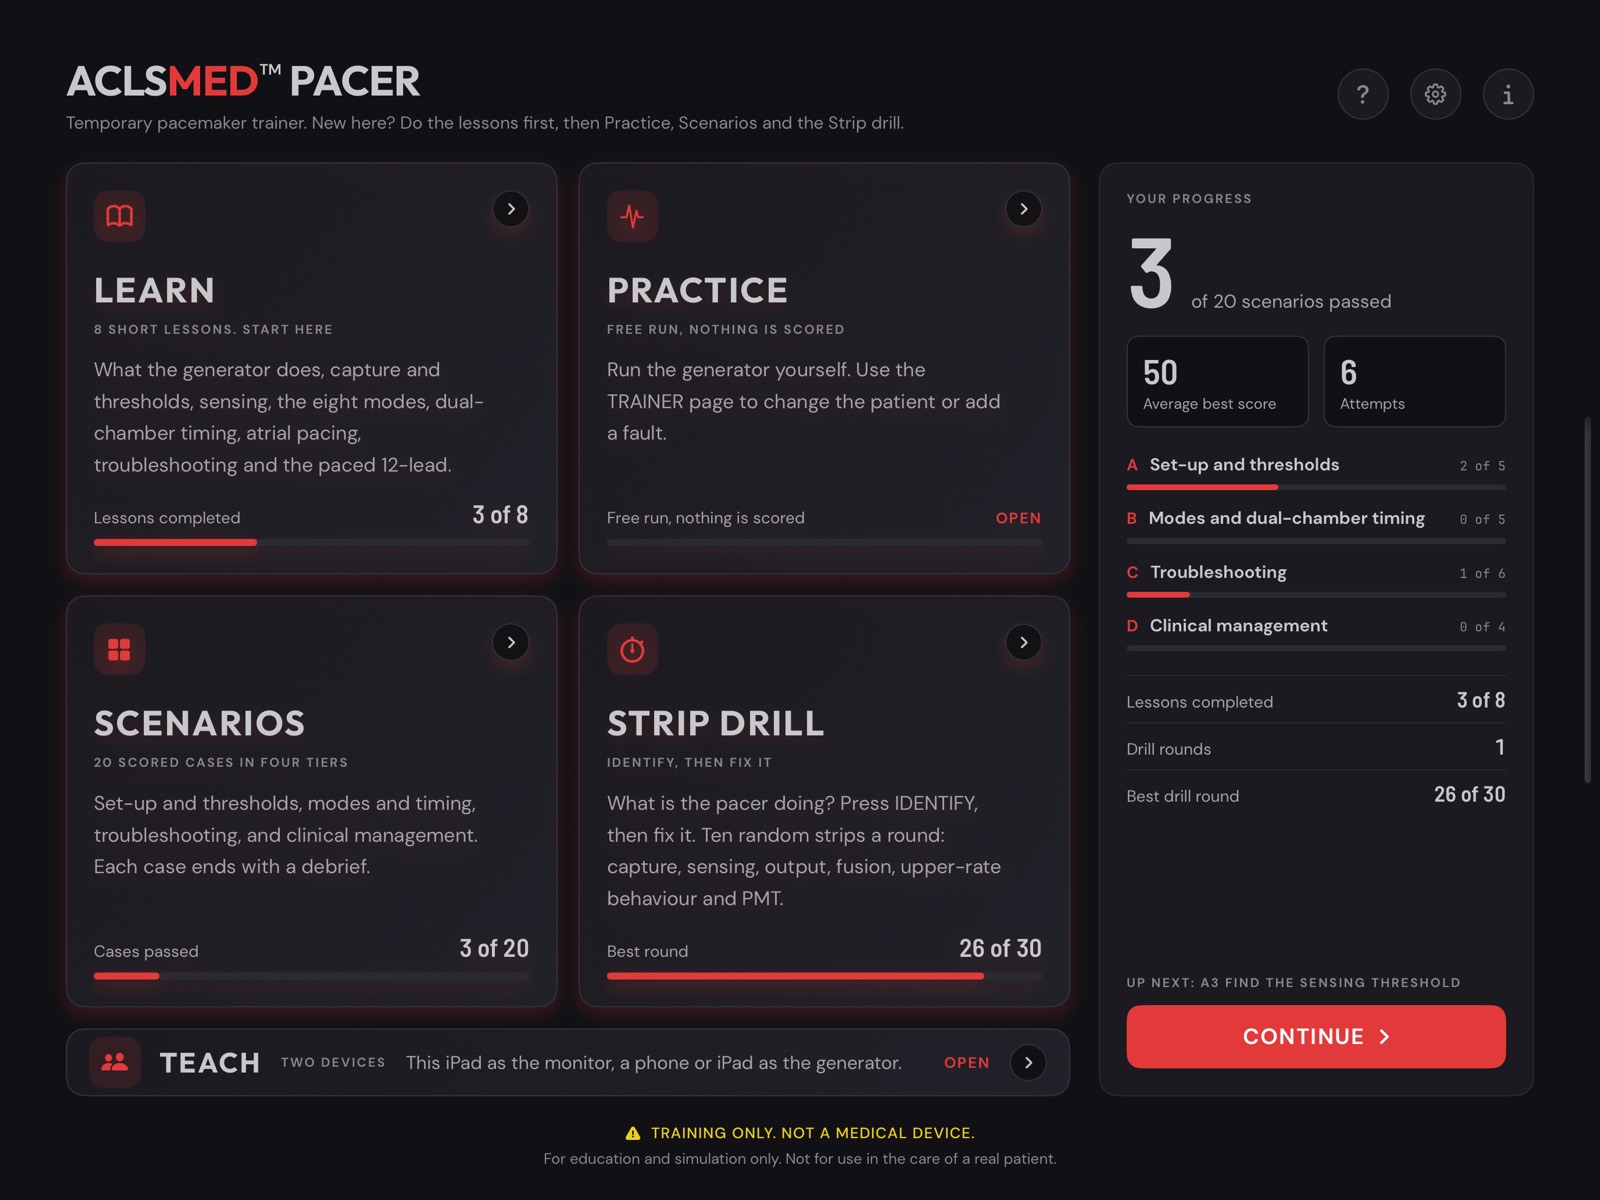
Home: the five modes
LEARN: 8 short lessons. Start here.
PRACTICE: free run, nothing scored.
SCENARIOS: 20 scored cases in four tiers.
STRIP DRILL: identify, then fix it.
TEACH: this iPad as the monitor, a phone or iPad as the generator.
The right panel shows the learner's own progress: cases passed by tier, lessons completed, drill rounds and the case up next. Across the top: GET PRO (free tier only), ? Help, ⚙ Settings and i the training notice.
The order the app suggests
Lessons first, then Practice, then Scenarios and the Strip drill. Before any case is tried, the up-next key starts the next lesson.
ACLSMED™ PACER Instructor ManualHome
§ 01
Devices, plans & privacy
A tablet runs the whole trainer. A phone is the generator a student holds. Pro is one purchase inside the app.
§ 01.01 — Which device does what
The tablet is the trainer. The phone is the generator.
Device
What it runs
TEACH role
iPad
The whole trainer, in landscape: Practice, lessons, scenarios, the drill, TEACH
Monitor or generator
iPhone
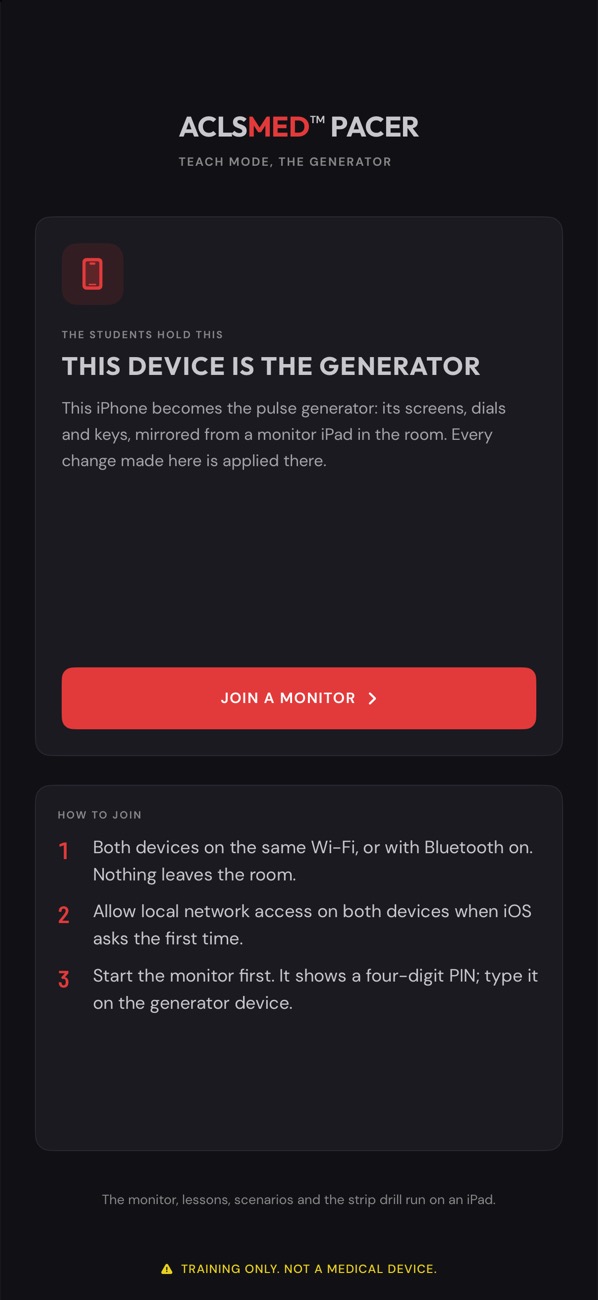
Only the TEACH generator. It opens on TEACH's role screen and nothing else; the monitor, lessons, scenarios and drill run on an iPad
Generator
iPhone Duo
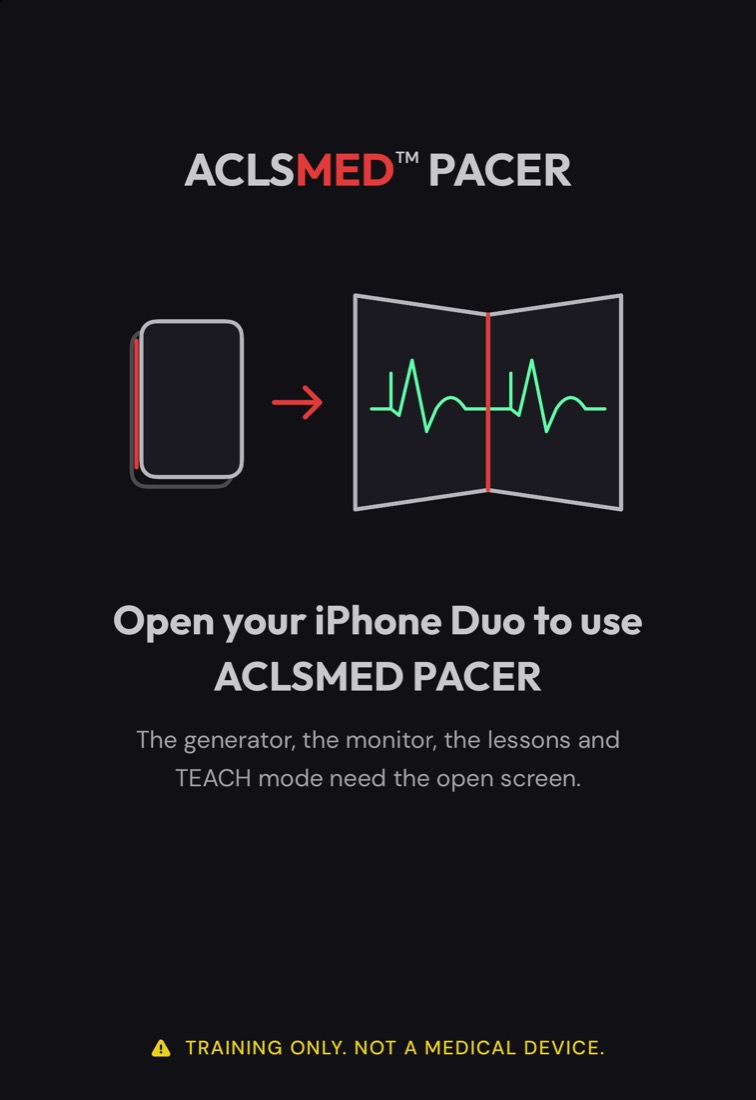
Open: the whole trainer, as an iPad runs it. Closed: a screen that asks you to open it
Open: either role
Android tablet
The whole trainer, in landscape; a foldable opened flat counts as a tablet
Monitor or generator
Android phone
Only the TEACH generator, joined to an Android tablet on the same Wi-Fi
Generator
TEACH pairs like with like
iPad and iPhone pair with each other over Wi-Fi or Bluetooth. Android devices pair with each other over the same Wi-Fi. An iOS device cannot pair with an Android device (§ 08.02).
Devices, plans & privacyDevices
§ 01.02 — Phone and iPhone Duo
What a phone shows
iPhone · opens on TEACHiPhone · the generatoriPhone Duo · openiPhone Duo · closed
An ordinary iPhone shows "The monitor, lessons, scenarios and the strip drill run on an iPad." Closing an iPhone Duo pauses whatever was running (Practice, a lesson, a case, the drill, a TEACH link) without ending it; opening it resumes from the same moment. In TEACH the link is kept.
Devices, plans & privacyPhone and Duo
§ 01.03 — Free and Pro
Free to start. Pro when you are ready.
Free
Pro, yearly
Pro, lifetime
Price
USD 0
USD 39.99 a year, renews automatically
USD 79.99 once, never renews
Practice and TEACH Practice
Included
Included
Included
All 8 lessons
Included
Included
Included
Scenarios
4 cases: A1, A2, B1, C1
All 20
All 20
Strip drill
One round a calendar day
No limit
No limit
No trial
There is no trial period. The free tier does not expire.
Its own purchase
ACLSMED™ PACER Pro is bought inside this app. It is not part of ACLSMED™ SIM Pro or the Suite.
Pro on the monitor
In TEACH the scenarios keep their Pro gate on the monitor device. A phone holding the generator needs nothing.
Prices in US dollars at the time of writing; the store shows your local price. Buy and restore through the App Store or Google Play.
Devices, plans & privacyFree and Pro
§ 01.04 — The paywall
Where Pro is offered, and how to restore it
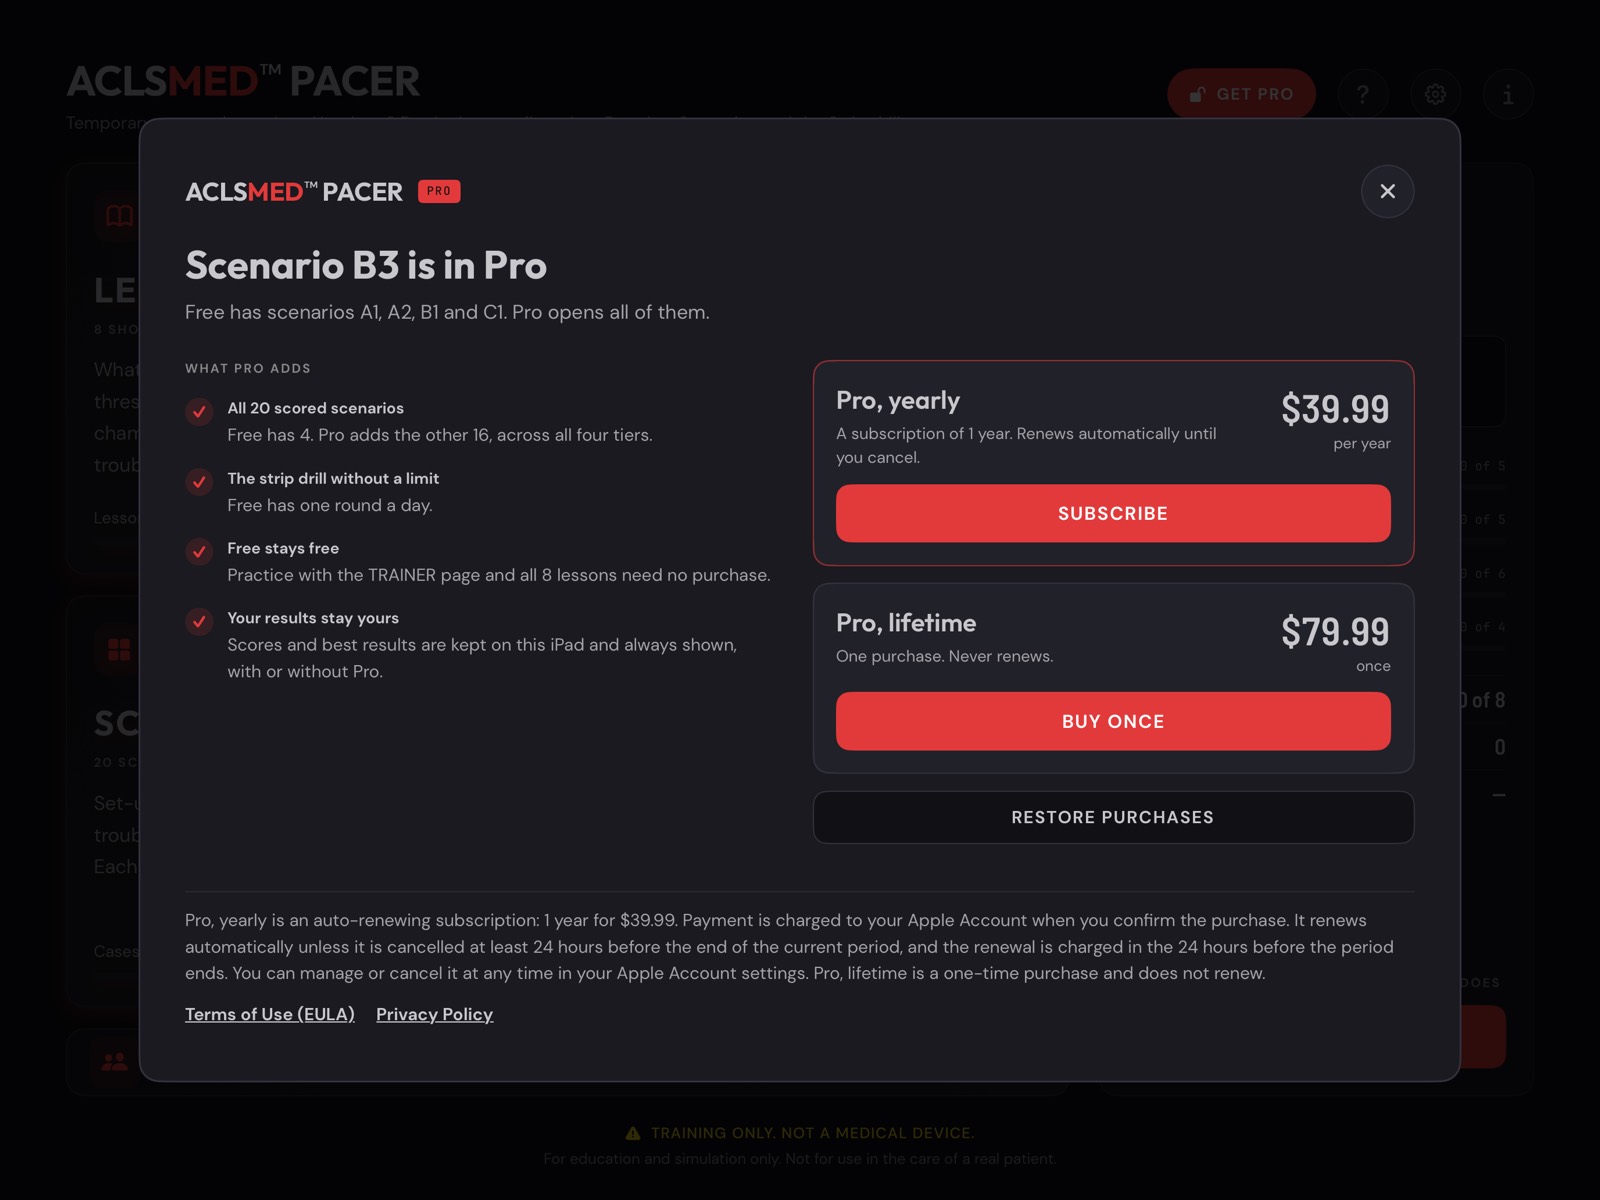
The paywall opens from three places:
GET PRO on Home.
A locked case in Scenarios: "Scenario B3 is in Pro".
A second drill round on the same day: "Today's free drill round is used".
New iPad, same Apple Account
RESTORE PURCHASES is on the paywall and in Settings, beside Manage subscription. Settings shows "Pro is active on this Apple Account" once it is.
Results stay
Scores and best results are kept on the device and shown with or without Pro. Locking never hides anything already earned.
Devices, plans & privacyPaywall
§ 01.05 — First launch
The training notice comes first
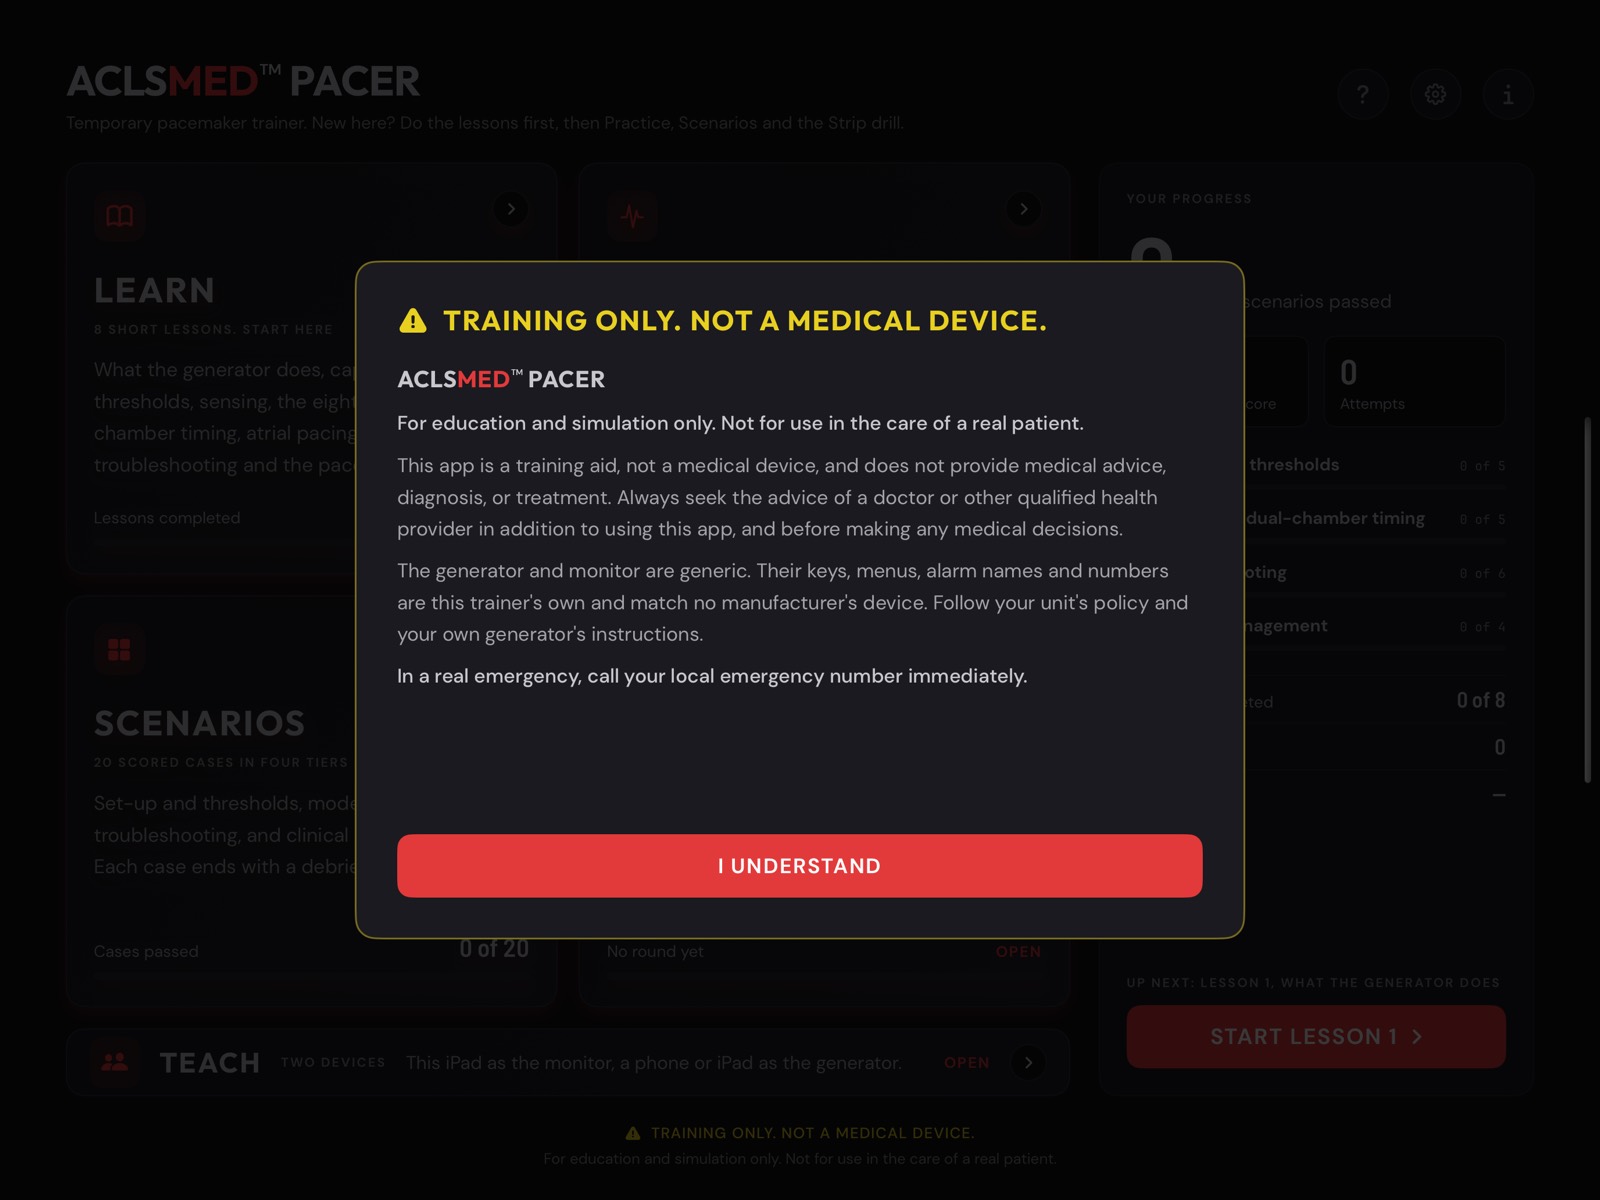
A fresh install opens on this notice. The learner taps I UNDERSTAND once. It says:
For education and simulation only. Not for use in the care of a real patient.
A training aid, not a medical device. No medical advice, diagnosis or treatment.
The generator and monitor are generic and match no manufacturer's device.
In a real emergency, call your local emergency number.
Read it again any time from i on Home or Settings > Training notice. The device itself is printed TRAINING ONLY, NOT A MEDICAL DEVICE.
Devices, plans & privacyTraining notice
§ 01.06 — Privacy
Nothing to sign in to. Nothing collected.
NO ACCOUNT
No sign-in, no server, no analytics, no ads
The app collects no data. It runs on the device and needs no connection. Only buying or restoring Pro talks to the App Store or Google Play.
TEACH STAYS IN THE ROOM
Local network only
The link carries dial positions, key presses, generator screen frames and the session PIN between two devices in the same room. Nothing is stored, logged or sent anywhere else.
LOCAL NETWORK PERMISSION
Asked once, for TEACH
iOS asks for local network access the first time TEACH starts. Deny it and the app still works in full on one device; only TEACH cannot find a partner.
WHAT IS SAVED
On this device only
Scenario best scores, drill rounds and completed lessons. Settings > Your progress > Reset progress clears them after two confirmations. Pro is not affected.
For TEACH, each install keeps one random identifier so a phone that drops can rejoin as itself. It is not personal data. Privacy policy: aclsmed.com/privacy.html
Devices, plans & privacyPrivacy
§ 02
The generator
Hand-held, three dials, two screens. Our own generic device. Everything the learner sets lives here.
§ 02.01 — Anatomy
The generator, part by part
12345678
Lead terminals: atrium (A) and ventricle (V), each + and −. A loose or missing lead here is the first thing to check when pacing fails.
Top screen: the mode and what it means, RATE, A OUTPUT, V OUTPUT, both sensitivities, the AV interval, the battery.
Marker strip: the last 6 s of what the generator did, and PACED %.
Dials: RATE, A OUTPUT, V OUTPUT.
Menu screen: page tabs MODE · SENS · TIMING · RAP · DEVICE · TRAINER.
Softkeys: the legends follow the page. On most pages ▲ ▼ pick a row and − + change it; hold to run. Every row can also be tapped.
PAUSE · EMERGENCY · LOCK.
MENU · ON / OFF.
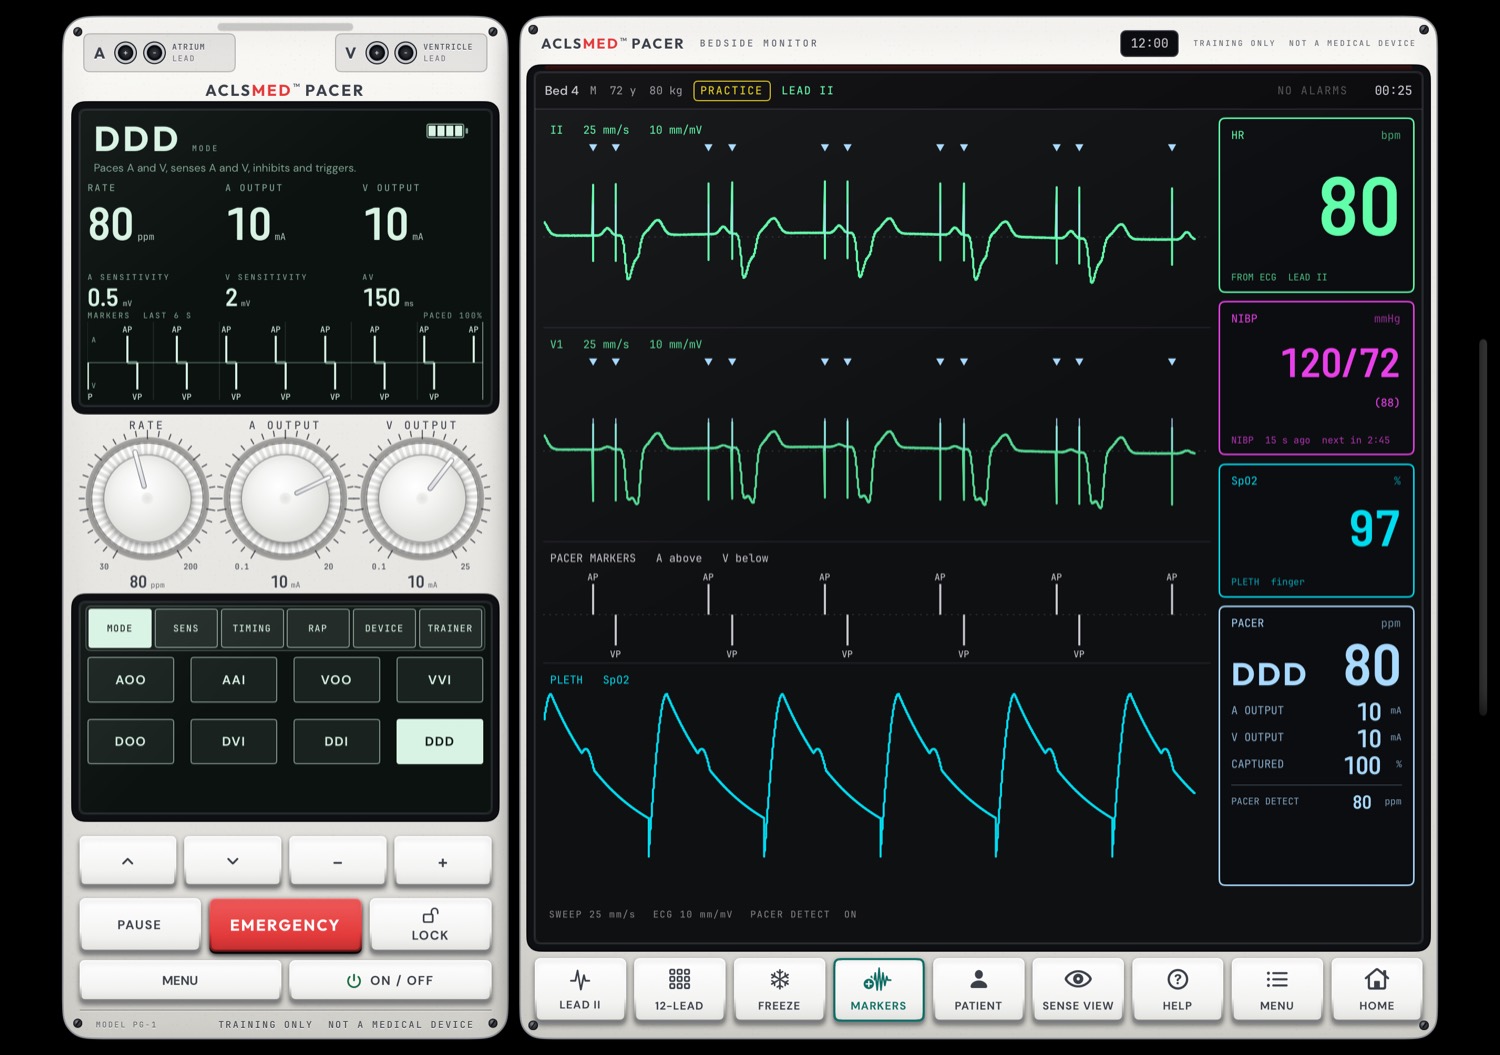
On an iPad the generator takes the left third and the monitor the right two thirds. On a phone the generator fills the screen (§ 02.13).
The generatorAnatomy
§ 02.02 — The three dials
RATE, A OUTPUT, V OUTPUT
TURN
Drag around the dial
The pointer and the engraved value follow. Each step clicks (Dial clicks, § 03.09).
TAP
Upper or lower half
One step up or down.
HOLD
Keeps running
The value keeps stepping while a finger stays on it.
Dial
Range
Steps
Factory
RATE
30 to 200 ppm
1 ppm to 100 · 2 ppm to 170 · 5 ppm to 200
80
A OUTPUT
0.1 to 20 mA
0.1 to 1 · 0.2 to 2 · 0.5 to 5 · 1 to 20
10
V OUTPUT
0.1 to 25 mA
0.1 to 1 · 0.2 to 2 · 0.5 to 5 · 1 to 25
10
Teach the grid
The step gets finer near the small numbers. Between 1 and 2 mA the output moves in 0.2 mA steps, so a threshold of 1.5 mA reads 1.6 on the dial. The lessons and cases allow for this.
The generatorDials
§ 02.03 — The top screen and the marker strip
What the generator did, and why
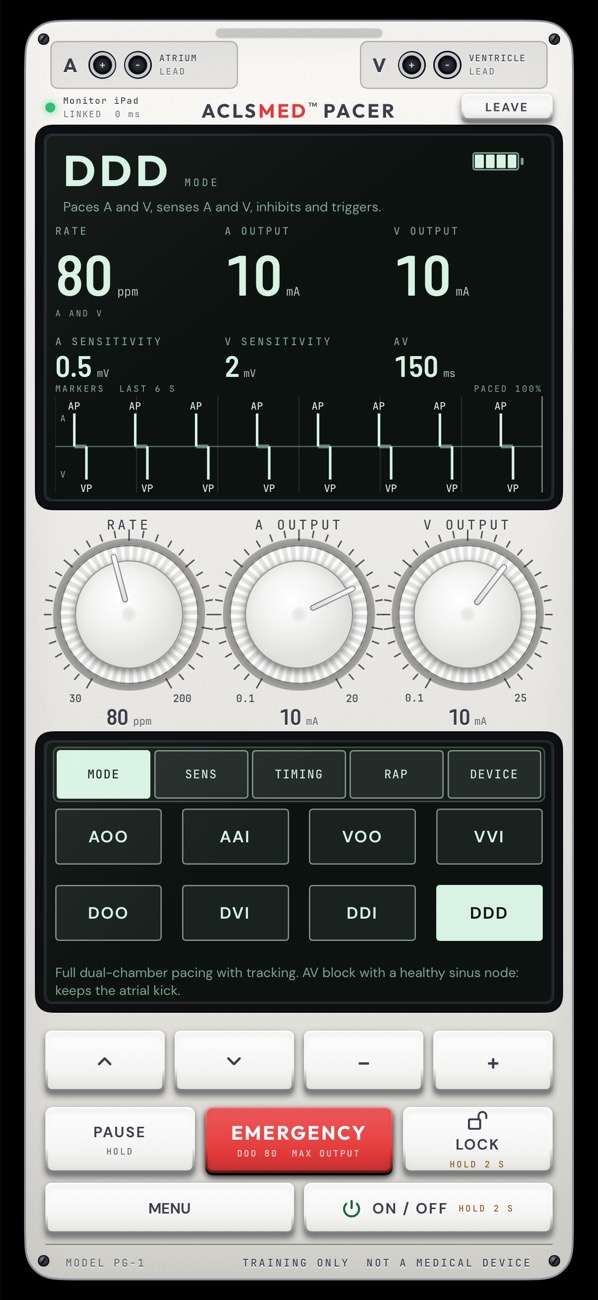
The top screen shows the mode in large letters with its meaning under it (DDD: "Paces A and V, senses A and V, inhibits and triggers"), then RATE, A OUTPUT and V OUTPUT in big numerals, the two sensitivities in mV, the AV interval, and the battery. Banners appear for PAUSED, LOCKED and EMERGENCY.
PACED % is not capture
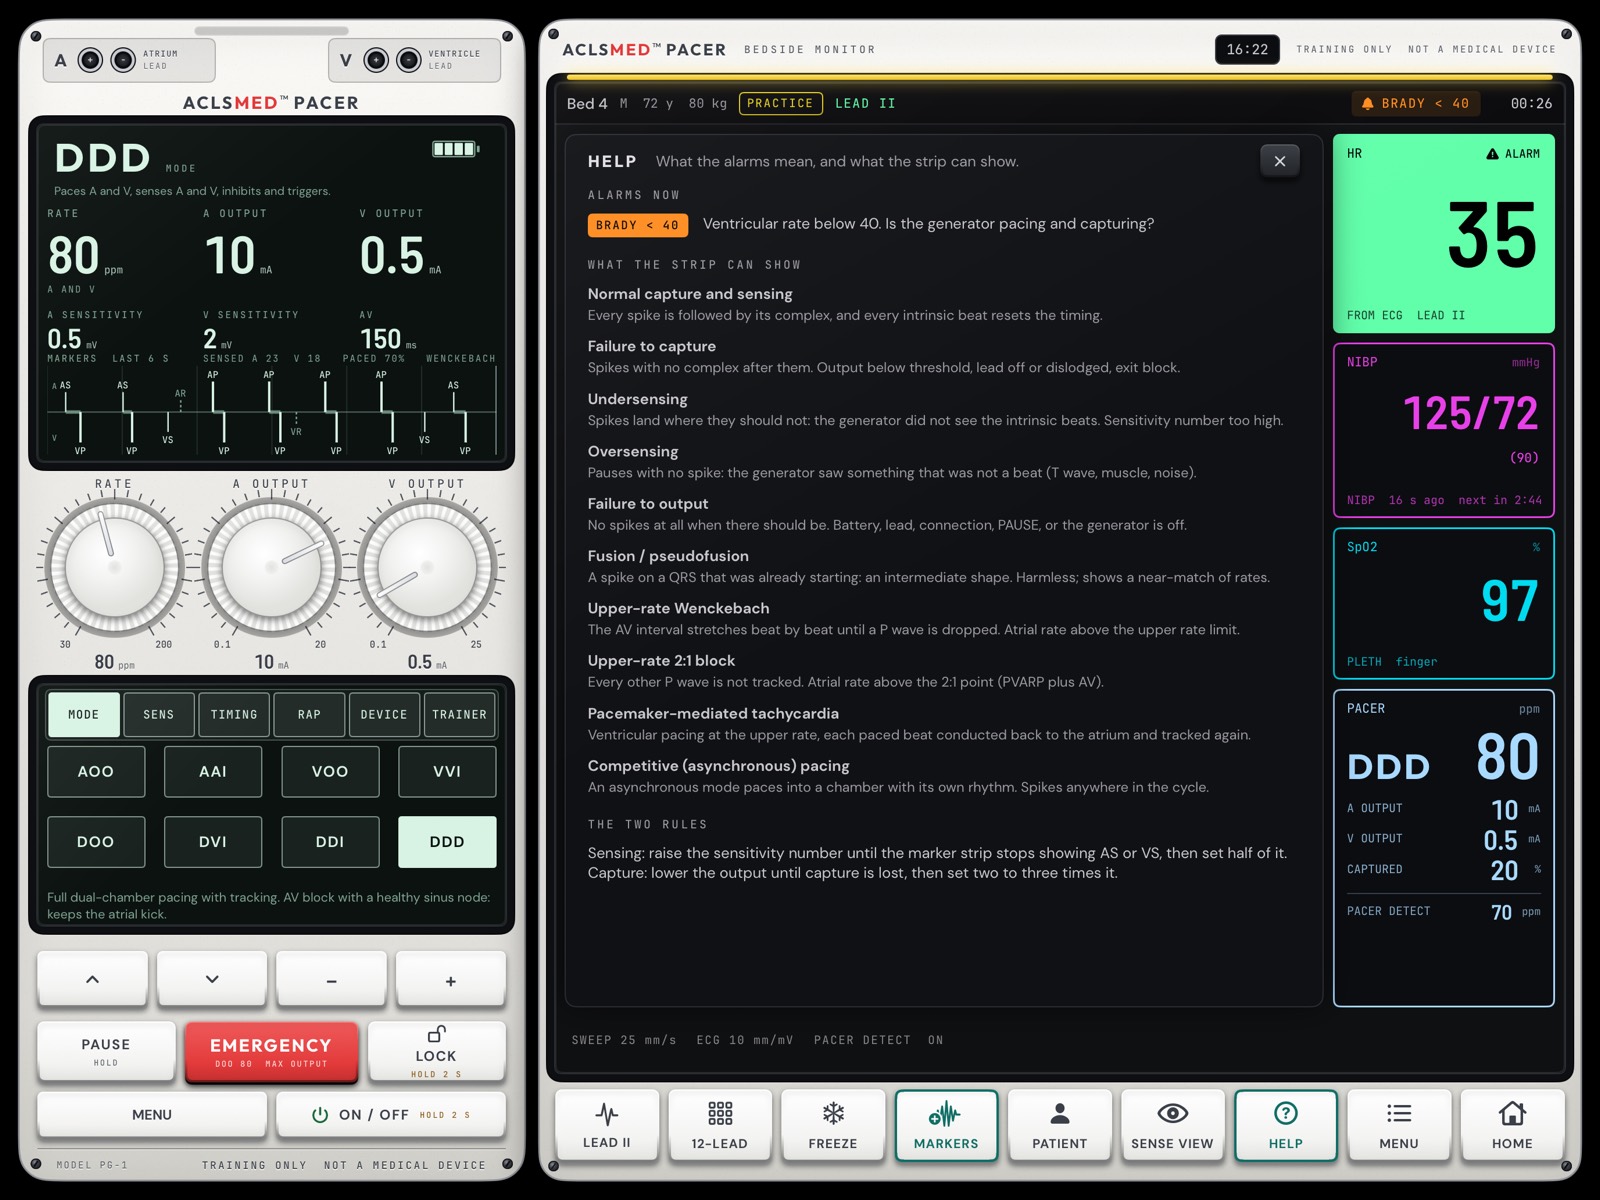
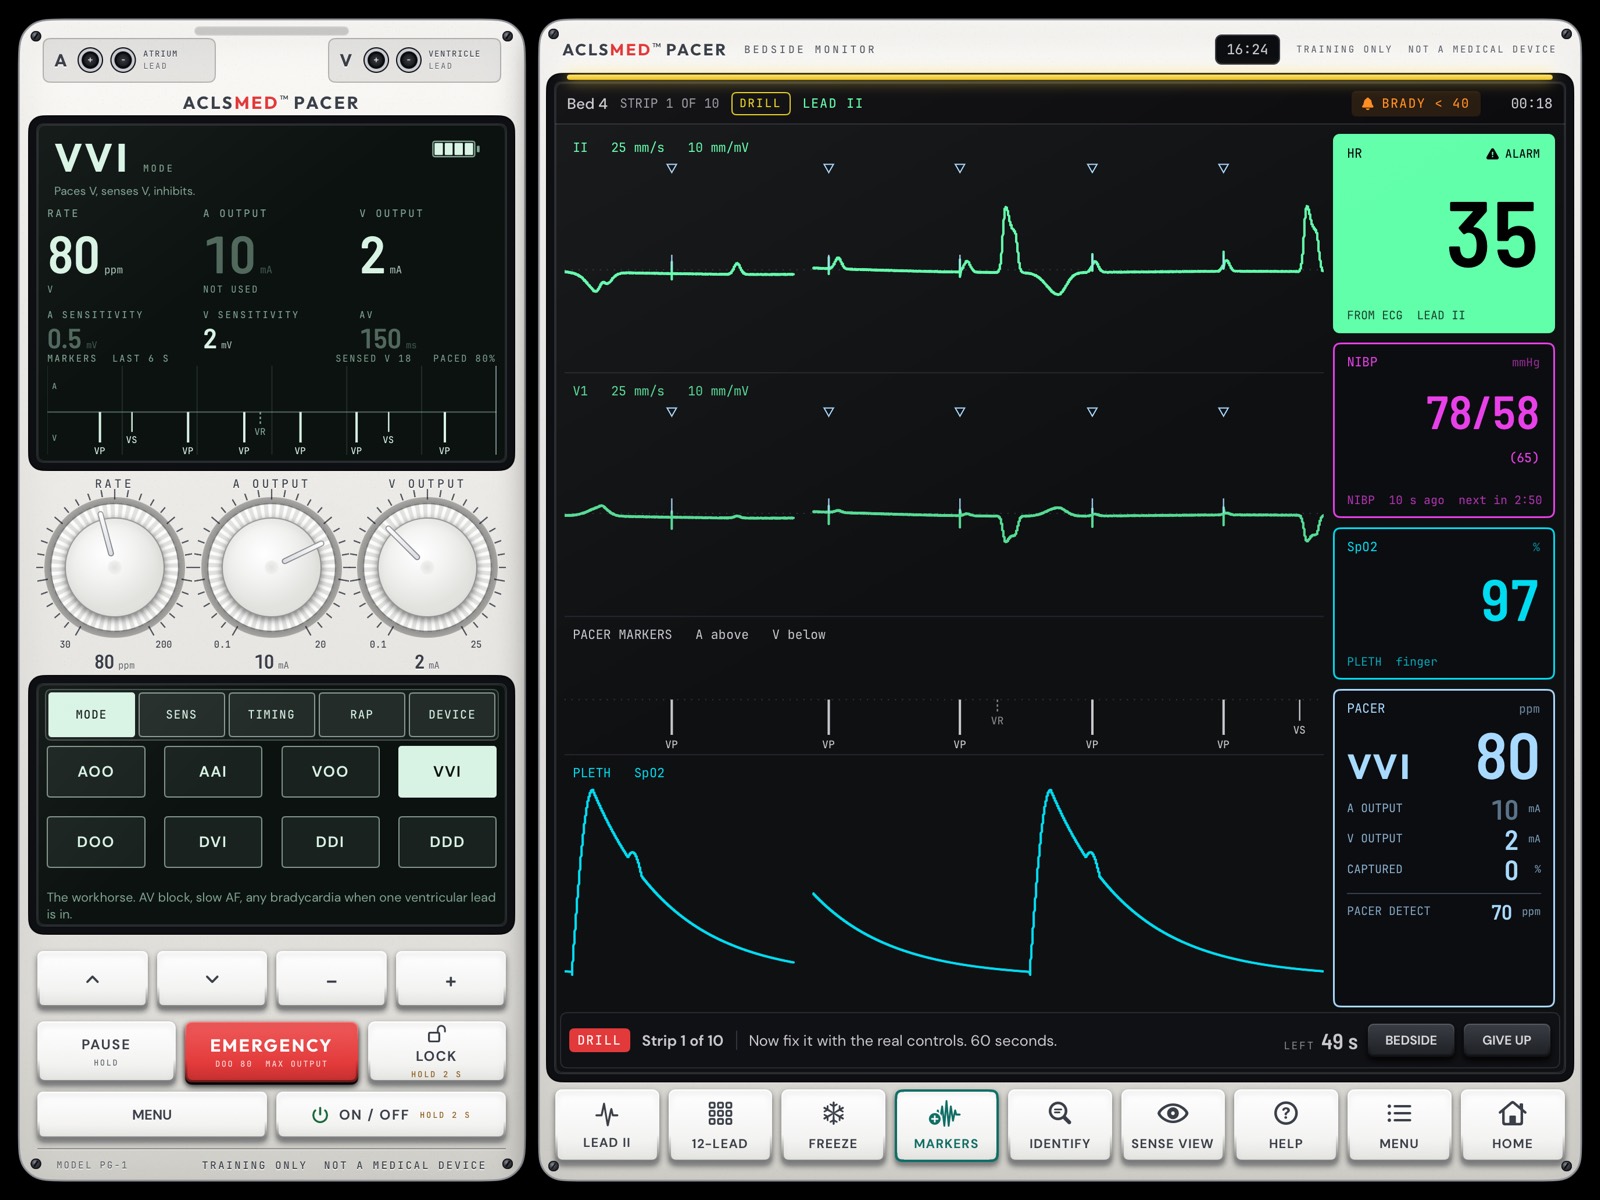
PACED % says how often the generator paced instead of sensed. The generator cannot confirm capture. Capture is read on the monitor: the complex after each spike, the PACER tile's CAPTURED, the pulse.
Flag
Meaning
AP
Atrial pace (above the line)
AS
Atrial sense that reset a timer
VP
Ventricular pace (below the line)
VS
Ventricular sense that reset a timer
AR · VR
A sense inside a refractory period: seen, not acted on
N
Noise
bar
Joins an atrial event to the ventricular pace that followed (the AV interval)
The strip scrolls the last 6 seconds. It is the teaching heart of the device: read it before you touch a dial.
The generatorTop screen
§ 02.04 — The keys
PAUSE, EMERGENCY, LOCK, MENU, ON / OFF
Key
Press
What happens
PAUSE
hold
No output and no sensing while held, so the patient's own rhythm shows. Lets go by itself after 10 s. Use with care in a dependent patient.
EMERGENCY
one press
DOO 80, A 20 mA, V 25 mA, whatever was set, even if the generator was off. The key then reads EXIT EMERG.
EXIT EMERG
press or change
Any change you make settles the emergency; the values stay until you change them. A second press leaves it too. Nothing is restored.
LOCK
hold 2 s
Every dial and key is ignored, the screen says LOCKED. Hold again to unlock.
MENU
press
Turns the pages of the lower screen.
ON / OFF
hold 2 s
Switches the generator off or on. Off: no output, dark screens.
The generatorKeys
§ 02.05 — The keys, seen
PAUSE, LOCK and OFF on the device
PAUSE held · the escape showsLOCK · controls ignoredOFF · no output
Settings > Practice opens > GENERATOR OFF starts Practice with dark screens, to practice turning on and setting up from nothing.
The generatorKeys seen
§ 02.06 — MODE page
Eight modes, one tap each
Mode
The app's own one-liner
AOO
Asynchronous atrial pacing. Rare; testing, or electrical noise with intact AV conduction.
AAI
Sinus bradycardia or sinus arrest with intact AV conduction. Keeps AV synchrony with one lead.
VOO
Asynchronous ventricular pacing. Noise, or when sensing cannot be trusted and the patient is dependent.
VVI
The workhorse. AV block, slow AF, any bradycardia when one ventricular lead is in.
DOO
Emergency asynchronous AV sequential pacing. The EMERGENCY key sets it.
DVI
AV sequential pacing without atrial sensing. Historic; competes with intrinsic P waves.
DDI
Dual-chamber pacing without atrial tracking. Atrial arrhythmias with AV block.
DDD
Full dual-chamber pacing with tracking. AV block with a healthy sinus node: keeps the atrial kick.
A tapped mode takes effect at once. The line under the keys repeats the one-liner for the mode chosen.
The generatorMODE
§ 02.07 — SENSITIVITY and TIMING pages
A smaller number is more sensitive
A SENSITIVITY 0.4 to 10 mV (factory 0.5) and V SENSITIVITY 0.8 to 20 mV (factory 2.0), each with −+ and ASYNC, which switches sensing off on that channel. A row the mode does not use says NOT IN and the mode.
AV INTERVAL · UPPER RATE (its note shows where the 2:1 point falls) · PVARP · A REFRACTORY · V REFRACTORY · V BLANKING after an A pace. Rows a mode does not use are dimmed.
The generatorSENSITIVITY · TIMING
§ 02.08 — RAP and DEVICE pages
Rapid atrial pacing, battery, leads, tones
RAP RATE 80 to 800 ppm (factory 300). Hold the RAP softkey (the third key on this page): atrial pacing at the RAP rate, no sensing, the ventricular channel off. Let go and the previous mode returns. Used to overdrive atrial flutter (Lesson 6, case B5).
BATTERY %, LEAD CHECK A and V (OK or OPEN), pulse width 1.0 ms fixed, and the device's three tones, Alarm tone, Beat beep and Spike click, each ON or OFF with a level set by the − + softkeys.
The generatorRAP · DEVICE
§ 02.09 — TRAINER page · Practice only
The instructor's drawer, on the generator
PATIENT · ten patientsFAULTS · V threshold rise onSHELL · colour and tour
On this page the softkeys read PATIENT · FAULTS · SHELL · CLEAR (clear all faults). The monitor's PATIENT key jumps here. Patient and faults change the heart live; nothing in Practice is scored. The TRAINER page is not offered in lessons or scored cases, and in TEACH the same controls move to the instructor panel (§ 08.06).
The generatorTRAINER
§ 02.10 — Patients and faults
Ten patients, twelve faults
Patient
Sinus rhythm 75
Sinus bradycardia 45
Complete heart block, junctional escape 40
Complete heart block, ventricular escape 35
Complete heart block, no escape
Slow atrial fibrillation 45
Atrial flutter 2:1
Mobitz II 2:1
Asystole
Complete block with retrograde conduction
Fault
What it does
A / V lead off
No output reaches the lead, nothing is sensed
A / V loose connection
Output and sensing drop out at random for 0.5 to 3 s
A / V lead dislodged
Threshold above any output; sensing falls
A / V threshold rise
Exit block: the threshold rises above the set output
Low battery
10%, falling 1% every 20 s until depleted
Myopotential noise
Muscle bursts on the V channel (oversensing)
Electrical noise
Mains interference on both channels and the monitor
Generator failure
No output on either channel
A fault stays on until it is cleared.
The generatorPatients and faults
§ 02.11 — Alarms and messages
What each alarm means on this generator
Alarm
What to check (the app's own advice)
LOW BATTERY
Change the battery soon. Have a second generator at the bedside.
BATTERY DEPLETED
No output. Press EMERGENCY on the spare generator and connect the leads.
A LEAD OFF
Check the atrial lead at the terminal block and at the patient.
V LEAD OFF
Check the ventricular lead at the terminal block and at the patient.
NOISE A
Interference on the atrial channel. Check the lead, the connections and nearby equipment.
NOISE V
Interference on the ventricular channel. The generator paces asynchronously until it clears.
PAUSED
No output while PAUSE is held. Release it.
LOCKED
Controls are locked. Hold LOCK for 2 seconds to unlock.
EMERGENCY
DOO at 80 with maximum outputs. Settle the settings once the patient is stable.
HIGH RATE
Sensed ventricular rate over 150 for 10 seconds. Look at the rhythm and the upper rate.
OUTPUT AT MAXIMUM
Capture may still be lost. Check the lead position and call.
OFF
The generator is off. Hold ON/OFF.
Red rows are high priority. The monitor raises its own alarms too, such as BRADY < 40 when the ventricular rate falls below 40. The monitor's HELP key lists the alarms showing right now with this advice (§ 03.07). Alarm tones are this trainer's own.
The generatorAlarms
§ 02.12 — Housings
Four housings, same controls
WhiteIvoryBlueGraphite
Pick the colour on the generator's TRAINER > SHELL tab, on the monitor's MENU, or in Settings > Generator. The dials, keys and screens are the same in every one.
The generatorHousings
§ 02.13 — The generator on a phone
The same generator, in one hand
LinkedLink down
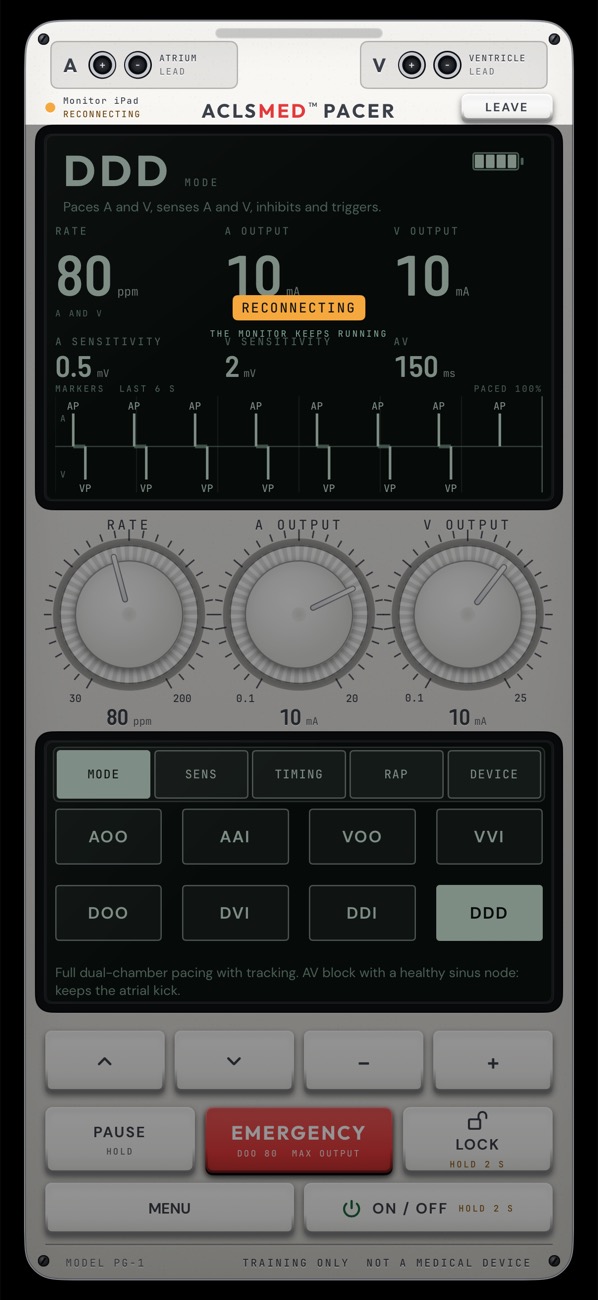
In TEACH the phone (or a second iPad) shows only the generator: its screens, dials and keys, full screen and upright. It runs no engine of its own. It mirrors the monitor's frames ten times a second, and every dial turn and key press goes back to the monitor and is applied there.
Top left: the monitor's name and LINKED with the round trip in ms.
Top right: LEAVE, held for 1 second.
Link down: the controls dim behind RECONNECTING and THE MONITOR KEEPS RUNNING. A touch only shows a notice.
The screen stays awake while it is linked.
The generatorOn a phone
§ 03
The monitor
What the class watches. The surface ECG, the generator's own markers lined up underneath, and the numbers.
§ 03.01 — Anatomy
The monitor, region by region
1234567
Status line: bed, patient, PRACTICE or the case chip, the lead, alarms, elapsed time. The lamp on the bezel blinks for a high-priority alarm.
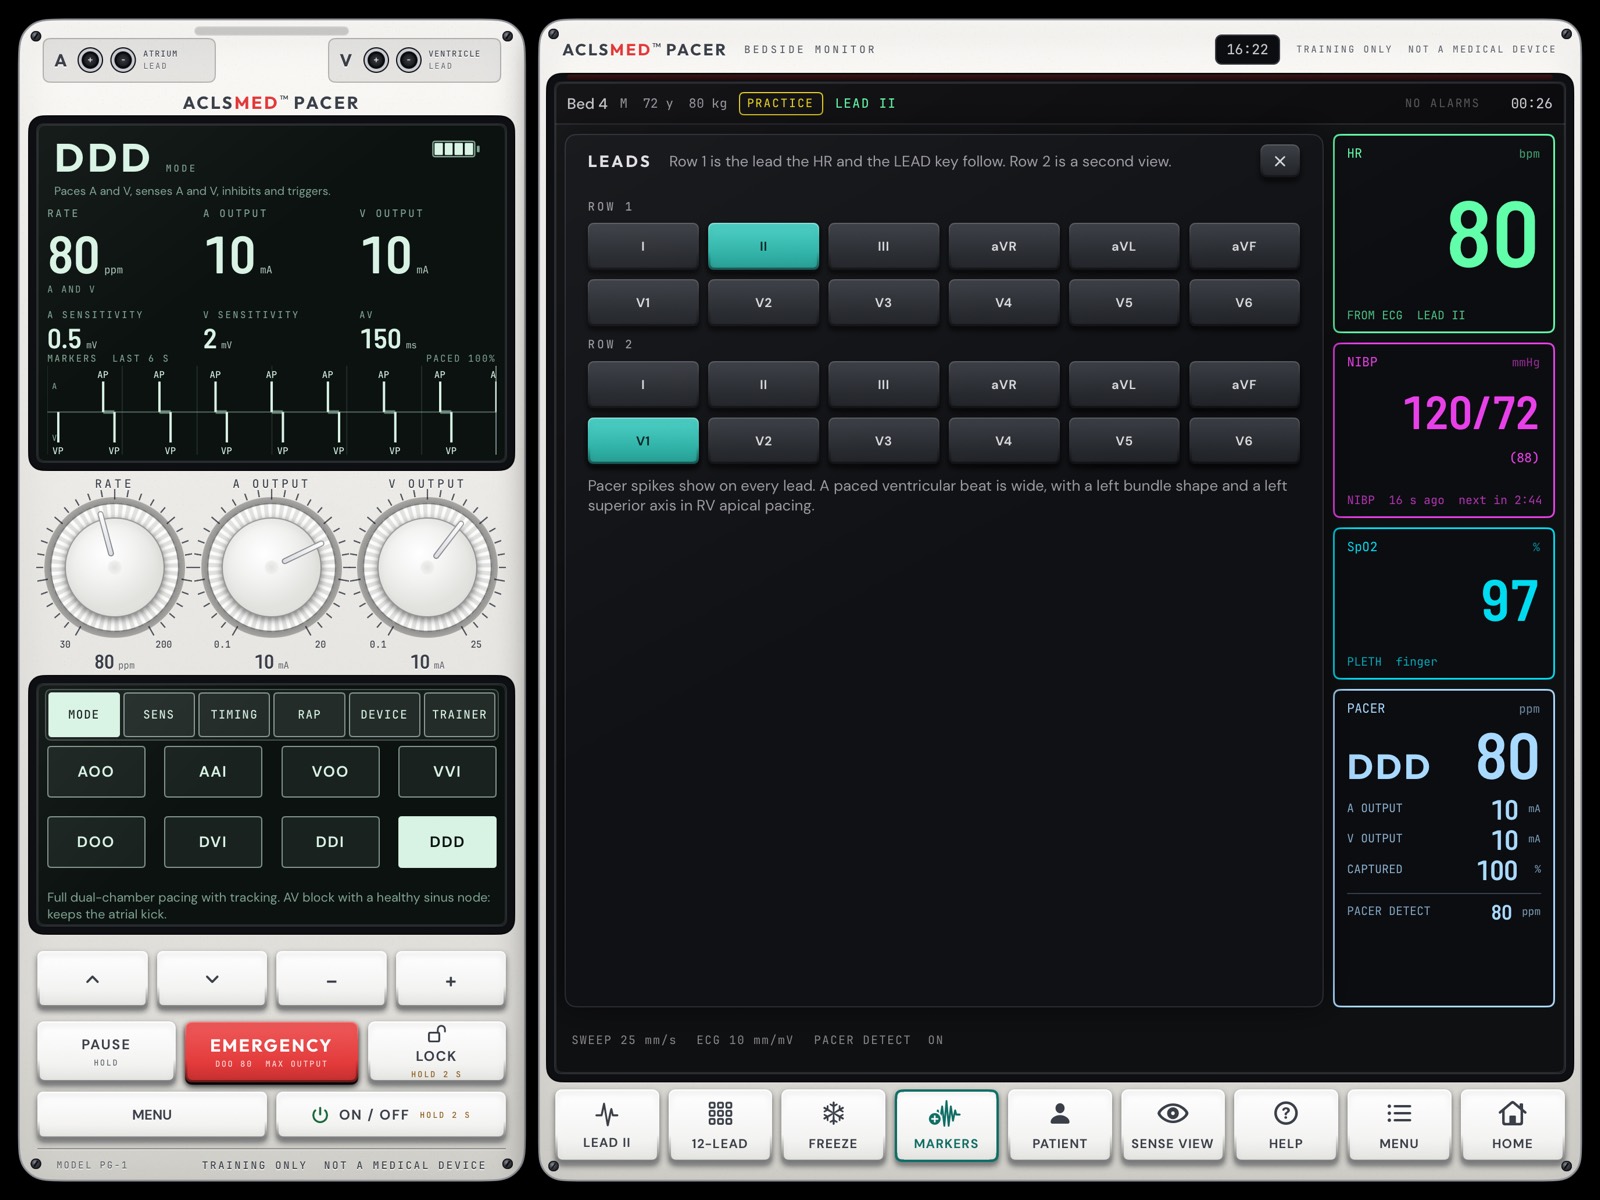
Two ECG rows: row 1 is the lead the LEAD key cycles; row 2 is a second view, V1 by default. Pacer detect draws a small blue mark above each spike it sees; an open mark is a spike that did not capture.
PACER MARKERS: the generator's flags, A above, V below, on the monitor's time base.
Pleth, or the arterial line when the patient has one. SENSE VIEW swaps in the electrogram.
HR from the ECG, and BP: a cuff every 3 minutes with a "next in" countdown, or ART live.
SpO₂ and the PACER tile: mode, rate, outputs, CAPTURED %, and PACER DETECT in ppm.
Keys (§ 03.02).
The monitorAnatomy
§ 03.02 — Keys reference
The nine keys under the glass
Key
Tap
Hold or notes
LEAD II
Row 1 to the next of the twelve leads. The label shows the lead.
Hold opens the lead picker for row 1 and row 2
12-LEAD
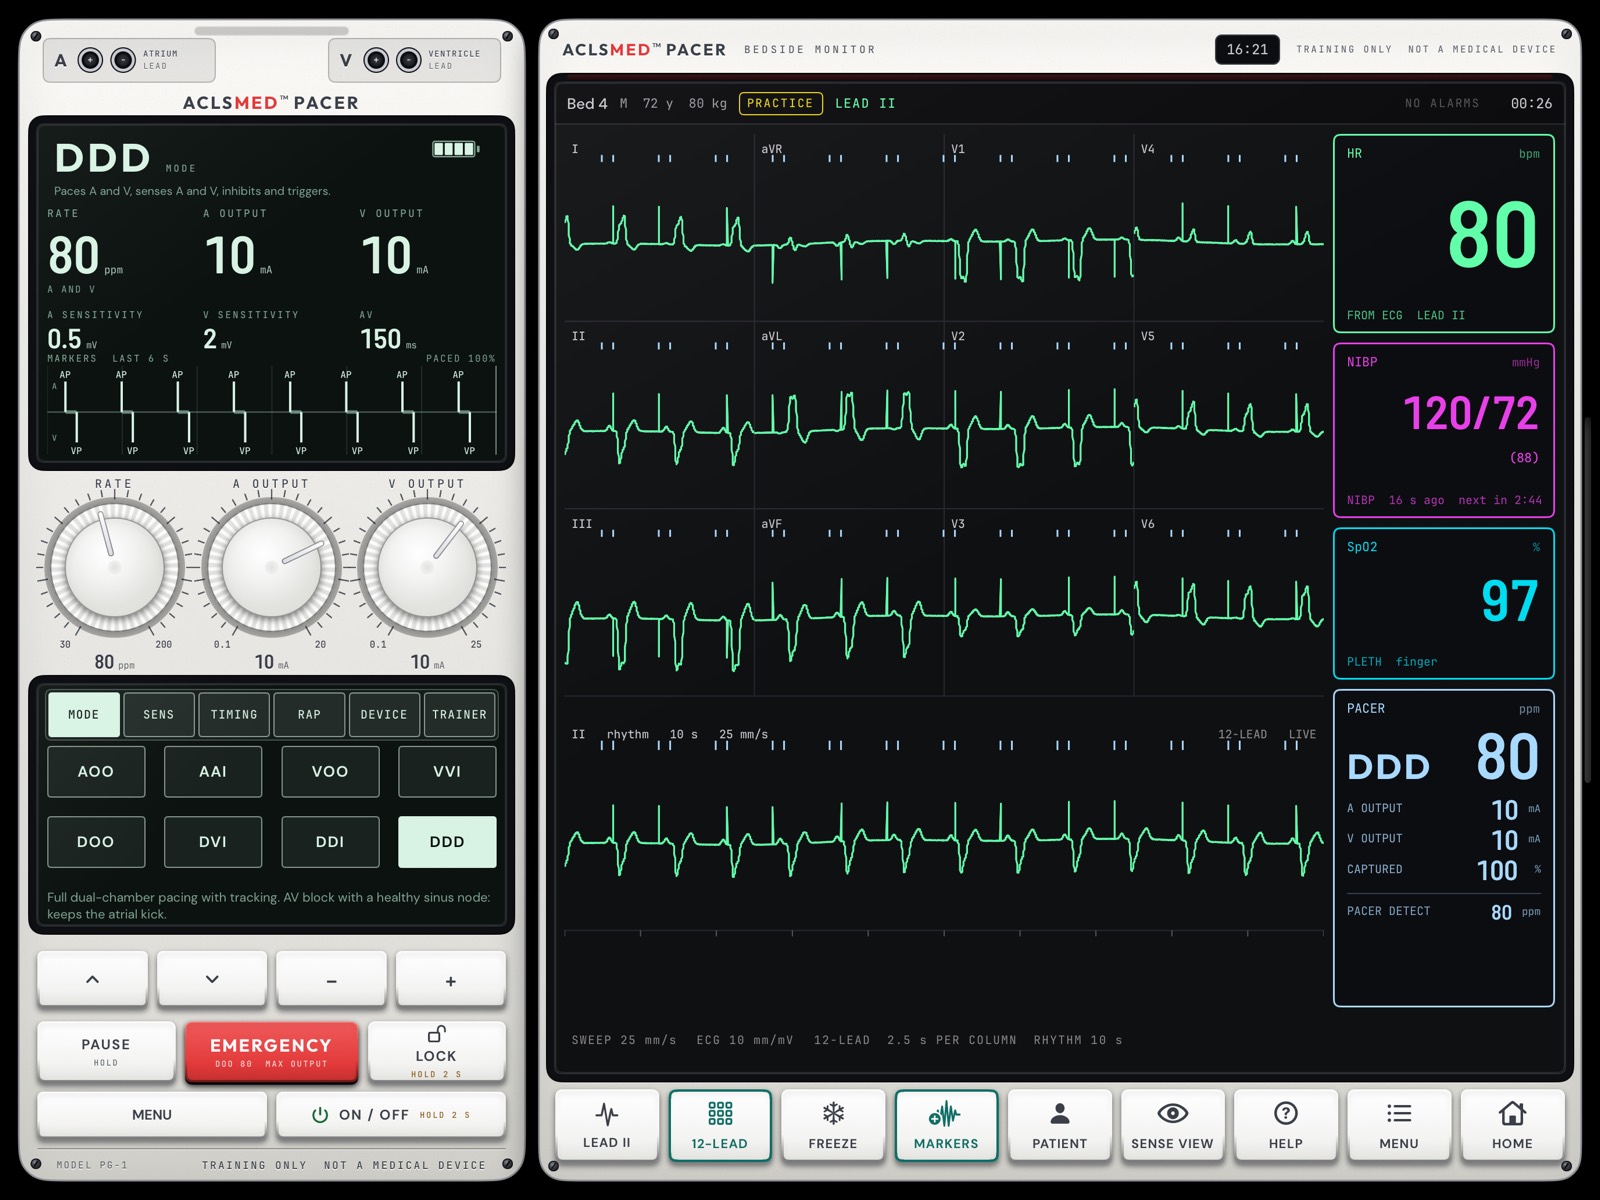
All twelve leads, three by four, with a 10 s lead II rhythm strip
Tap again to go back
FREEZE
Holds the traces; the status line shows FROZEN
Tap again to run
MARKERS
Shows or hides the PACER MARKERS channel
Lit when on
PATIENT
Practice: opens the generator's TRAINER page
TEACH: tap for patients, hold for faults on the instructor panel
IDENTIFY
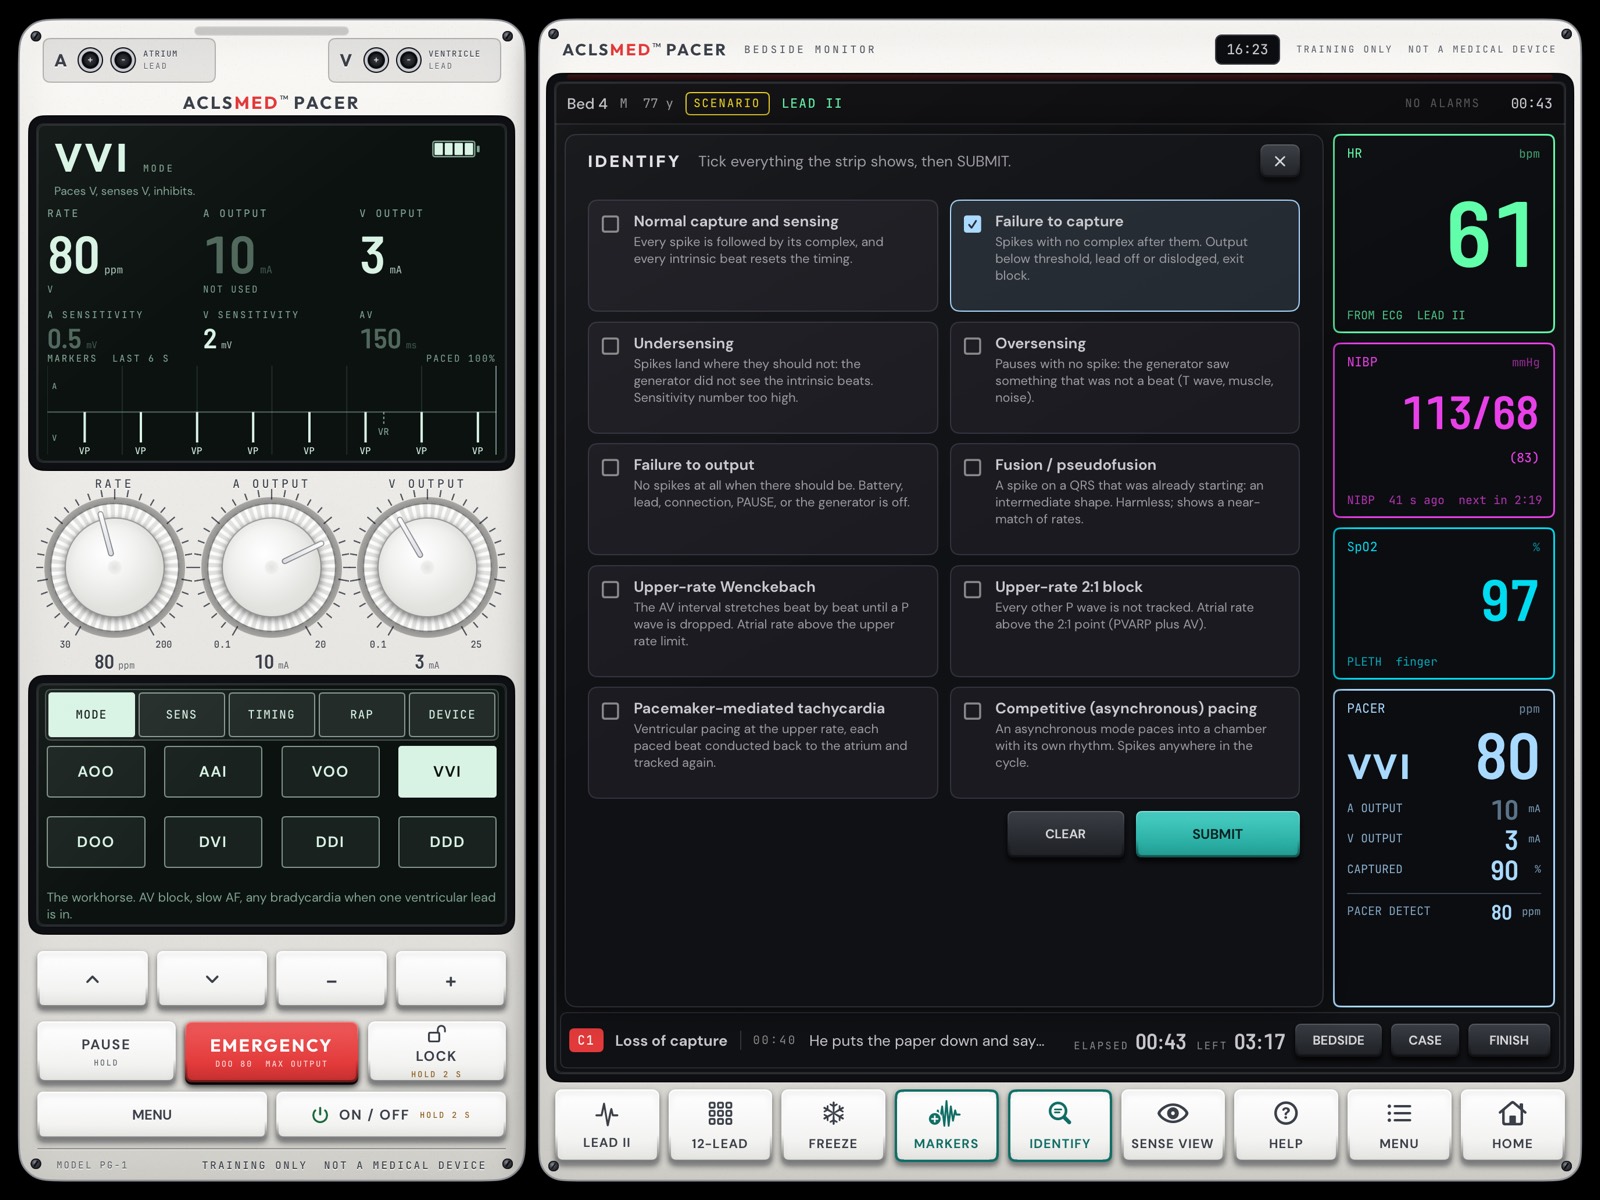
Replaces PATIENT in lessons, scenarios and the drill: tick what the strip shows, SUBMIT
§ 06.04
SENSE VIEW
Swaps the pleth row for what the generator sees
§ 03.05
HELP
The alarms showing with what to check, what the strip can show, the two rules
§ 03.07
MENU
Sound, shell colour, DEVICE TOUR, HOME or LEAVE
§ 03.08
HOME
Back to Home
In TEACH it asks before leaving
The first tap on LEAD ever shows "Hold LEAD to pick a lead". Every panel opens on the glass over the traces, so the tiles stay in view.
The monitorKeys
§ 03.03 — LEAD and 12-LEAD
Any lead, or all twelve
Hold LEAD · pick row 1 and row 212-LEAD · 2.5 s per column, rhythm 10 s
Pacer spikes are drawn on every lead, taller at a higher output (a simplification). Lesson 8 reads the paced 12-lead: a wide QRS, left bundle shape, left superior axis, discordant T waves.
The monitorLeads
§ 03.04 — The marker channel
Where undersensing and oversensing show
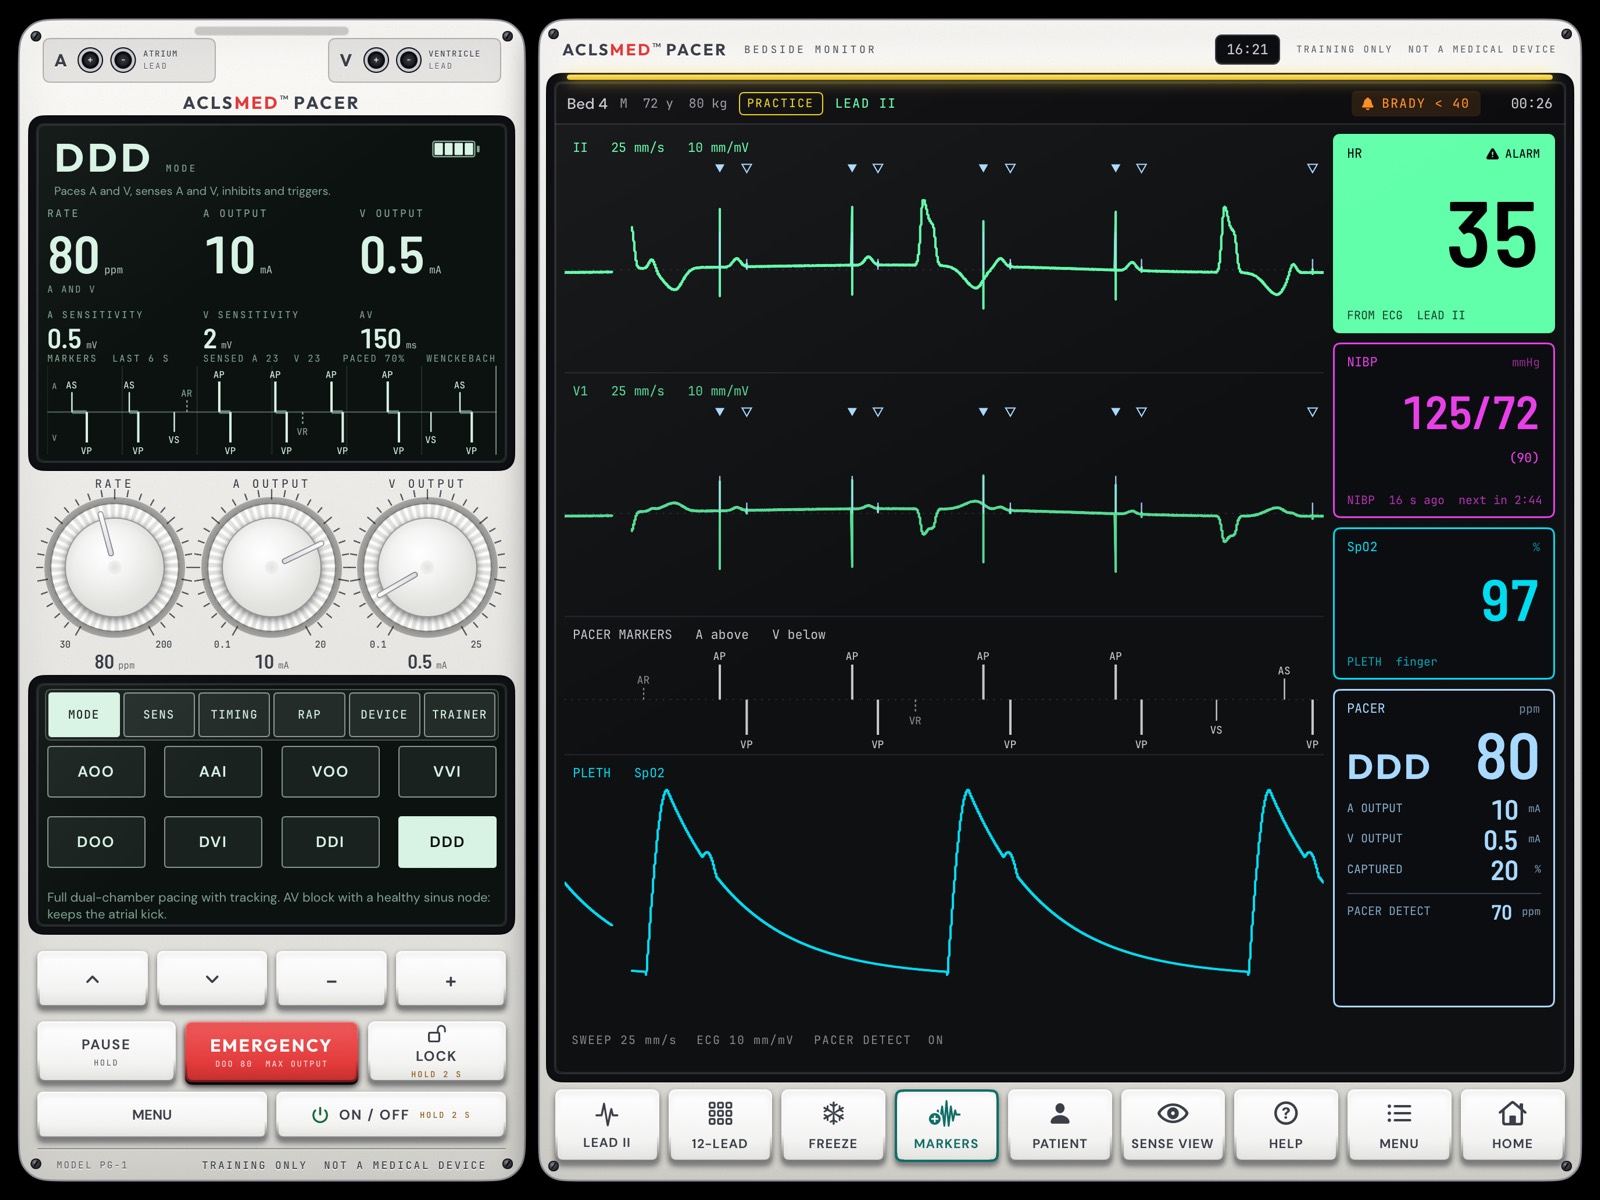
The marker channel lines the generator's AP, AS, VP and VS flags up with the ECG above. A spike can be matched to what the generator thought it was doing.
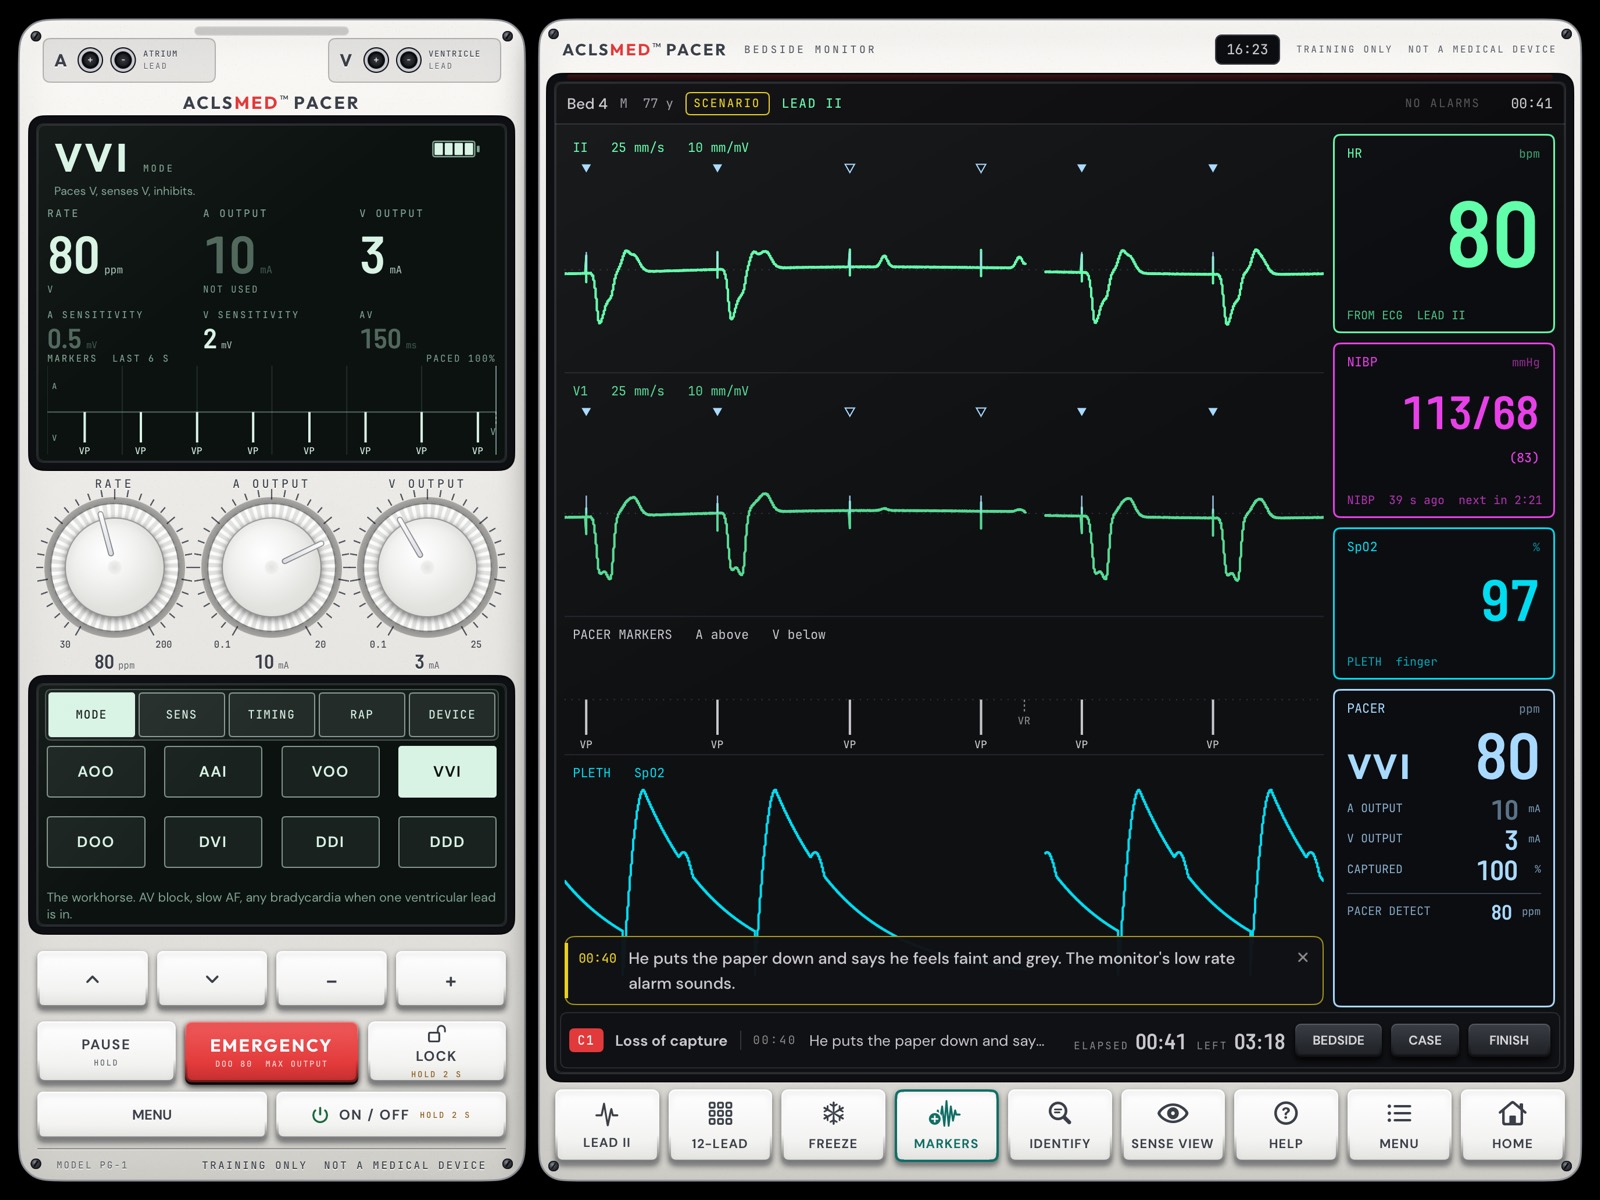
Loss of capture (left): every VP has its spike but no QRS after it; the slow escape shows through.
Undersensing: a VP where the generator should have seen a beat.
Oversensing: a pause with a VS where nothing real happened.
FREEZE before you teach
FREEZE holds every trace so you can point at a spike and its marker together. Lesson 8 uses it to show AP then P at 40 ms, VP then QRS at 30 ms.
The monitorMarkers
§ 03.05 — SENSE VIEW
What the generator sees
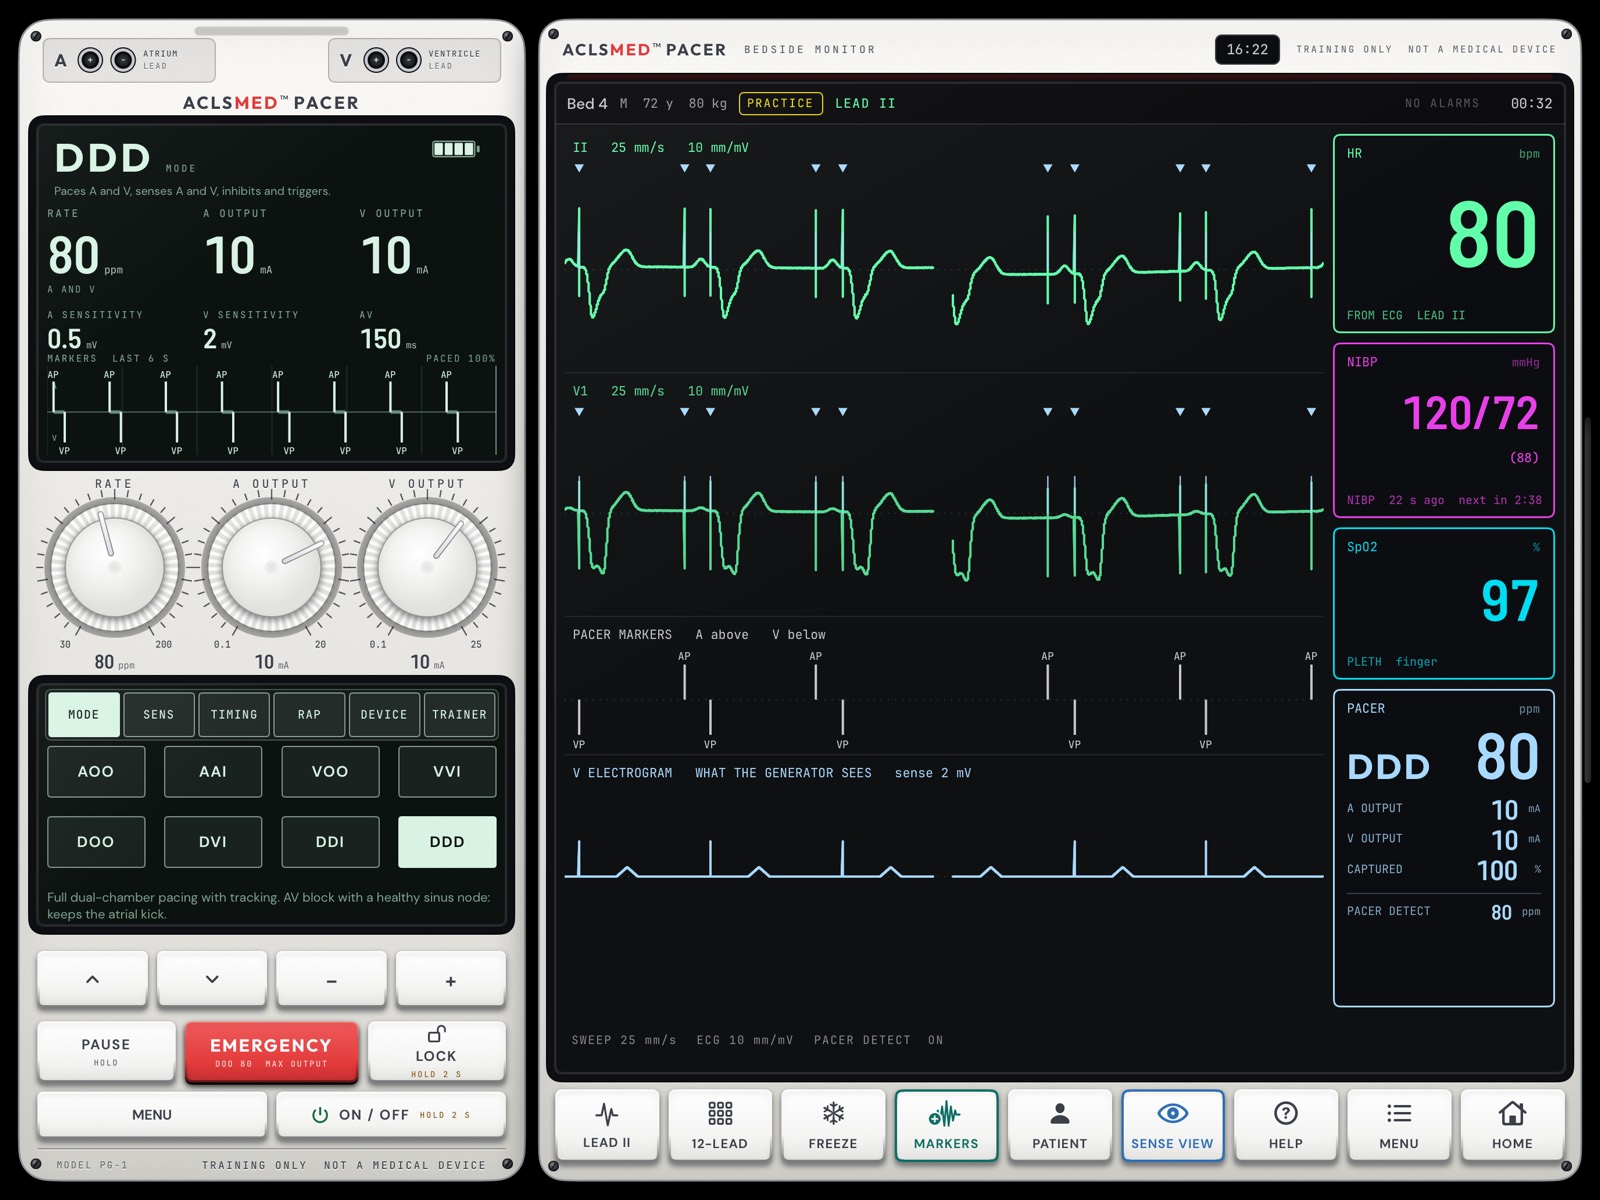
SENSE VIEW swaps the pleth row for the electrogram the generator sees on its lead, in mV, next to the sensitivity number. What rises above the line is sensed.
Sensing is on the device, so what the class sees on the surface ECG and what the generator senses can disagree. That gap is the teaching.
The sensing rule, as the app teaches it
Raise the sensitivity number until the marker strip stops showing AS or VS. That is the sensing threshold. Then set half of it.
The monitorSENSE VIEW
§ 03.06 — The numbers
Heart rate, pressure, SpO₂ and the PACER tile
HR
bpm, from the ECG lead
The heart's rate on the ECG, in bpm. The generator's set rate and PACER DETECT are in ppm.
BP
NIBP every 3 minutes, or ART
A cuff reading at the start of every session, then every 3 minutes with a "next in" countdown. A case with an arterial line shows ART live. Loss of the atrial kick shows here.
SpO₂
with the pleth
The pleth follows each captured or intrinsic beat.
PACER
the monitor's view of pacing
Mode and rate, A and V output, CAPTURED % and PACER DETECT, the spike rate the monitor detects in ppm. Capture is reported here, never on the generator.
ppm or bpm
Keep the two words apart with learners. A generator pacing at 80 ppm with loss of capture can sit beside a heart rate of 35 bpm.
The monitorTiles
§ 03.07 — HELP
HELP on the glass, and Help on Home
The monitor's HELP: ALARMS NOW, each with what to check; WHAT THE STRIP CAN SHOW, the ten findings; THE TWO RULES for sensing and capture.
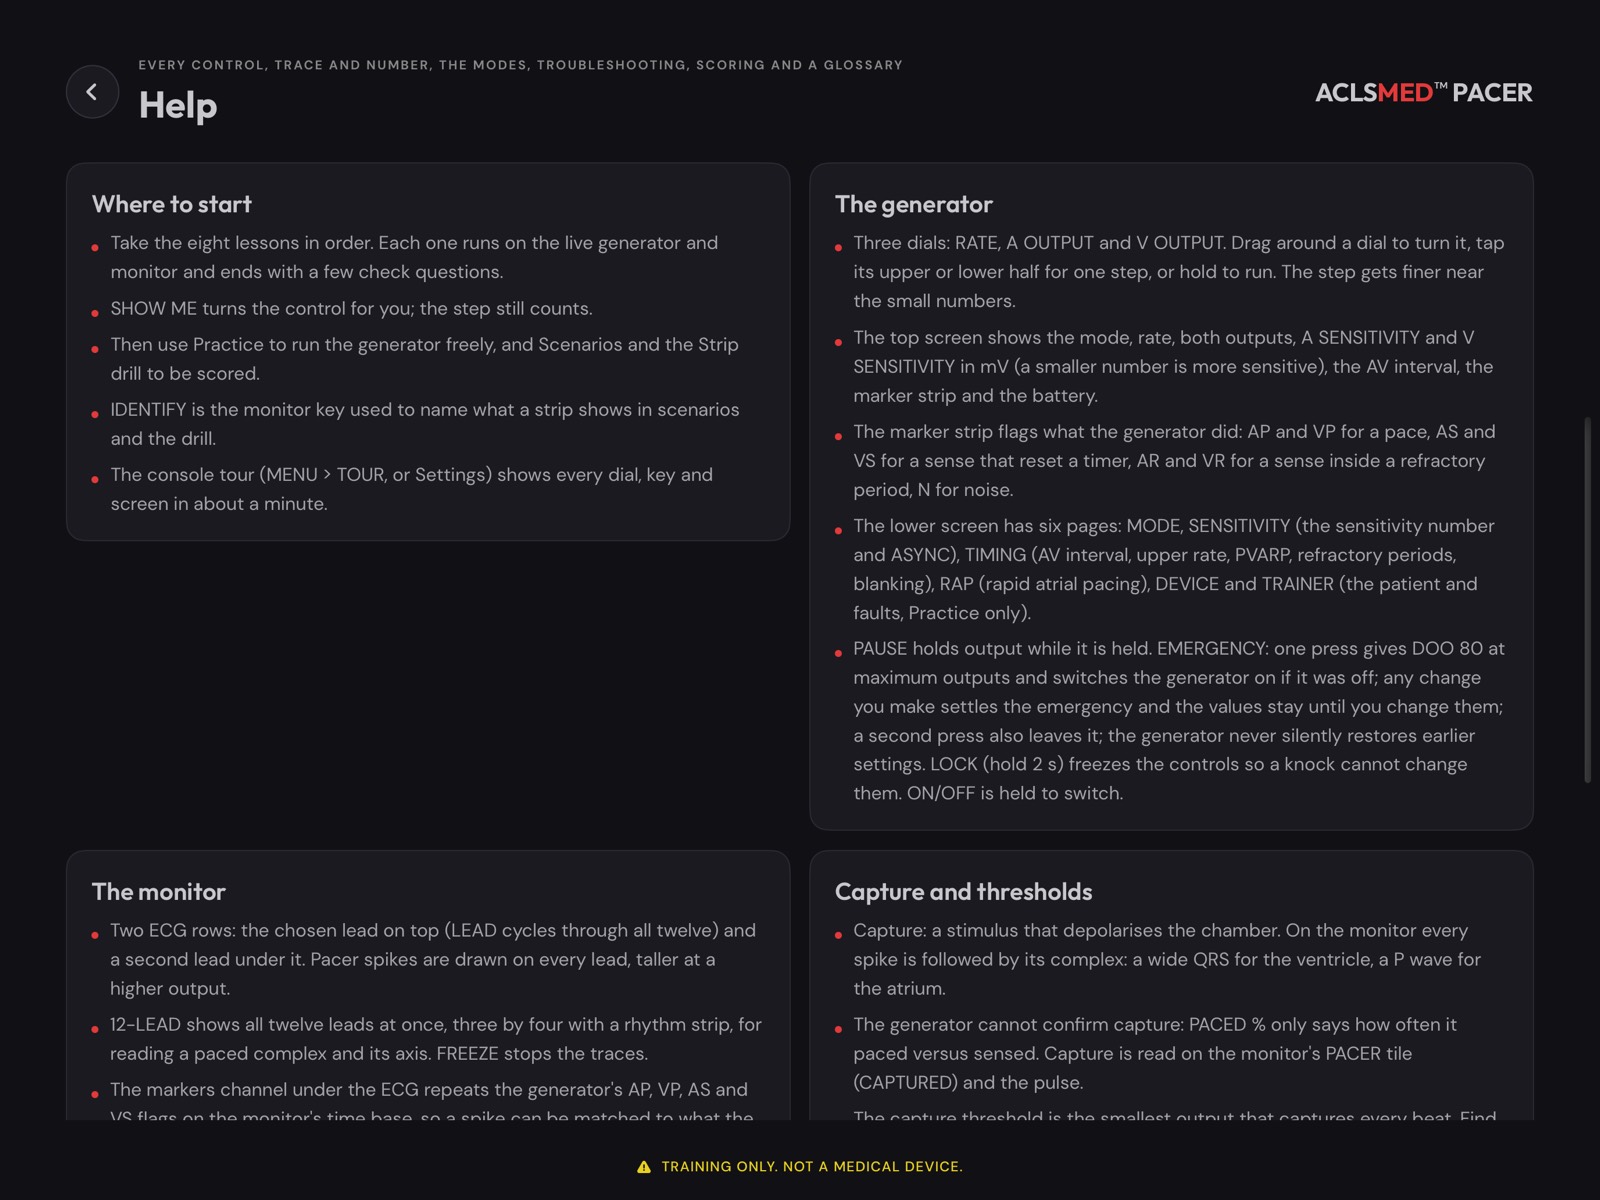
Help from ? on Home or Settings: where to start, every control, capture and sensing, the modes, dual-chamber timing, troubleshooting, scoring, a glossary, and what is saved.
The monitorHELP
§ 03.08 — MENU
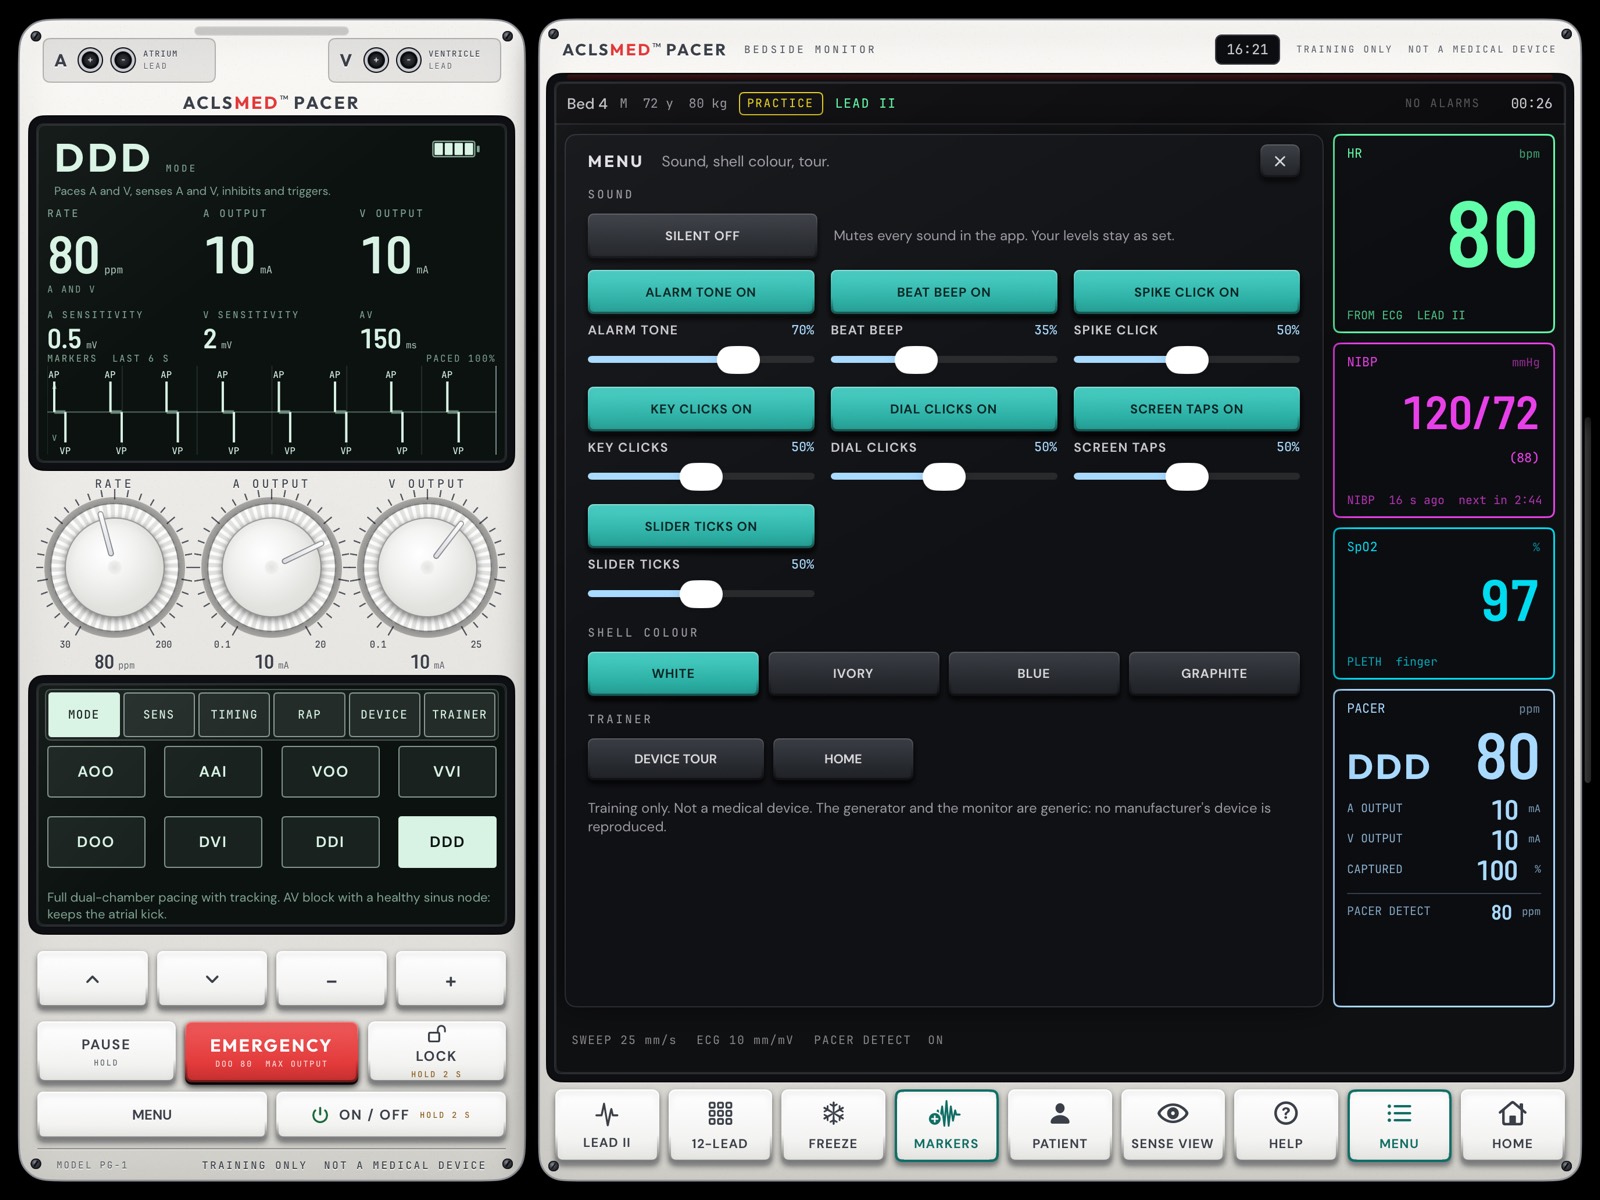
Sound, shell colour, tour, home
SILENT ON / OFF mutes every sound in the app. Your levels stay as set.
The device's tones: ALARM TONE · BEAT BEEP · SPIKE CLICK, each ON or OFF with a slider.
The interface sounds: KEY CLICKS · DIAL CLICKS · SCREEN TAPS, then SLIDER TICKS.
SHELL COLOUR: White, Ivory, Blue, Graphite.
DEVICE TOUR and HOME (LEAVE in a lesson, case or drill).
One set of switches
MENU and Settings write the same values, so they always agree. Letting go of a slider plays a sample at the new level. While SILENT is on, the rows are dimmed but still live.
The monitorMENU
§ 03.09 — Settings and sound
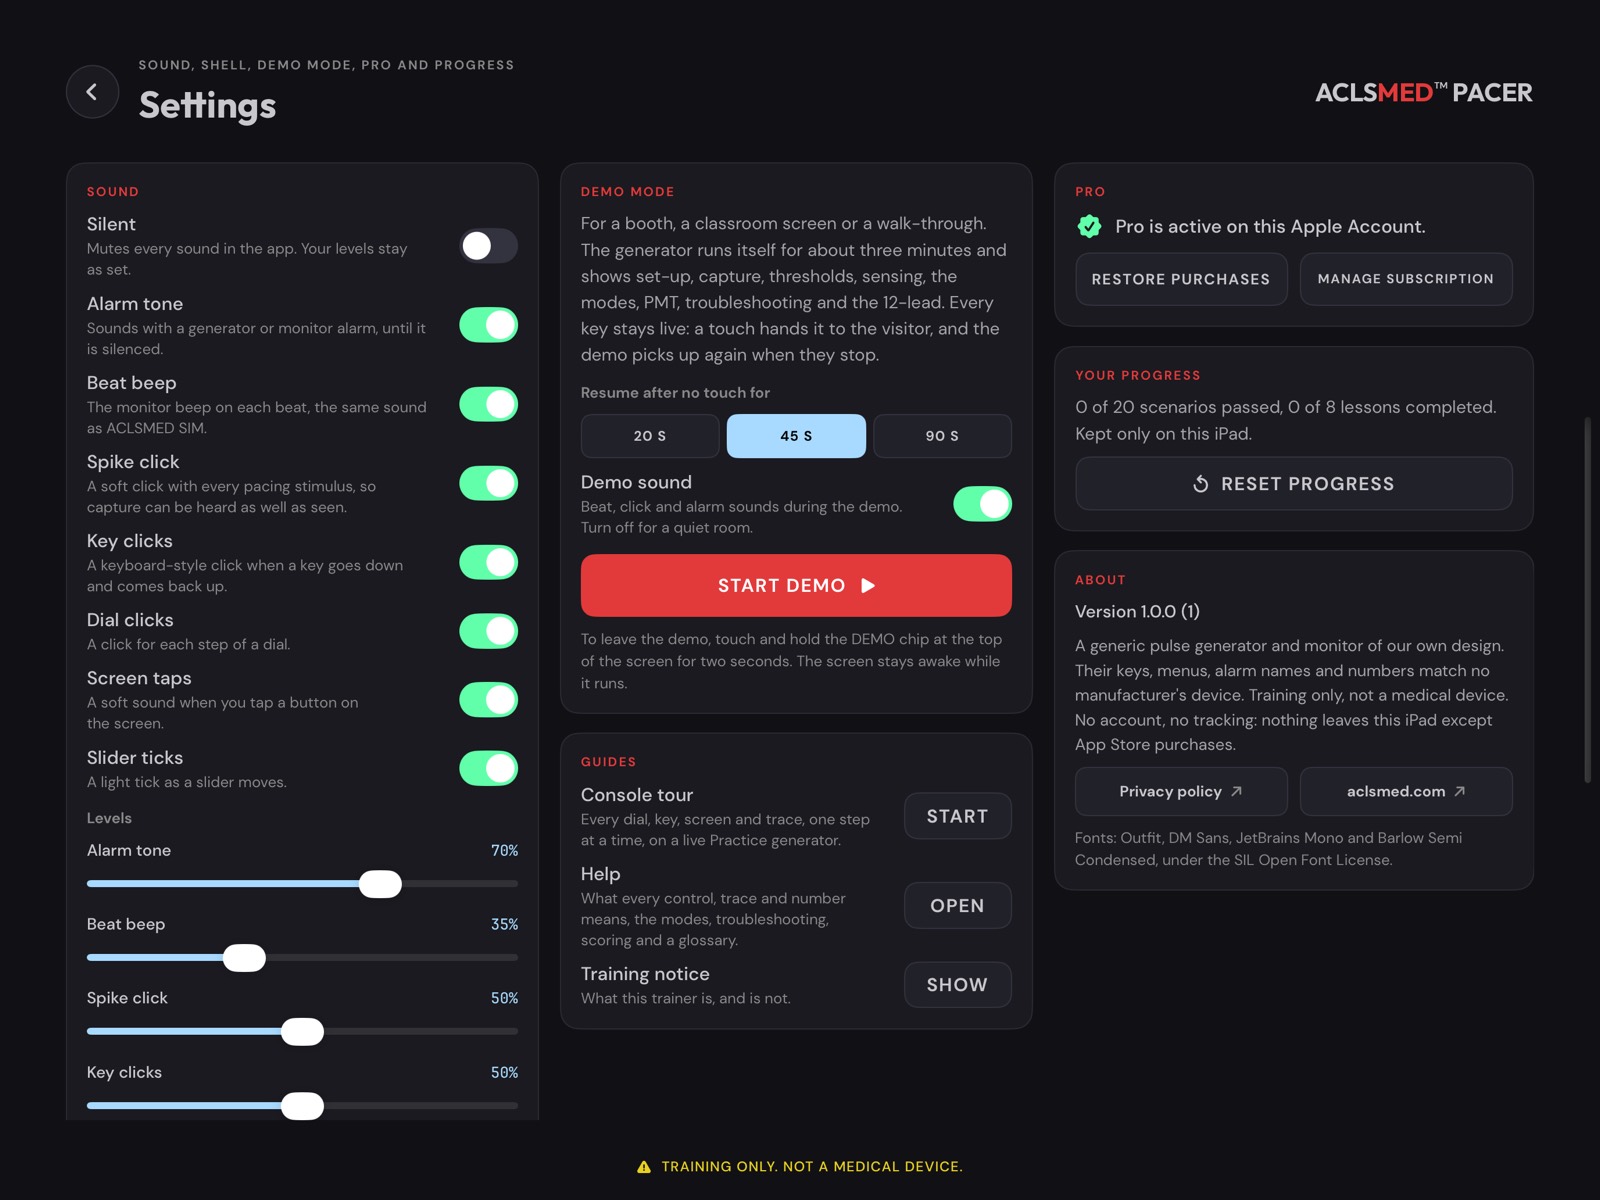
Settings, from the gear on Home
Generator: shell colour; Practice opens DDD 80 CAPTURING, VVI 80 CAPTURING or GENERATOR OFF. Demo mode (§ 04.04). Guides: console tour, Help, training notice. Pro, Your progress, About.
Sound
What it is
Default
Silent
Mutes every sound in the app
Off
Alarm tone
With a generator or monitor alarm, until silenced
70%
Beat beep
The monitor beep on each beat
35%
Spike click
A soft click with every stimulus, so capture is heard as well as seen
50%
Key clicks
When a key goes down and comes back up
50%
Dial clicks
For each step of a dial
50%
Screen taps
When you tap a button on the screen
50%
Slider ticks
As a slider moves
50%
Each sound has an on/off switch and a level. The device's volume buttons set the overall loudness.
The monitorSettings
§ 04
Practice
Free run. Nothing is scored. The best place to demonstrate on a projector and to let learners play.
§ 04.01 — Practice opens
DDD 80 over complete heart block
Practice opens pacing DDD 80 at 10 mA over complete heart block with a junctional escape of 40, capturing, sound on. Change the start in Settings > Practice opens.
The first Practice on a device starts the console tour; after that it is under MENU > DEVICE TOUR or Settings.
A two-minute demonstration
Drag the V OUTPUT dial down below 1 mA. The spikes lose their QRS and the rate falls to the escape. Turn it back up and capture returns. Then try PAUSE, EMERGENCY and the MODE page.
PracticeOpening state
§ 04.02 — Things to show in Practice
Change one thing, watch the strip
V OUTPUT 0.5 mA · loss of capturePAUSE held · the underlying rhythmVVI 80 · no atrial pacingSlow AF 45 · VVI
Every one of these is a real engine state reached through the same keys a learner presses.
PracticeDemonstrations
§ 04.03 — The console tour
Every dial, key and screen in about two minutes
The tour spotlights one part at a time on a live Practice generator while the patient keeps running. NEXT and BACK step through it; SKIP ends it. Start it from MENU > DEVICE TOUR, TRAINER > SHELL > DEVICE TOUR, or Settings > Guides.
#
Step
#
Step
1
Welcome
11
The four softkeys
2
Lead terminals
12
PAUSE
3
The top screen
13
EMERGENCY
4
The marker strip
14
LOCK, MENU, ON/OFF
5
RATE
15
The monitor: two ECG leads
6
A OUTPUT and V OUTPUT
16
The marker channel
7
The menu screen: MODE
17
Pleth, ART, or what the generator sees
8
SENSE
18
Numbers
9
TIMING
19
LEAD, 12-LEAD, FREEZE, MARKERS
10
RAP · DEVICE
20
PATIENT, SENSE VIEW, HELP, MENU, HOME
Take the tour yourself once before class. It is the fastest way to learn where everything is.
PracticeTour
§ 04.04 — DEMO mode
A trainer that runs itself
For a booth, a classroom screen as people arrive, or a walk-through. The generator runs itself for about three minutes, pressing its own keys: set-up, capture, thresholds, sensing, the modes, PMT, EMERGENCY and the 12-lead. Then it loops.
Settings > Demo mode > Start demo.
Any touch hands the device to the visitor. After 20, 45 or 90 s without a touch the demo starts again on a fresh patient.
Demo sound off for a quiet room.
To leave, touch and hold the DEMO chip at the top for two seconds.
The screen stays awake while it runs.
PracticeDEMO
§ 05
Learn: the 8 lessons
Stepped lessons on the live generator and monitor. About six to eight minutes each. All free.
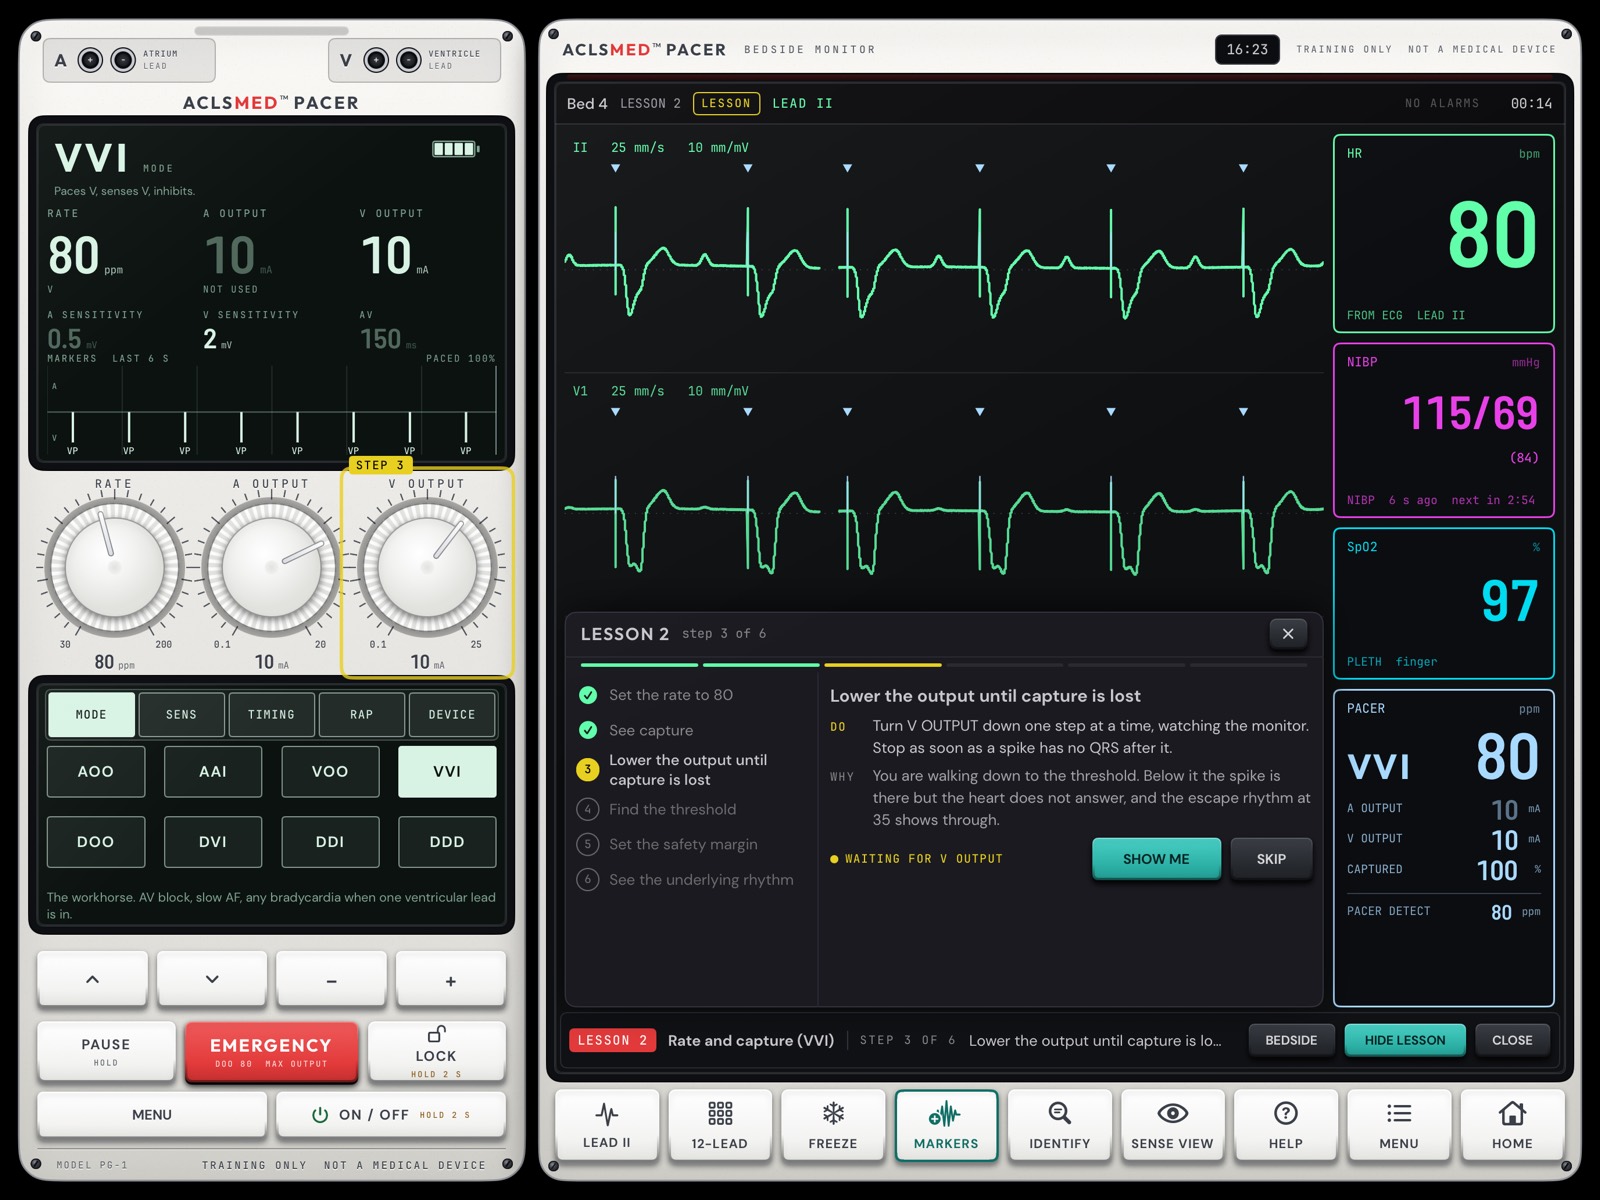
§ 05.01 — How a lesson works
Do it on the real keys
An intro card sets the patient and the goal.
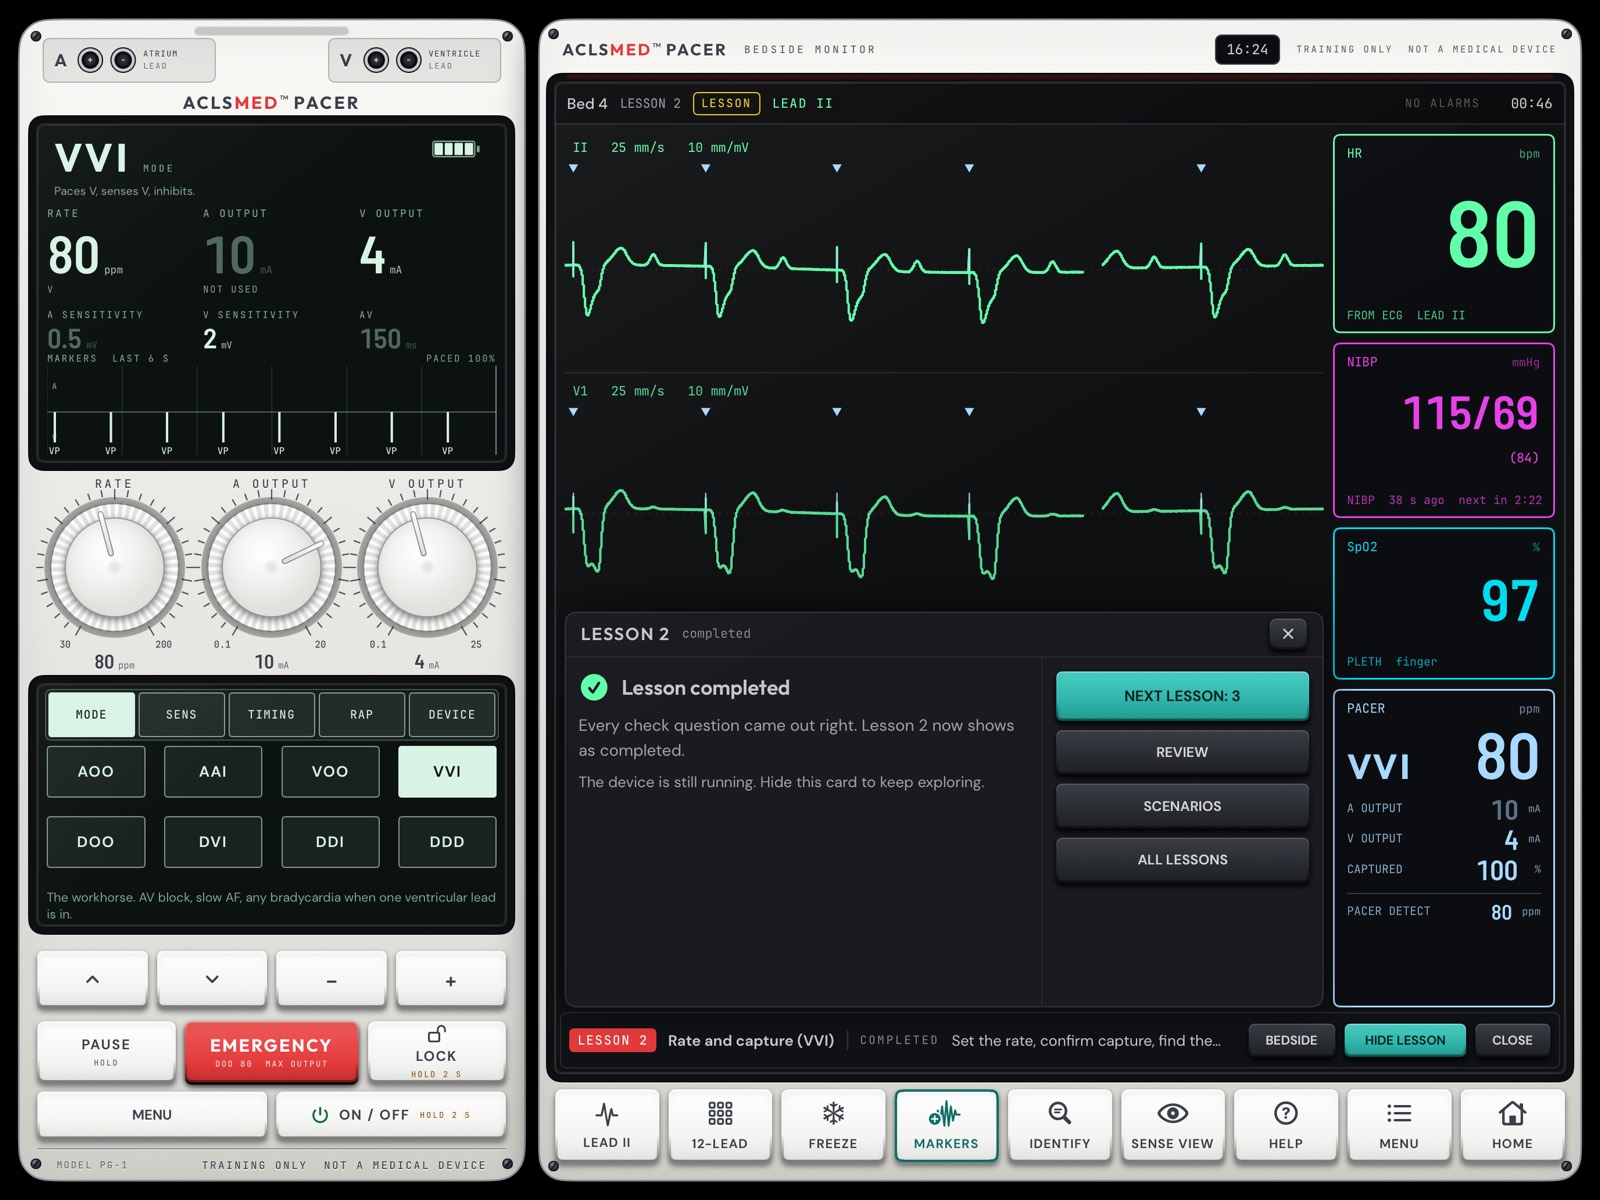
Each step says what to do and why. It is done when the engine sees it happen, not when a button is pressed.
SHOW ME turns the control for you; the step still counts.
The card sits over the marker and pleth rows so HR, BP, SpO₂ and PACER stay visible. Hide it to look at the whole monitor; the patient is live behind it.
When every step is done, three check questions follow.
LearnA lesson
§ 05.02 — Check questions
Completed when every answer is right
A missed question · the right answer markedLesson completed
The first tap is the answer. A wrong answer shows the right one and the reason, and the question comes back once at the end. A question still wrong at the second try leaves the lesson "Not completed yet", with TRY THE CHECK AGAIN.
LearnQuestions
§ 05.03 — The eight lessons
Take them in order
#
Lesson
Objective (from the app)
Min
L1
What the generator does
Name the parts, turn it on, read the top screen and the marker strip while it paces a patient in complete heart block.
6
L2
Rate and capture (VVI)
Set the rate, confirm capture, find the ventricular capture threshold and set the output with a safety margin.
7
L3
Sensitivity and sensing (VVI)
Watch a sensed beat inhibit the generator, find the sensing threshold, set half of it, and see asynchronous pacing.
7
L4
The modes
Read the NBG letters and try every mode on one patient with sinus bradycardia and intact conduction.
7
L5
Dual-chamber timing
AV interval, upper rate limit and PVARP in DDD; Wenckebach and 2:1 upper-rate behavior and PMT, and ending each.
8
L6
Atrial pacing and overdrive
AAI for sinus bradycardia, the atrial threshold, and rapid atrial pacing to overdrive atrial flutter.
7
L7
Troubleshooting
Failure to capture, undersensing, oversensing and failure to output, and what to check in which order.
8
L8
The paced 12-lead
RV apical pacing, the paced P wave, fusion and pseudofusion, where the spikes fall; then the EMERGENCY key.
6
Lesson 2 is the best first lesson to show a group: the stepped card, SHOW ME on the real dial, and the questions.
LearnThe eight
§ 06
Scenarios
Twenty scored cases in four tiers. The patient and the room change; the learner reads the monitor and works the generator.
§ 06.01 — The scenario list
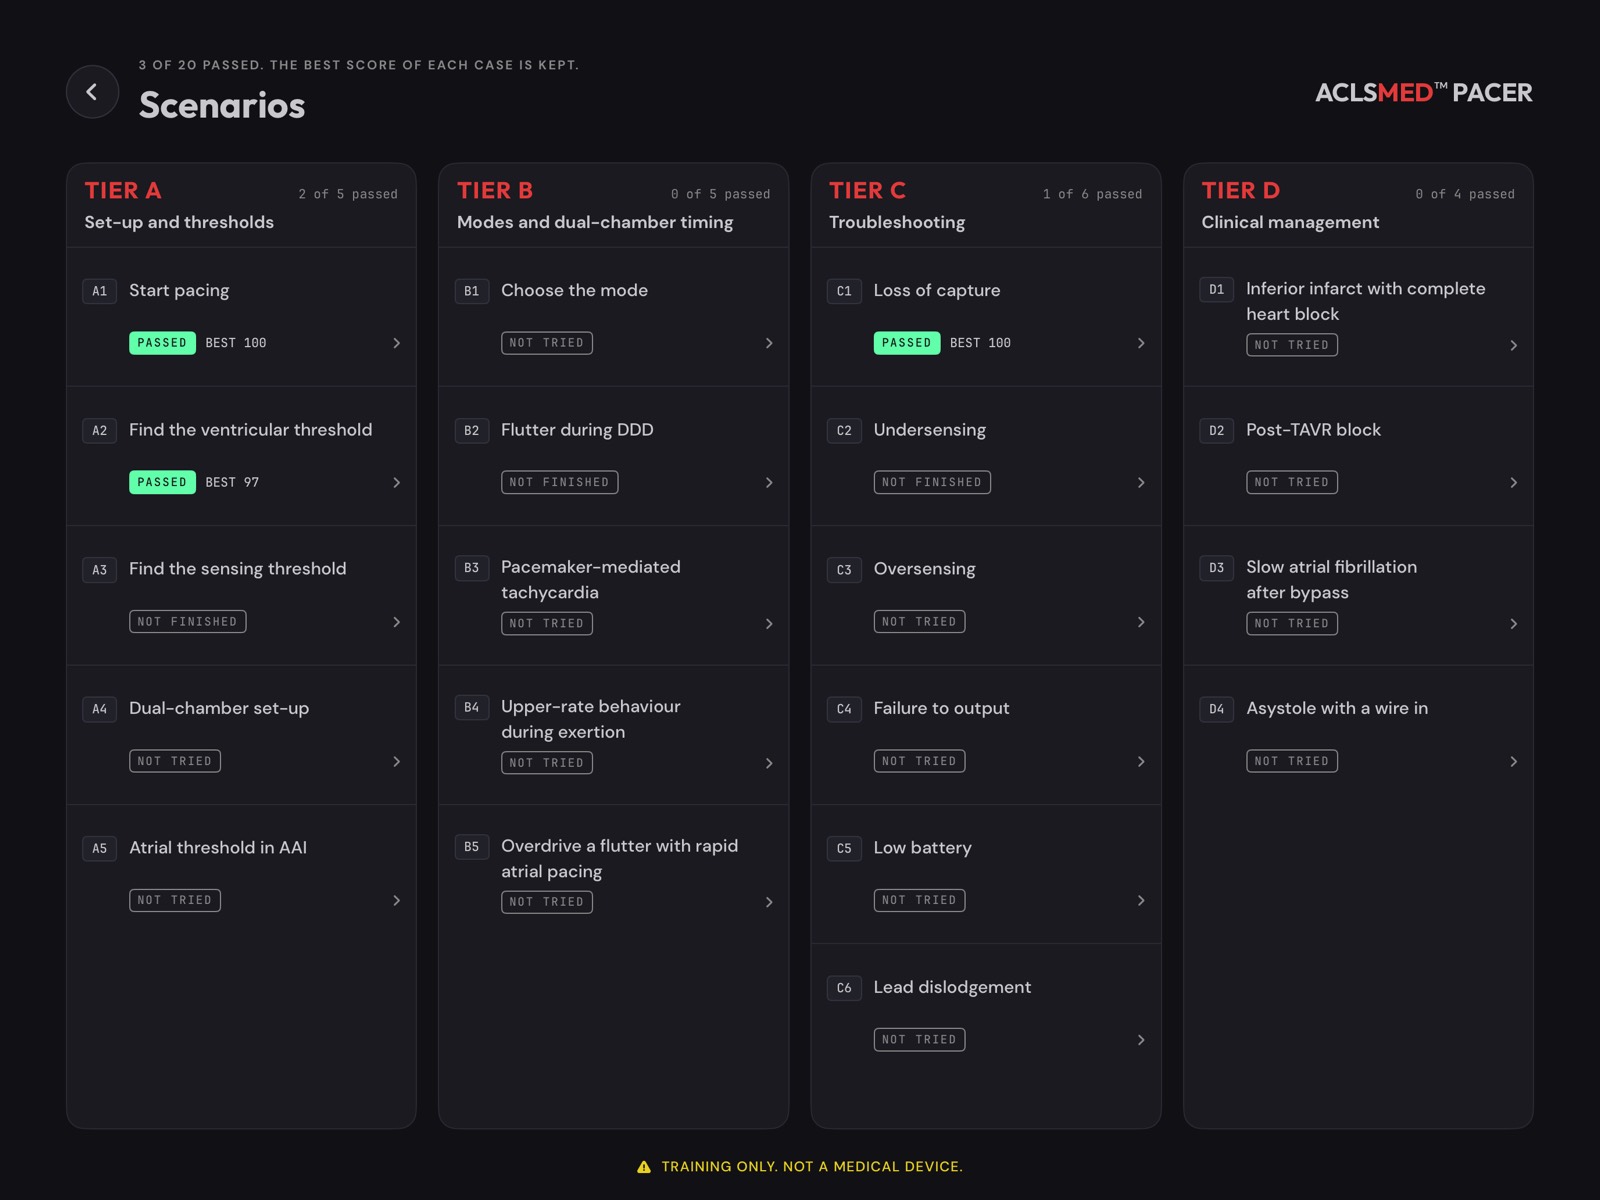
Four tiers, twenty cases
Tier
Name
Cases
A
Set-up and thresholds
5
B
Modes and dual-chamber timing
5
C
Troubleshooting
6
D
Clinical management
4
Each row shows the learner's best score. Free cases are A1, A2, B1 and C1; the rest wear a lock until Pro. A locked case still shows the best score earned in it.
ScenariosThe list
§ 06.02 — The briefing
Read the patient, then start
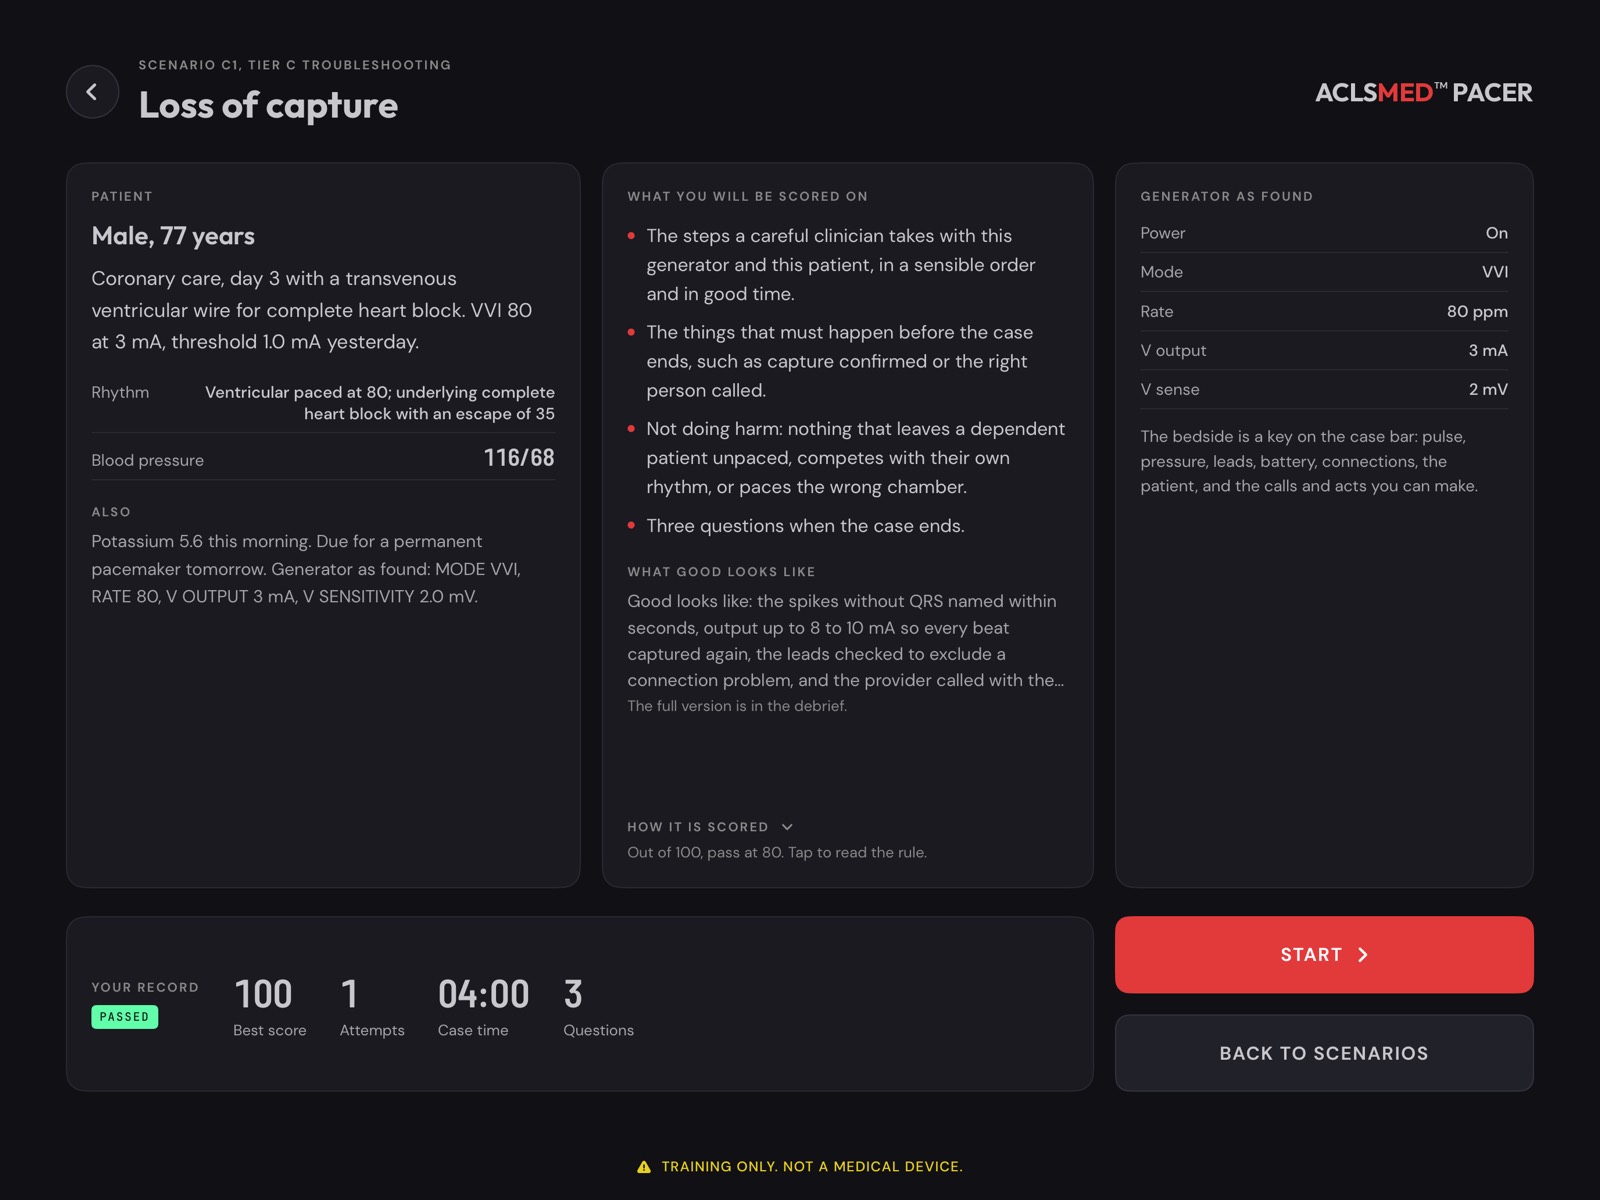
The patient: age, setting, rhythm, blood pressure, and the generator as found.
How it is scored: expected steps in a sensible order and in good time; things that must happen before the end; not doing harm; three questions at the end.
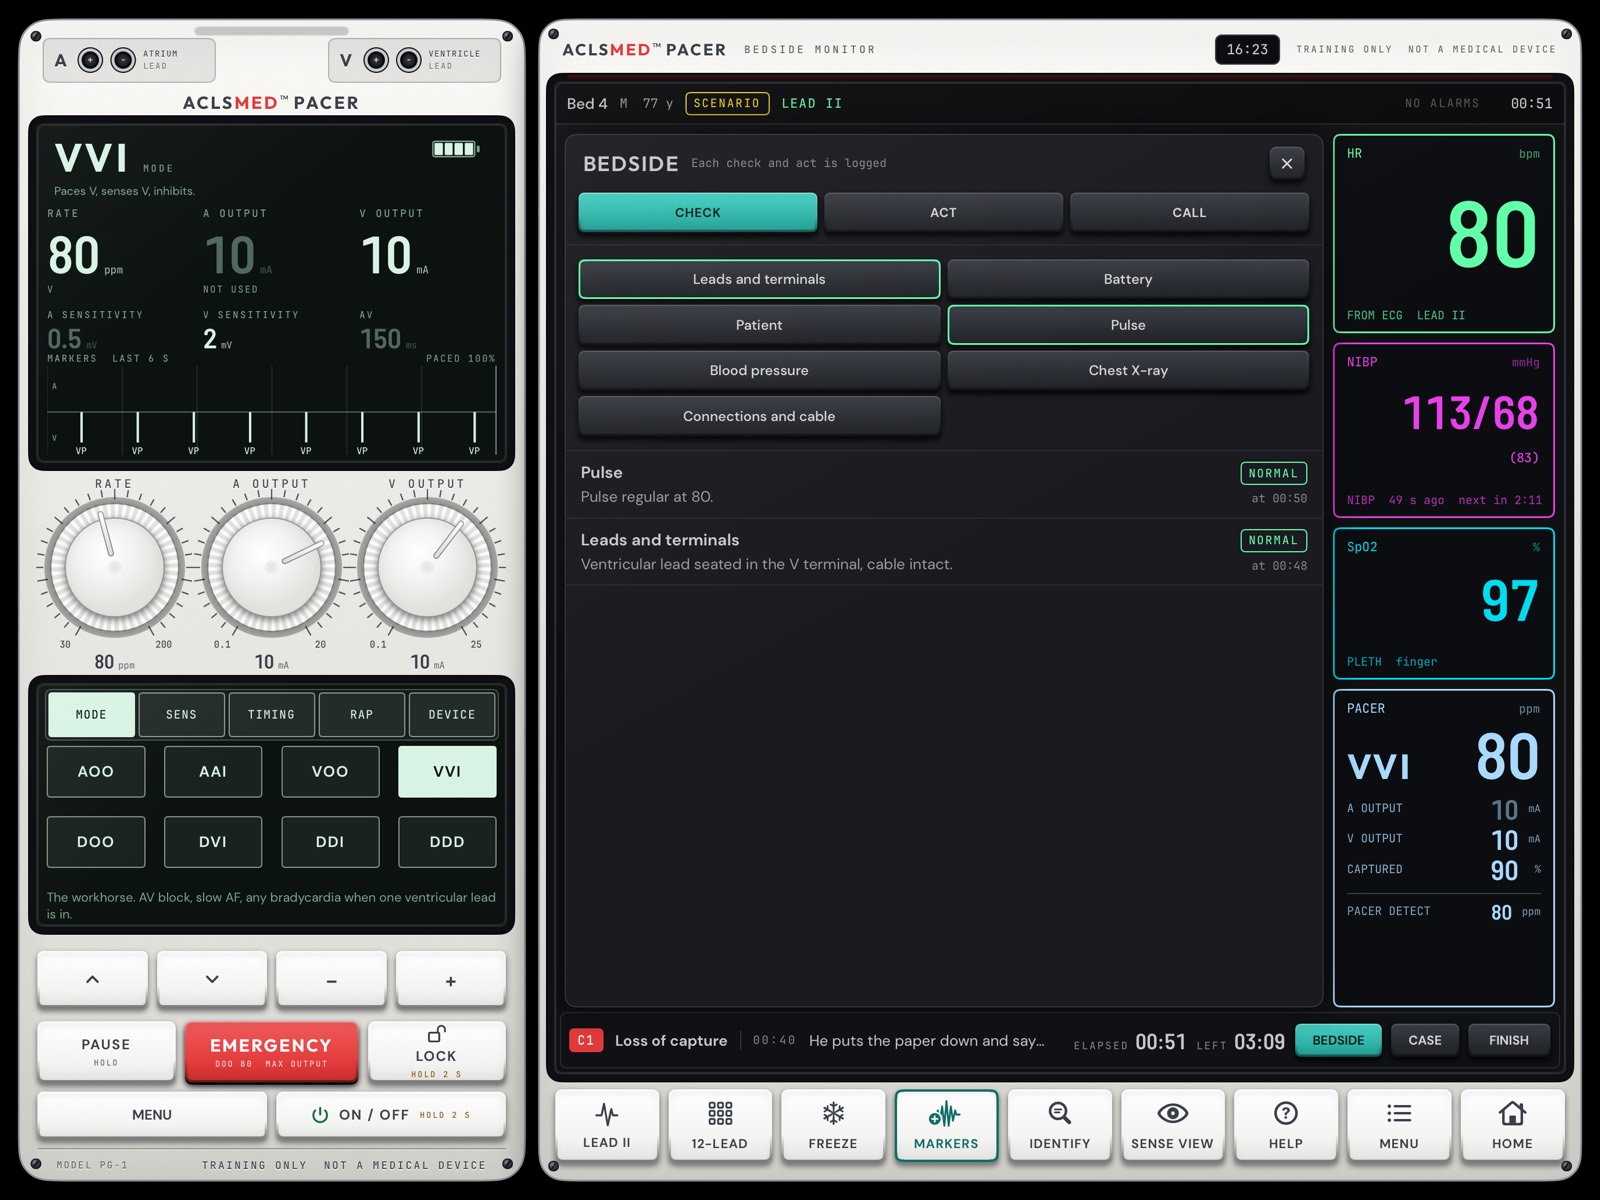
The bedside is a key on the case bar: pulse, pressure, leads, battery, connections, the patient, and the calls and acts.
The case text never names the answer
Events describe the patient and the room: symptoms, what the nurse says, which alarm sounds. The learner reads the monitor and the marker strip for the finding.
ScenariosBriefing
§ 06.03 — Running a case
The case bar and the event card
An event card appears when something happens. Tap it to dismiss.
The case bar at the foot of the monitor shows the latest event, BEDSIDE and FINISH. If the expected step has been open a while, the bar shows it as a HINT (never on a TEACH monitor).
Work the case on the generator. Name what you see with IDENTIFY: speed counts.
Use the bedside for checks, acts and calls.
Press FINISH when done, or let the clock run out.
Leaving a case before it ends saves nothing; it can be started again from the list.
ScenariosRunning
§ 06.04 — IDENTIFY and the bedside
Name it. Check it. Call it.
IDENTIFY: tick everything the strip shows, then SUBMIT. The ten findings are the drill's (§ 07.02).
CHECK
Leads and terminals · Battery · Patient · Pulse · Blood pressure · Chest X-ray · Connections and cable
ACT
Swap the generator · Change the battery · Secure the leads and connections · Transcutaneous pads as backup · Ask for the lead to be repositioned · Give atropine
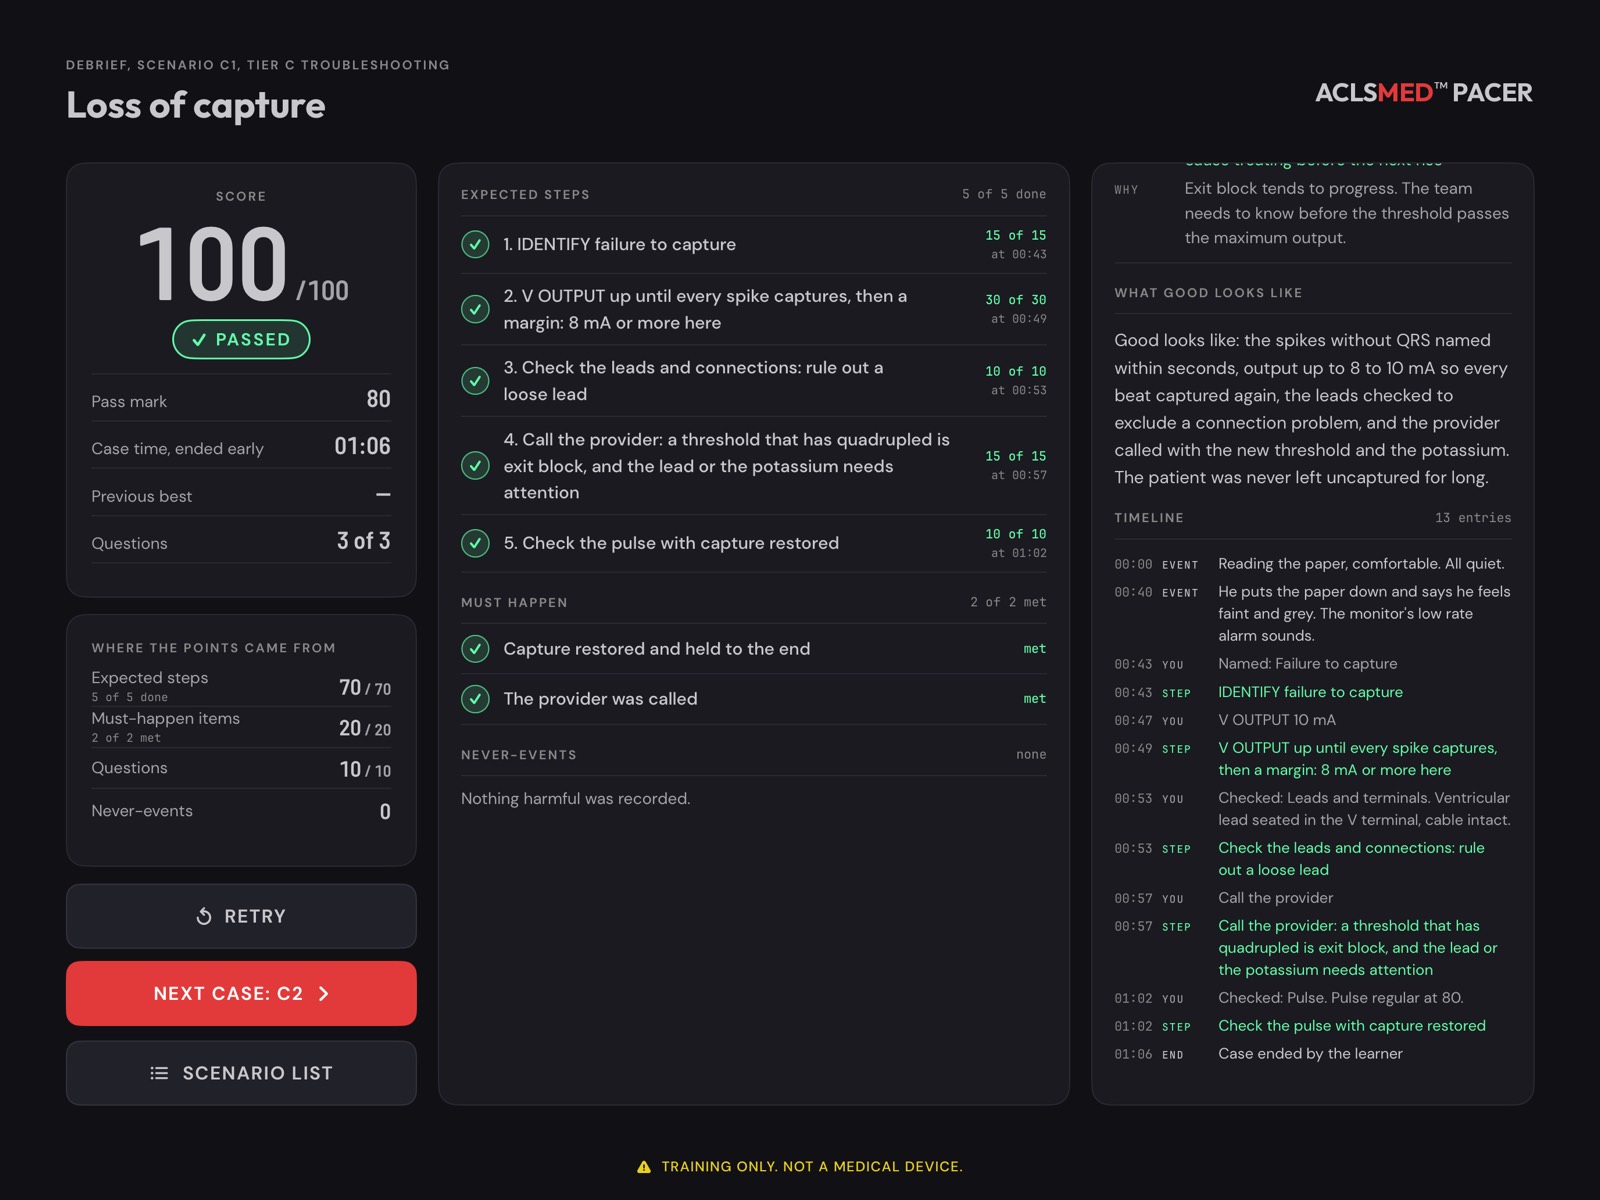
Each step has a window. Done in time: full points. Done late: half. A step judged on a setting pays only after the learner has touched that control, so a setting already right at the start pays nobody.
MUST-HAPPEN ITEMS · 20
Things that must be true before the case ends, such as capture held to the end or the provider called. Every one must be met to pass.
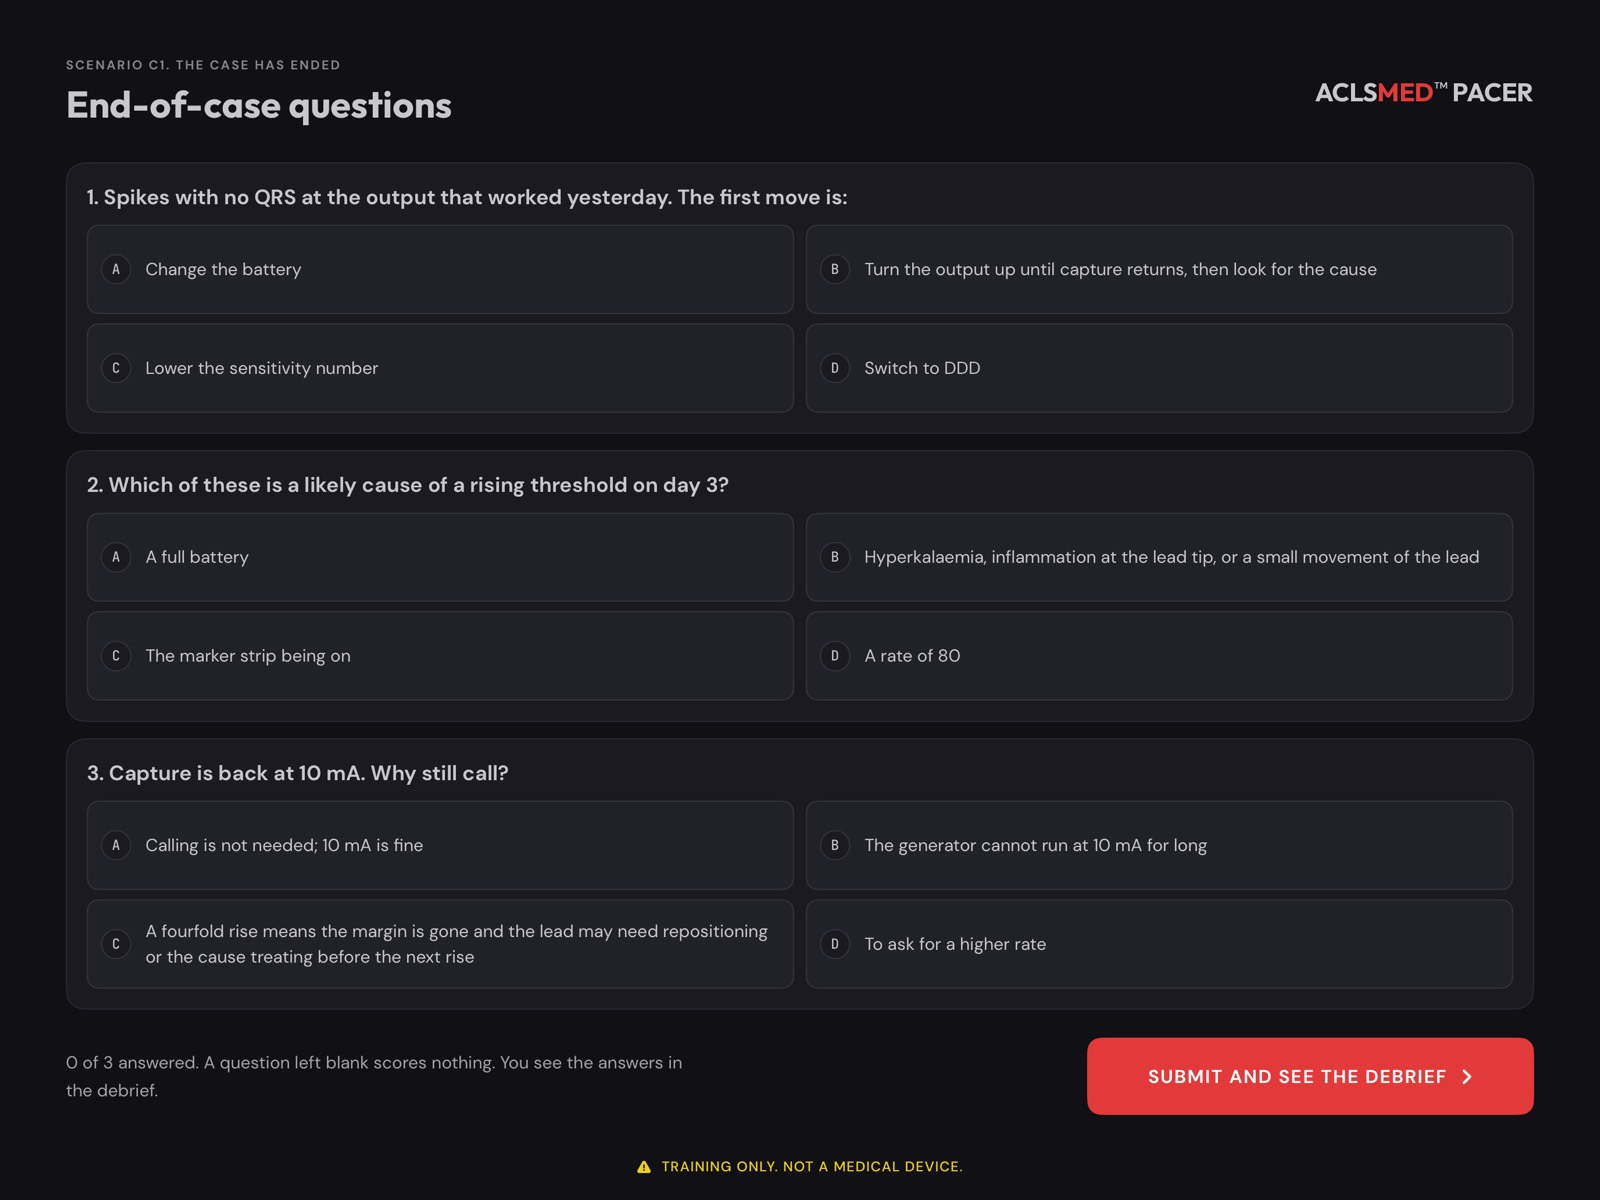
QUESTIONS · 10
Three questions at the end, worth 4, 3 and 3. The answers are shown in the debrief.
NEVER-EVENTS
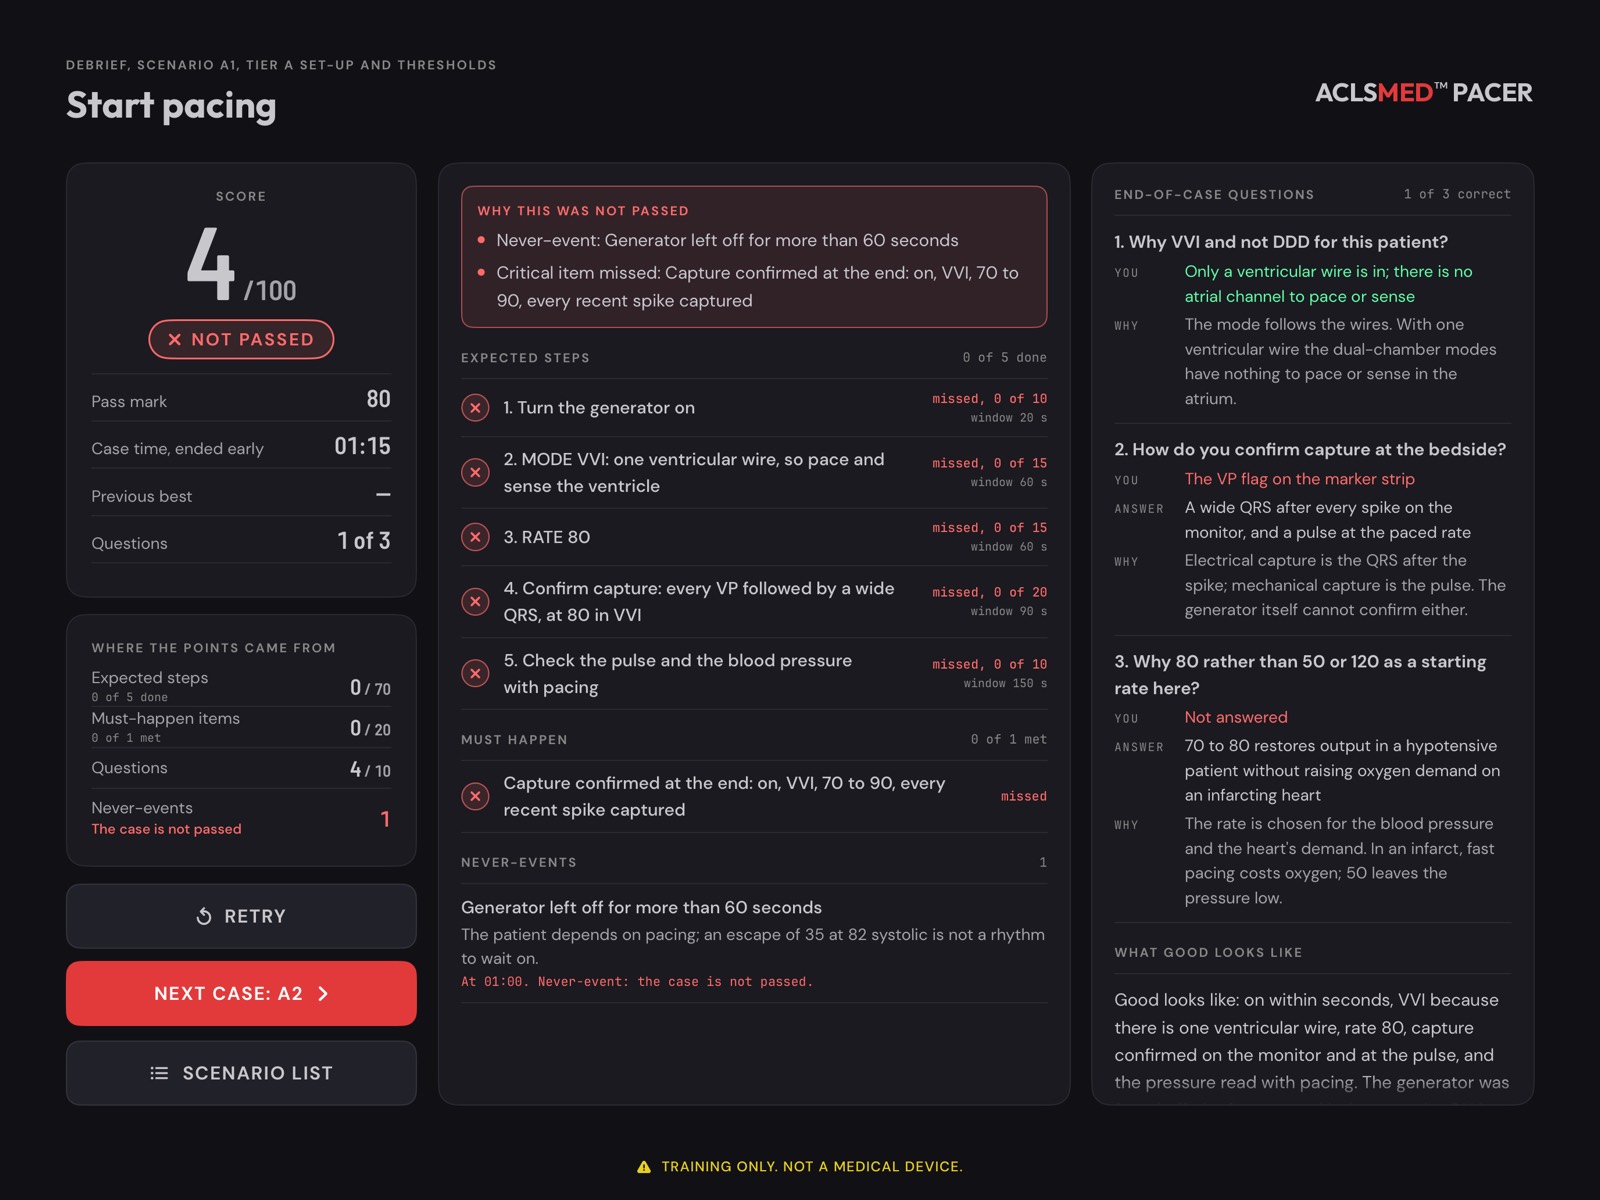
Harmful actions, such as leaving a dependent patient without capture too long. Any one fails the case and caps the score at 59.
Pass rule
Score 80 or more, and every must-happen item met, and no never-event. A learner who does nothing scores 0. Only the best score of each case is kept.
ScenariosScoring
§ 06.06 — Questions and the debrief
Every step, and when it was done
End-of-case questionsDebrief · passedDebrief · not passed
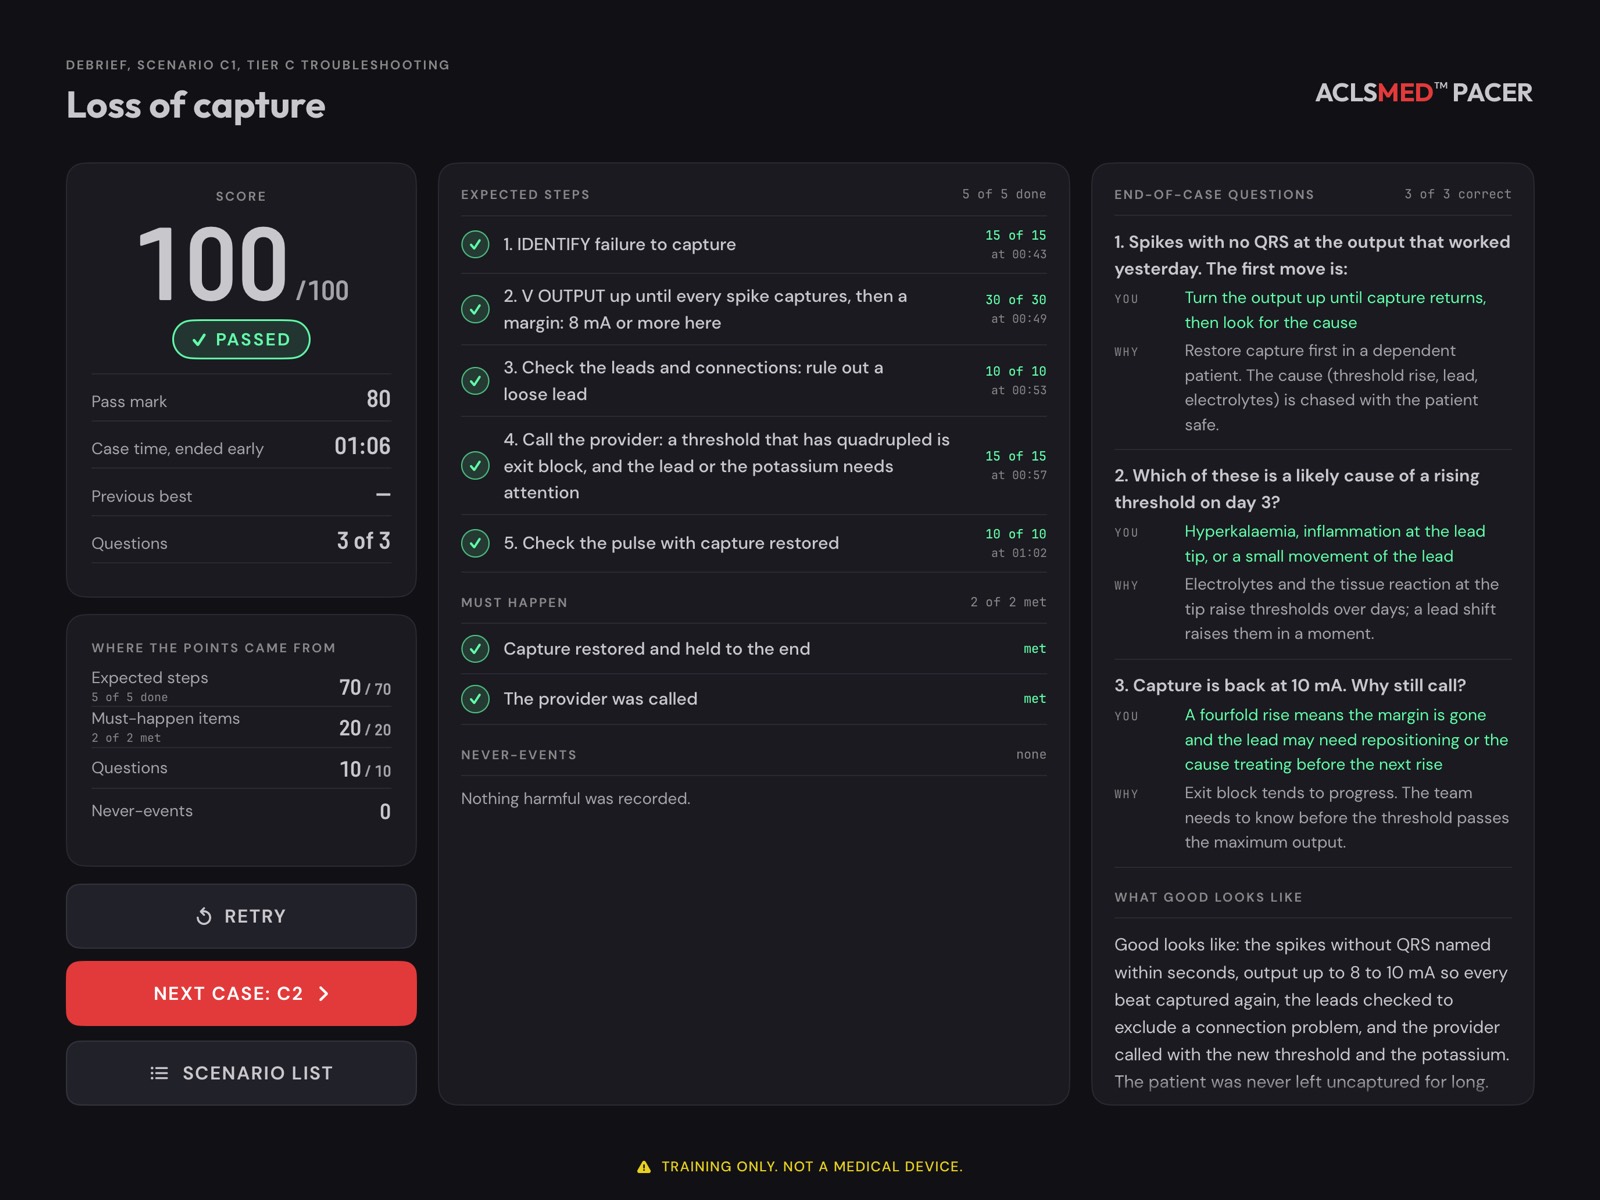
The debrief shows the score and where the points came from, the must-happen items met or missed, each expected step with the time it was done, any harmful action and why it matters, the questions with their reasoning, "What good looks like", and a timeline of events, alarms and actions. RETRY returns to the briefing.
ScenariosDebrief
§ 06.07 — Debriefing a group
Teach from the timeline
Start with the event: what did the patient and the room tell you?
When was the finding named with IDENTIFY, and what did the strip show at that moment?
Walk the expected steps in order. Which were late, and why?
If the case was not passed, read "Why this was not passed" aloud.
Finish with "What good looks like".
In TEACH
The questions and the debrief appear on the monitor, so the whole class debriefs from the same screen (§ 08.07).
ScenariosDebriefing
§ 06.08 — Scenario reference · 1 / 2
Tiers A and B
ID
Case
Patient and setting
What the case teaches
Time
A1
Start pacing
68 M · inferior infarct day 1 · new V wire, generator off
Turn on, VVI, rate 80, confirm capture, check pulse or BP
4:00
Free
A2
Find the ventricular threshold
74 F · complete heart block · VVI 80 at 10 mA
Lower to loss of capture, find the threshold, set a margin
4:00
Free
A3
Find the sensing threshold
61 M · after valve surgery · sinus rhythm, backup V wire
Raise the number until undersensing, find the threshold, set half
4:00
Pro
A4
Dual-chamber set-up
66 F · first evening after aortic valve replacement · both wires
DDD 90, both thresholds, both margins
6:00
Pro
A5
Atrial threshold in AAI
72 M · day 2 after bypass · atrial wire only
Atrial threshold and margin in AAI
4:00
Pro
B1
Choose the mode
58 F · day 1 after mitral repair · sinus bradycardia, set VVI 60 overnight
A mode that keeps the atrial kick, atrial capture, check BP
4:00
Free
B2
Flutter during DDD
70 M · day 3 after bypass · heart block, DDD 90
Recognize tracking at the upper rate, change to a non-tracking mode
4:00
Pro
B3
Pacemaker-mediated tachycardia
64 F · transvenous A and V leads · DDD 70, ectopics
Recognize PMT and end it with PVARP
4:00
Pro
B4
Upper-rate behavior during exertion
54 M · day 2 after bypass · DDD 70, upper rate 100
Recognize Wenckebach then 2:1, set the upper rate
5:00
Pro
B5
Overdrive a flutter with rapid atrial pacing
69 M · day 2 after bypass · new atrial flutter
Set the RAP rate, deliver the burst, back to a pacing plan
5:00
Pro
ScenariosReference 1 / 2
§ 06.09 — Scenario reference · 2 / 2
Tiers C and D
ID
Case
Patient and setting
What the case teaches
Time
C1
Loss of capture
77 M · coronary care day 3 · VVI 80 at 3 mA
Recognize failure to capture, output up, check leads, call
4:00
Free
C2
Undersensing
63 F · day 2 after valve surgery · sinus rhythm returned
Recognize undersensing, set the sensitivity
4:00
Pro
C3
Oversensing
81 M · heart block with no escape · VVI 70
Recognize oversensing, fix the sensitivity
4:00
Pro
C4
Failure to output
70 F · VVI 80 · back from the commode
Check the leads first, then secure them
4:00
Pro
C5
Low battery
79 M · no escape · generator running five days
Check the battery, swap or change it in time
4:00
Pro
C6
Lead dislodgement
66 F · wire placed yesterday · coughing
Recognize failure to capture, pads as backup, call for repositioning
5:00
Pro
D1
Inferior infarct with complete heart block
71 F · emergency department · hypotensive, wire just placed
Turn on, VVI 70 to 80, capture, check BP, call
4:00
Pro
D2
Post-TAVR block
84 M · six hours after transcatheter valve · both wires
EMERGENCY at once, then settle to a pacing plan with capture
4:00
Pro
Every case ships a patient, the generator as found, timed events, expected steps, must-happen items, never-events, three questions and a debrief. The numbers are this trainer's teaching defaults.
ScenariosReference 2 / 2
§ 07
The strip drill
What is the pacer doing? Ten random strips a round. Name it, then fix it with the real controls.
§ 07.01 — A round
Name it, then fix it
An 8-second strip plays on the monitor.
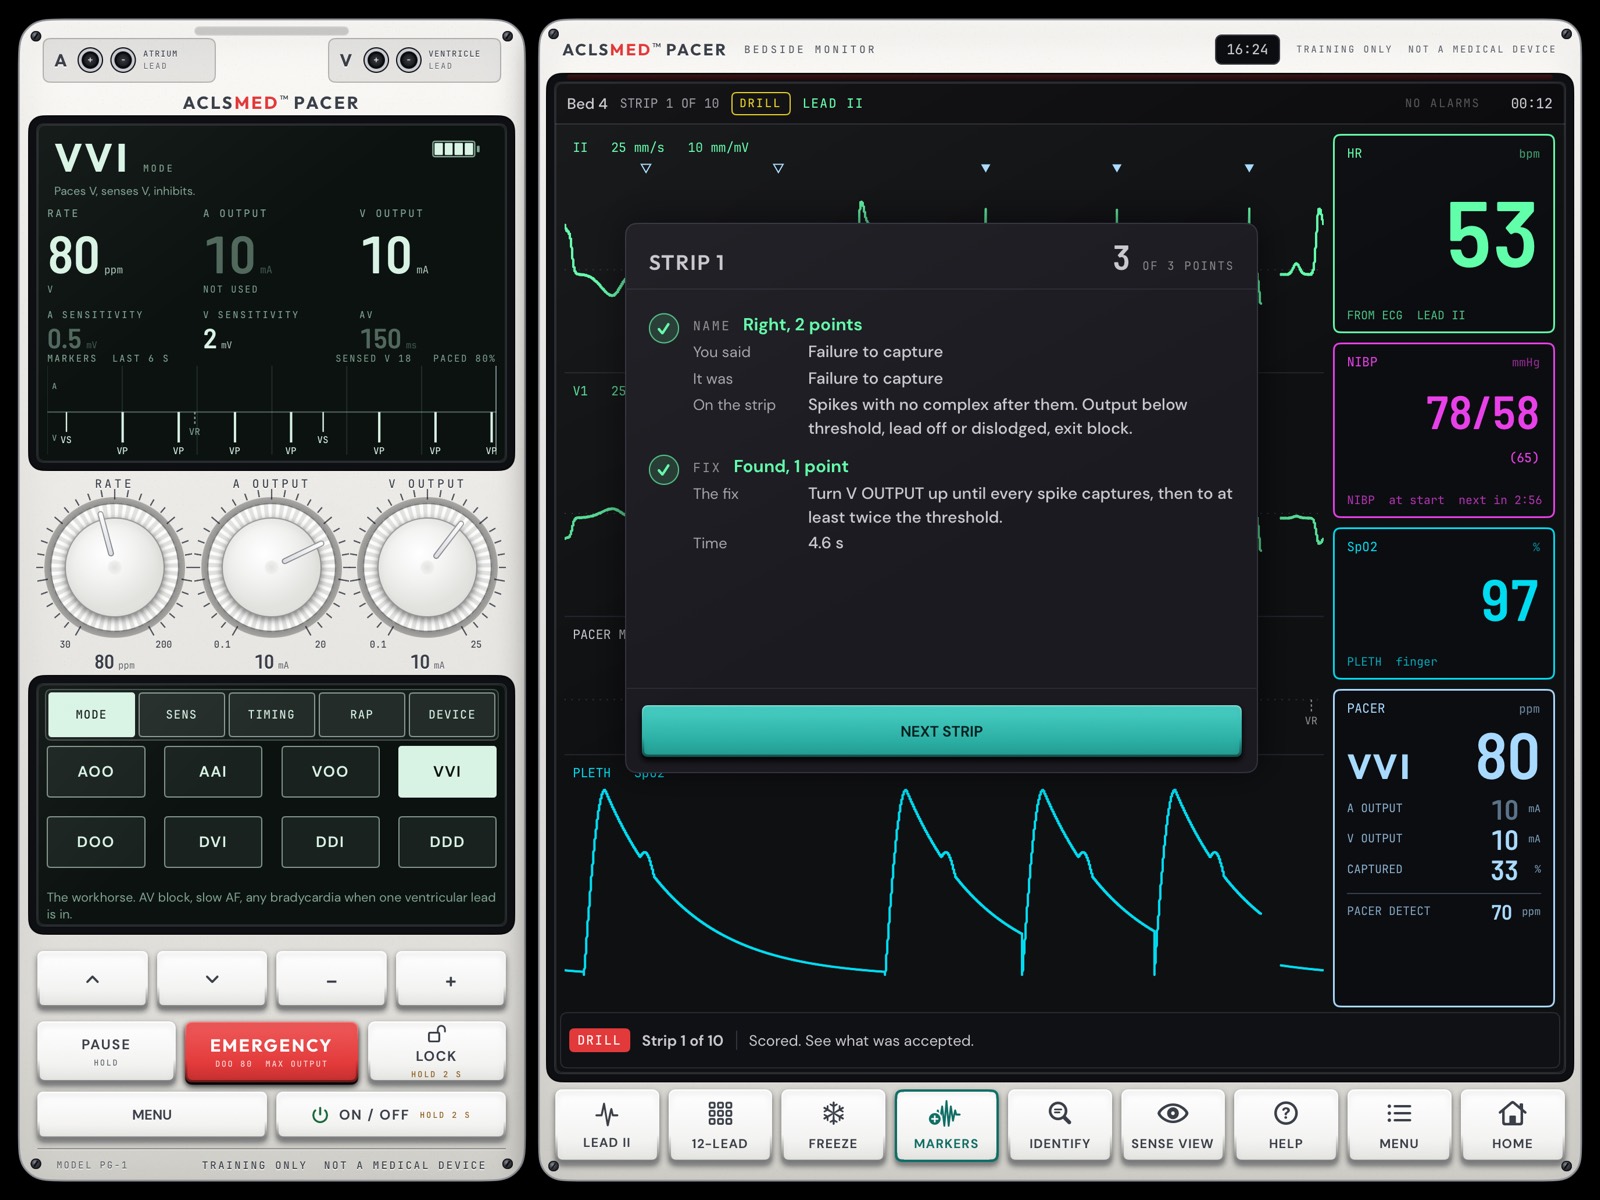
Press IDENTIFY, tick one finding, SUBMIT. Right: 2 points.
Now fix it with the real controls within 60 seconds, then DONE. Found: 1 point.
The feedback shows what was accepted. Then the next strip.
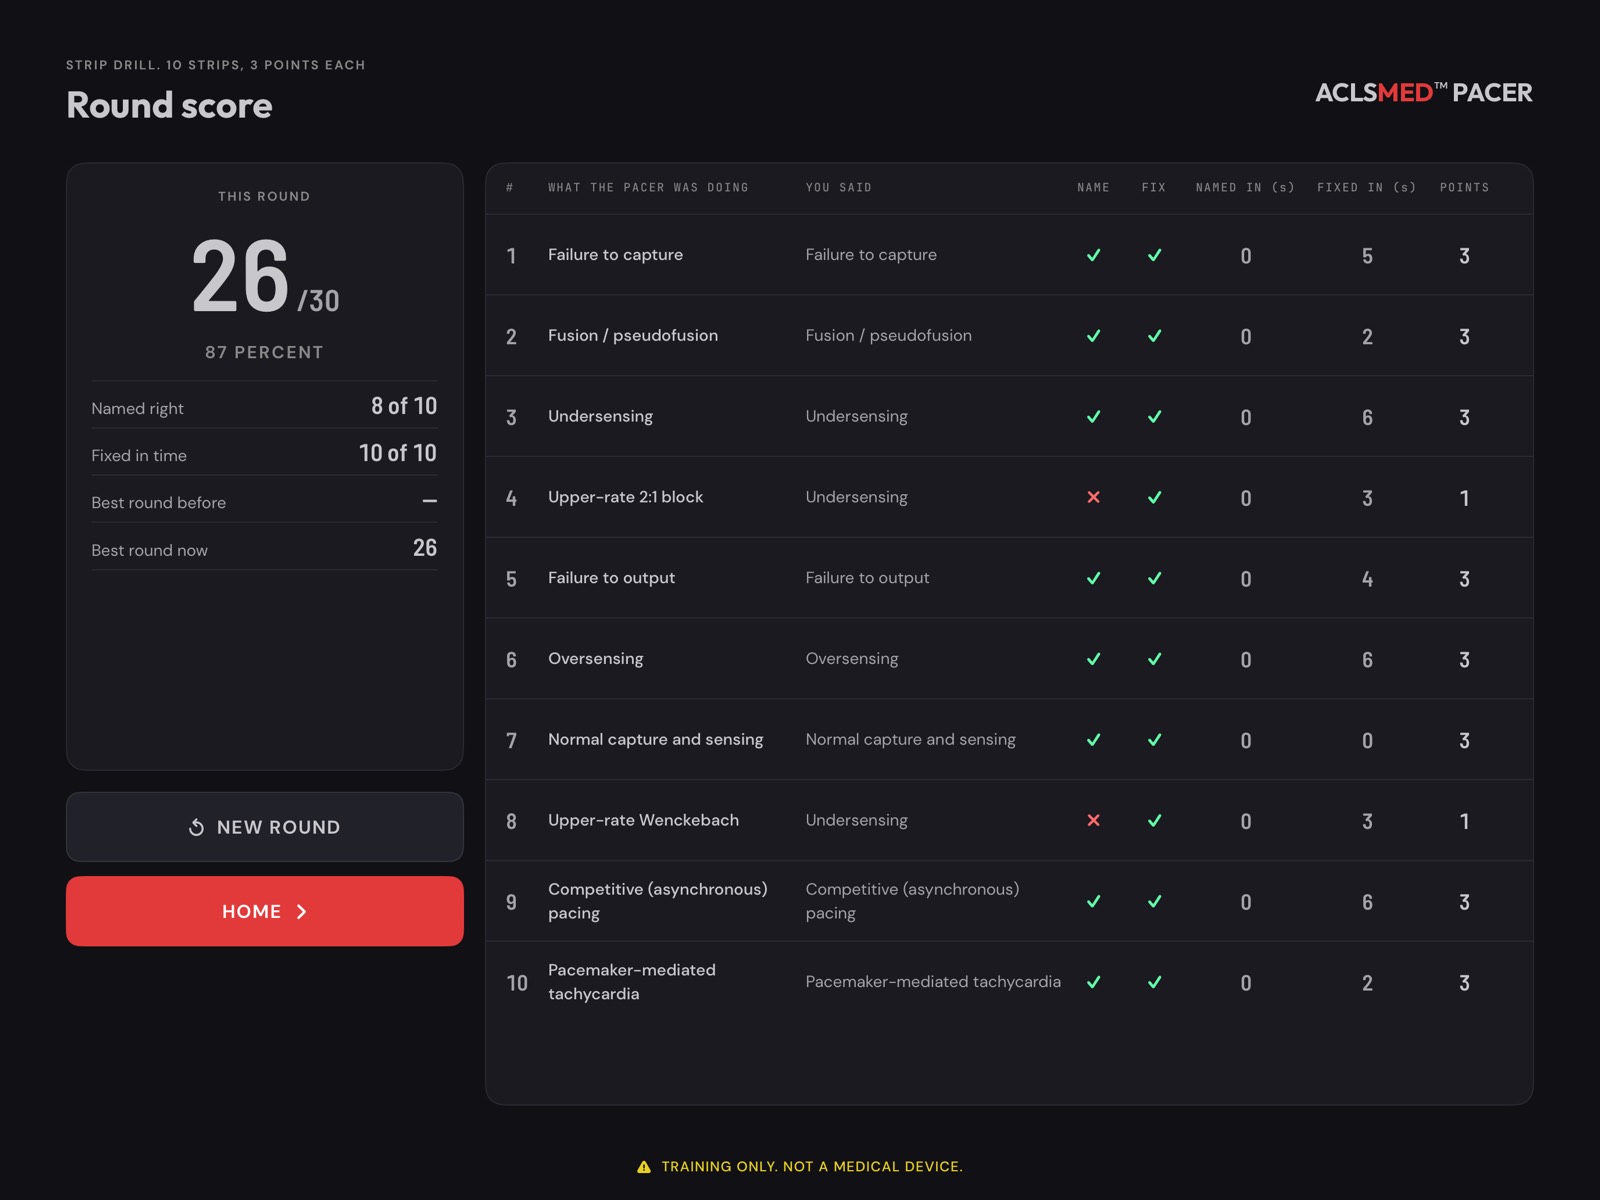
10
Strips a round
3
Points a strip
30
Best round
Free: one round a calendar day. Pro: no limit. Leaving a round saves nothing.
Strip drillA round
§ 07.02 — The ten findings
What the strip can show
Feedback for one stripEnd of the round
Finding
On the strip (the app's own words)
Normal capture and sensing
Every spike is followed by its complex, and every intrinsic beat resets the timing.
Failure to capture
Spikes with no complex after them.
Undersensing
Spikes land where they should not: the generator did not see the intrinsic beats.
Oversensing
Pauses with no spike: the generator saw something that was not a beat.
Failure to output
No spikes at all when there should be.
Fusion / pseudofusion
A spike on a QRS that was already starting.
Upper-rate Wenckebach
The AV interval stretches beat by beat until a P wave is dropped.
Upper-rate 2:1 block
Every other P wave is not tracked.
Pacemaker-mediated tachycardia
Pacing at the upper rate, each paced beat conducted back to the atrium and tracked again.
Competitive pacing
An asynchronous mode paces into a chamber with its own rhythm.
Strip drillFindings
§ 08
TEACH mode
Two devices, one class. One tablet is the monitor the class watches. A phone or a second tablet is the generator the students hold.
§ 08.01 — How TEACH works
One engine, on the monitor
THE MONITOR
iPad or Android tablet · the class watches this
Runs the one heart and generator model, the scoring, and the instructor panel in its left third. The bedside monitor keeps the right two thirds, exactly as on one tablet.
THE GENERATOR
A phone or a second tablet · the students hold this
The generator's screens, dials and keys, mirrored from the monitor ten times a second. No engine runs on it.
THE LINK
Local network, a four-digit PIN
Every dial turn and key press on the generator is applied on the monitor through the same path a local key uses. Latency on a local network reads as immediate.
Why this matters
A scored case in TEACH scores the students' actions exactly as it scores one learner on one iPad, and the two devices can never disagree about the patient.
TEACH runs Practice and scored Scenarios. Lessons and the strip drill stay single-device.
TEACH modeHow it works
§ 08.02 — Which devices pair
Like pairs with like
Monitor
Generator
Link
iPad (or open iPhone Duo)
iPhone, or a second iPad
Wi-Fi or Bluetooth, no network set-up
Pairs
Android tablet
Android phone, or a second Android tablet
The same Wi-Fi network
Pairs
iPad
Android phone
None
No
Android tablet
iPhone
None
No
Same version
Both devices need the same version of ACLSMED™ PACER. If they differ the join is refused: "Update both, then join again."
Local network allowed
Allow local network access on both devices the first time it is asked.
One generator per monitor
A second device is told "This monitor already has a generator".
TEACH modePairing
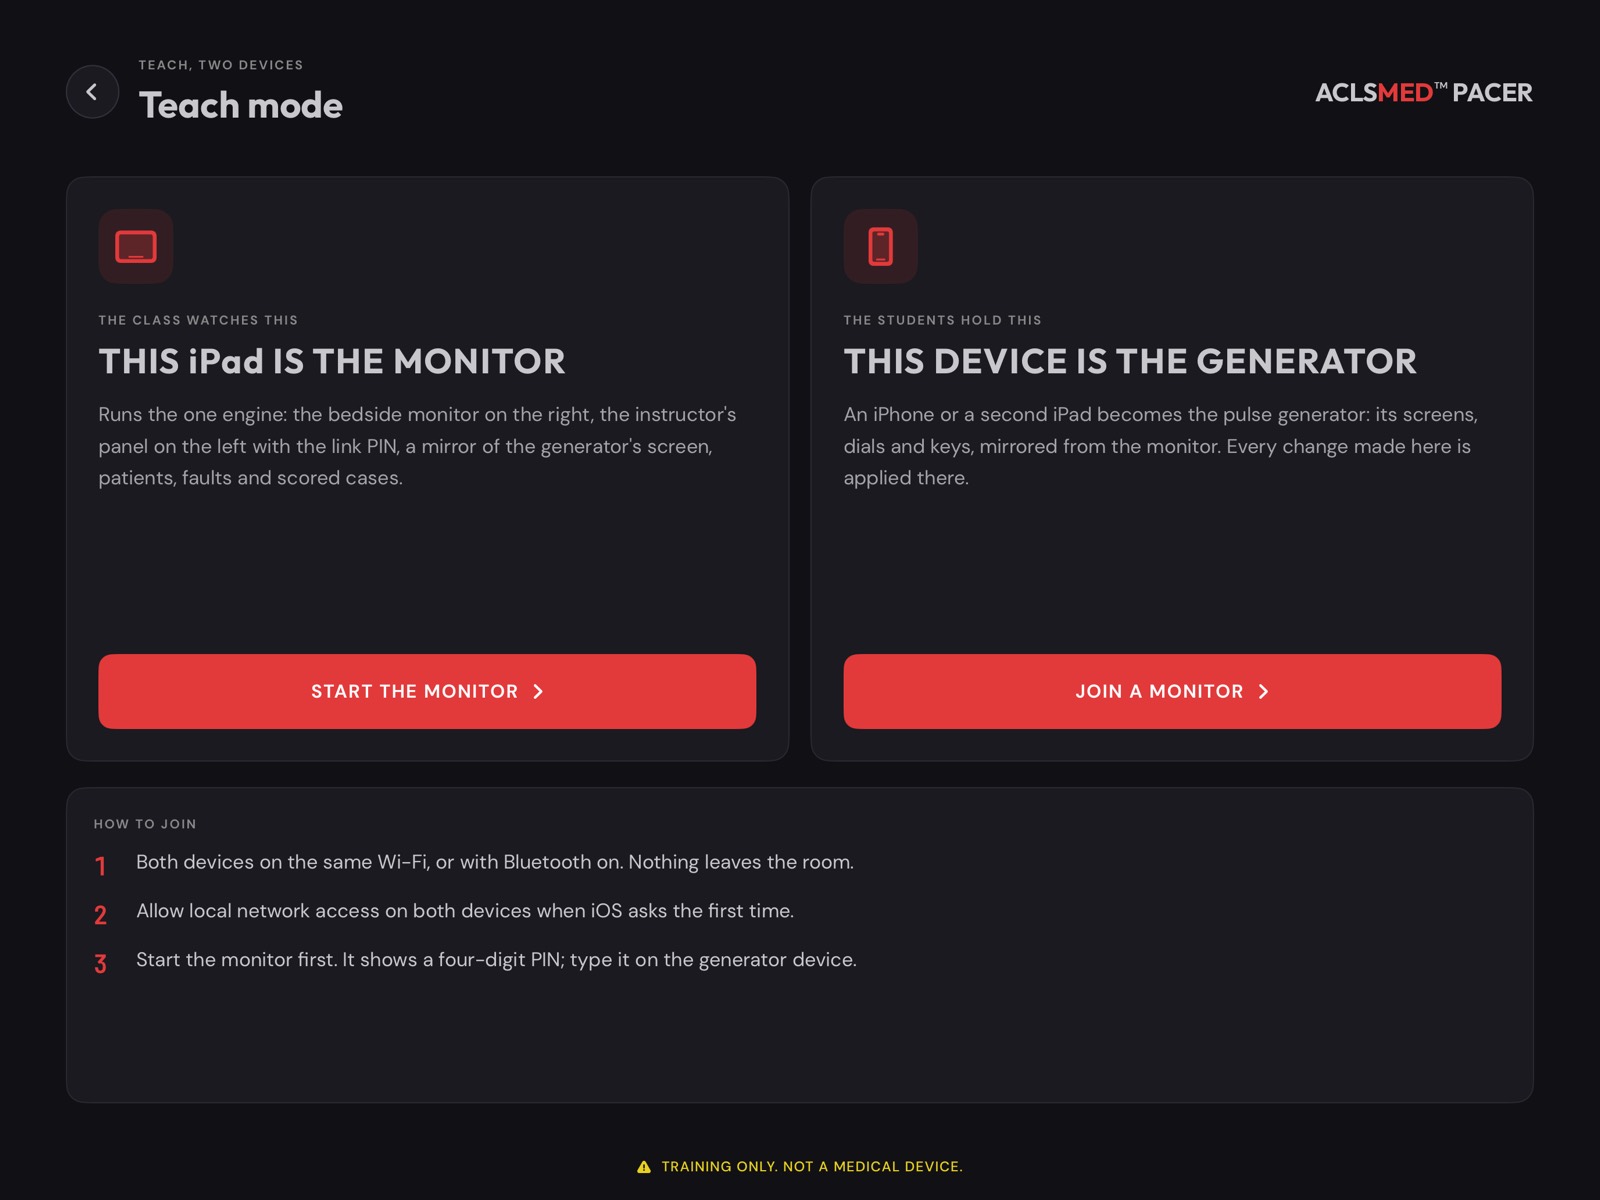
§ 08.03 — Start the monitor
Start the monitor first
Home > TEACH · the role screenSTART THE MONITOR · searching, with the PIN
On the tablet at the front: Home > TEACH > START THE MONITOR. Allow local network access when asked. The left third shows SEARCHING FOR A GENERATOR and a four-digit PIN large enough for the room to read. The monitor keeps its screen awake for the whole session.
TEACH modeStart the monitor
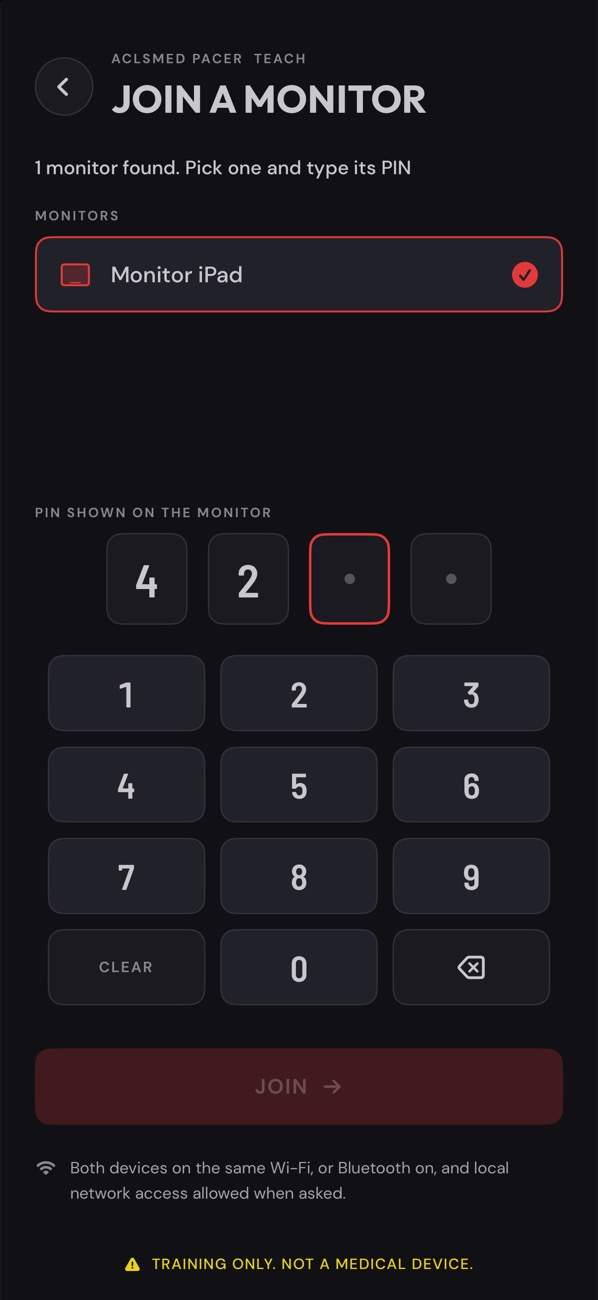
§ 08.04 — Join from the generator
Pick the monitor, type the PIN
Join a monitorJoined
Open the app on the phone. A phone opens on TEACH; a second iPad goes Home > TEACH.
Tap JOIN A MONITOR. Allow local network access when asked.
Pick the monitor from the list. With only one, it is picked for you.
Type the four-digit PIN shown on the monitor, then JOIN.
The generator appears. Turn a dial: the monitor's ECG, markers and the instructor's mirror follow at once.
No monitor in the list?
After about 10 seconds the phone says: check both devices are on the same Wi-Fi and that ACLSMED PACER is allowed Local Network in Settings > Privacy & Security.
TEACH modeJoin
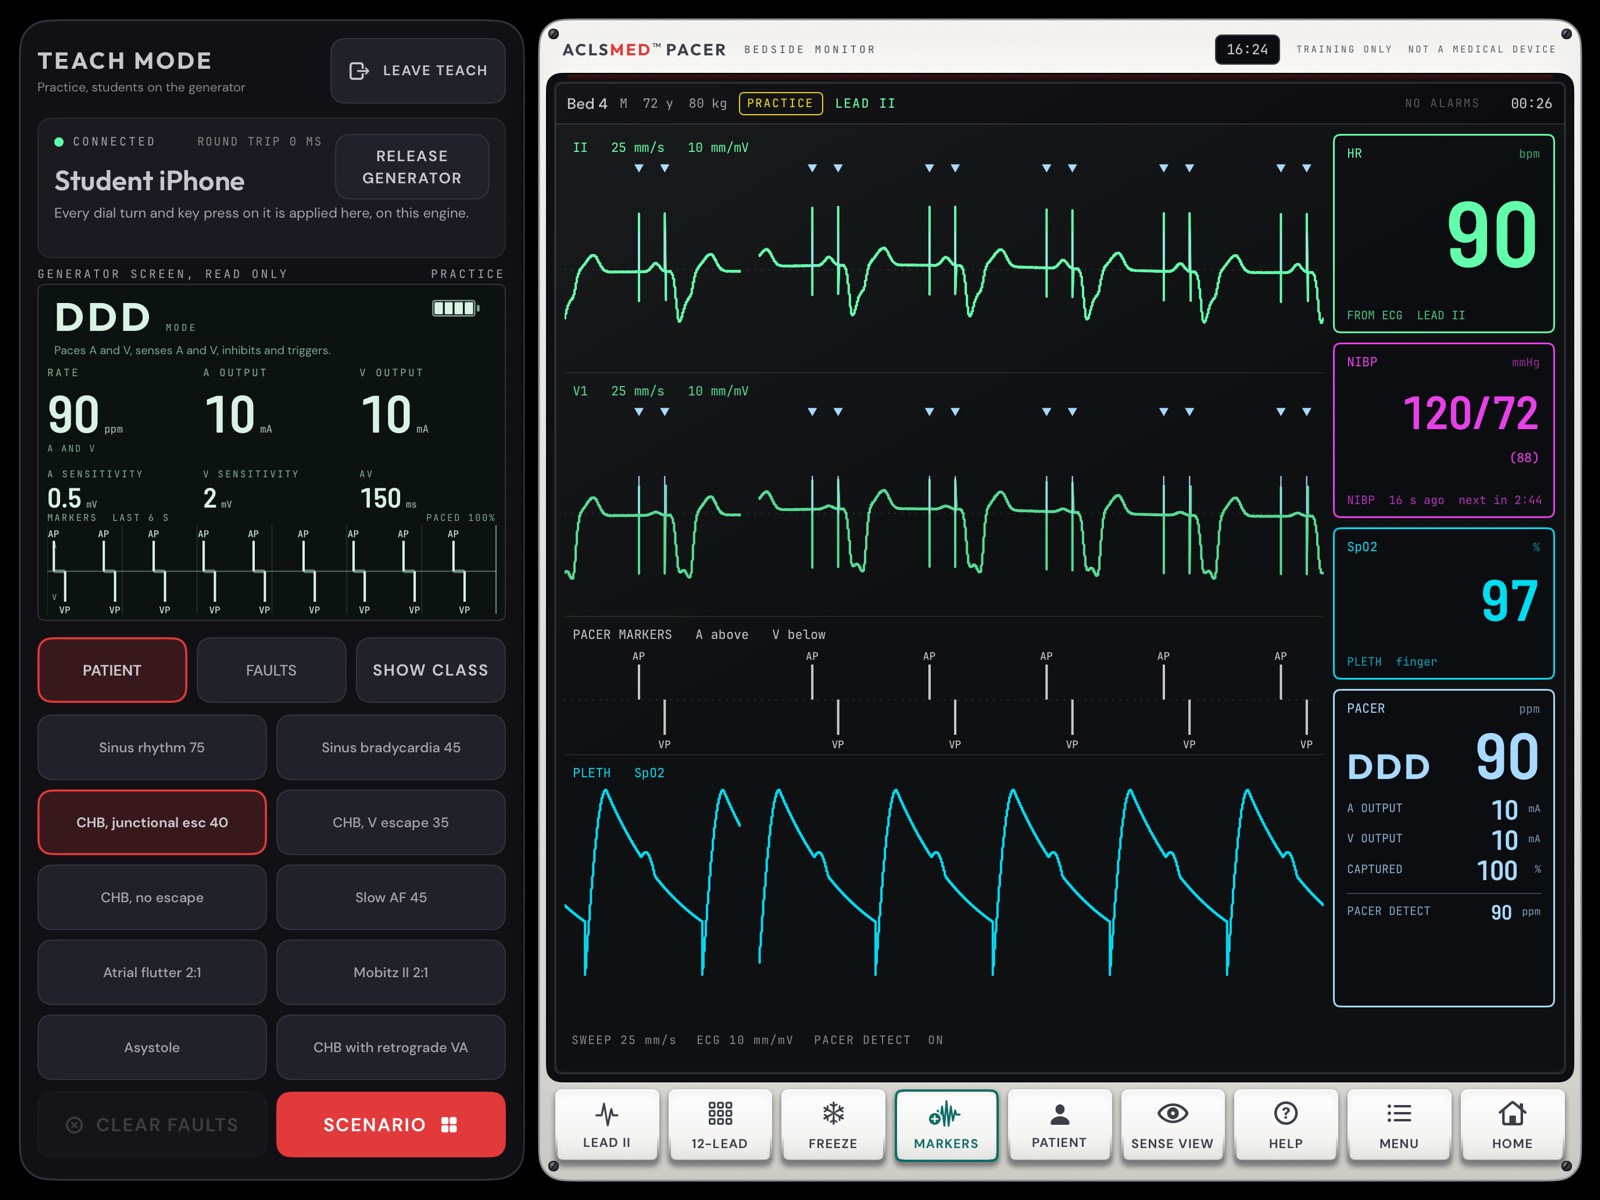
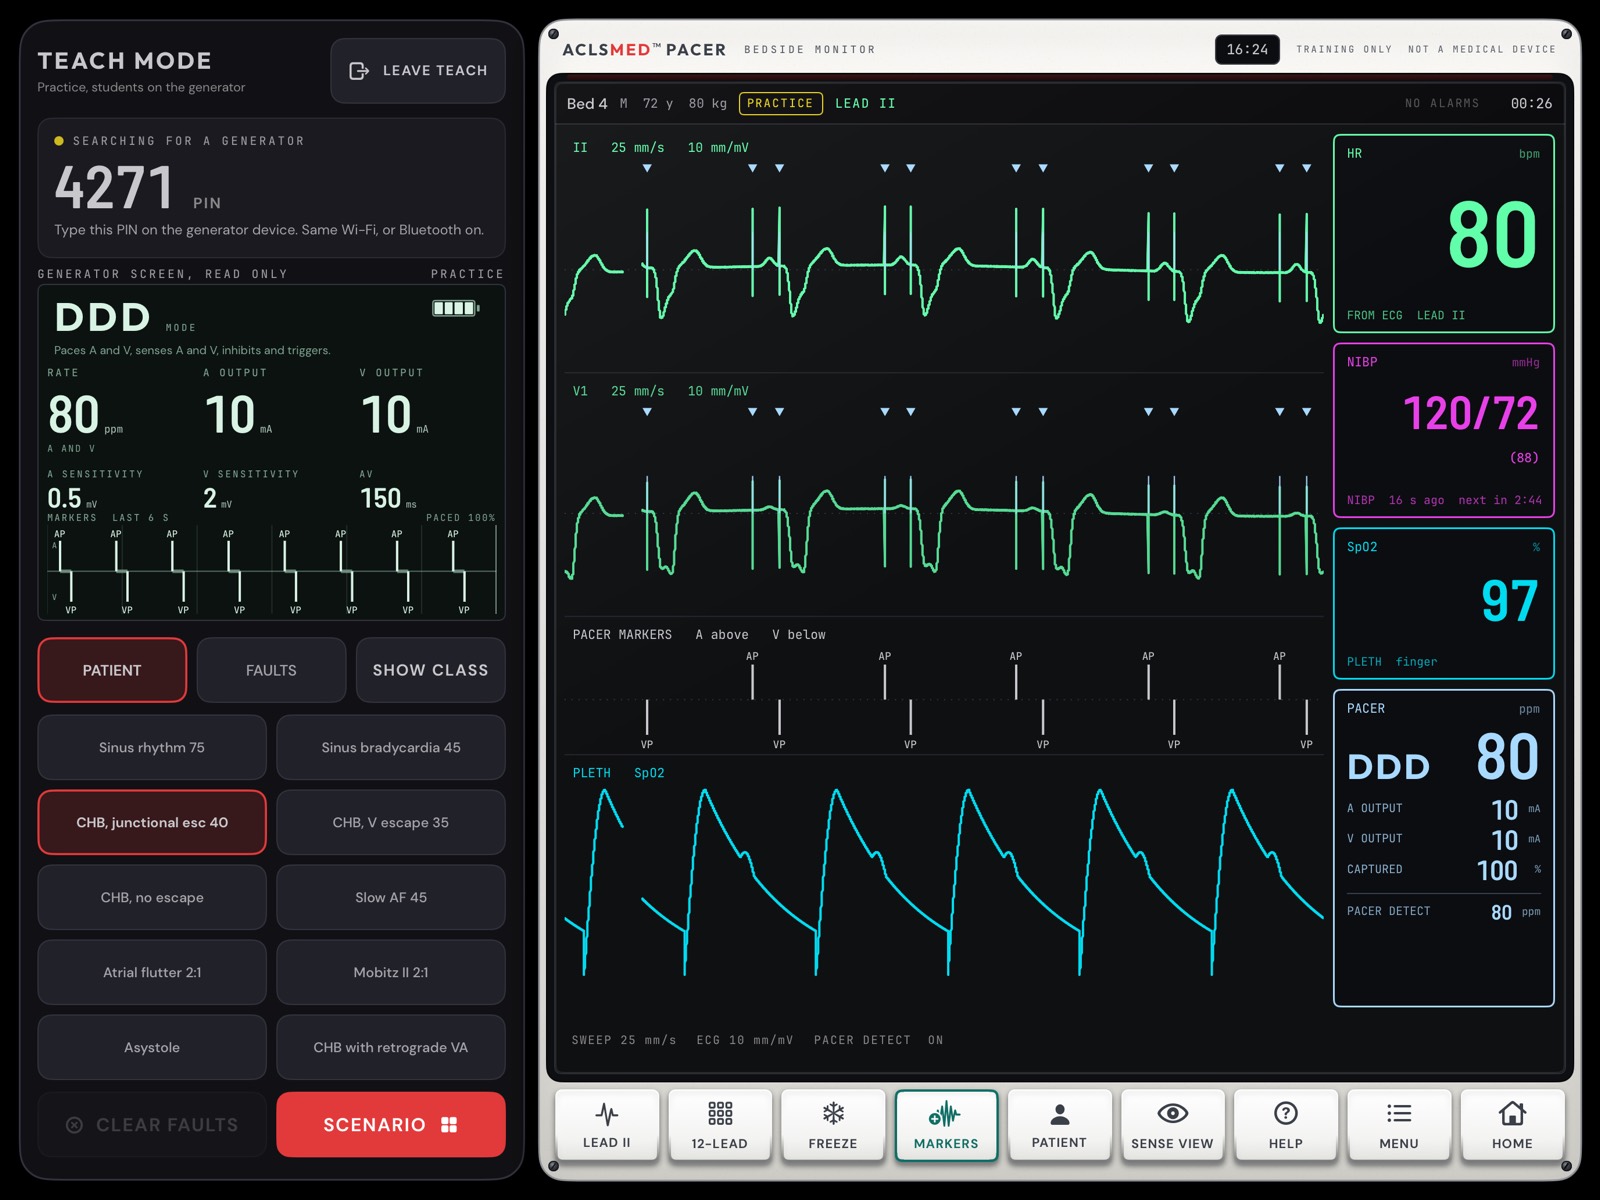
§ 08.05 — The instructor panel
The left third is yours
123456
TEACH MODE and LEAVE TEACH (asks first).
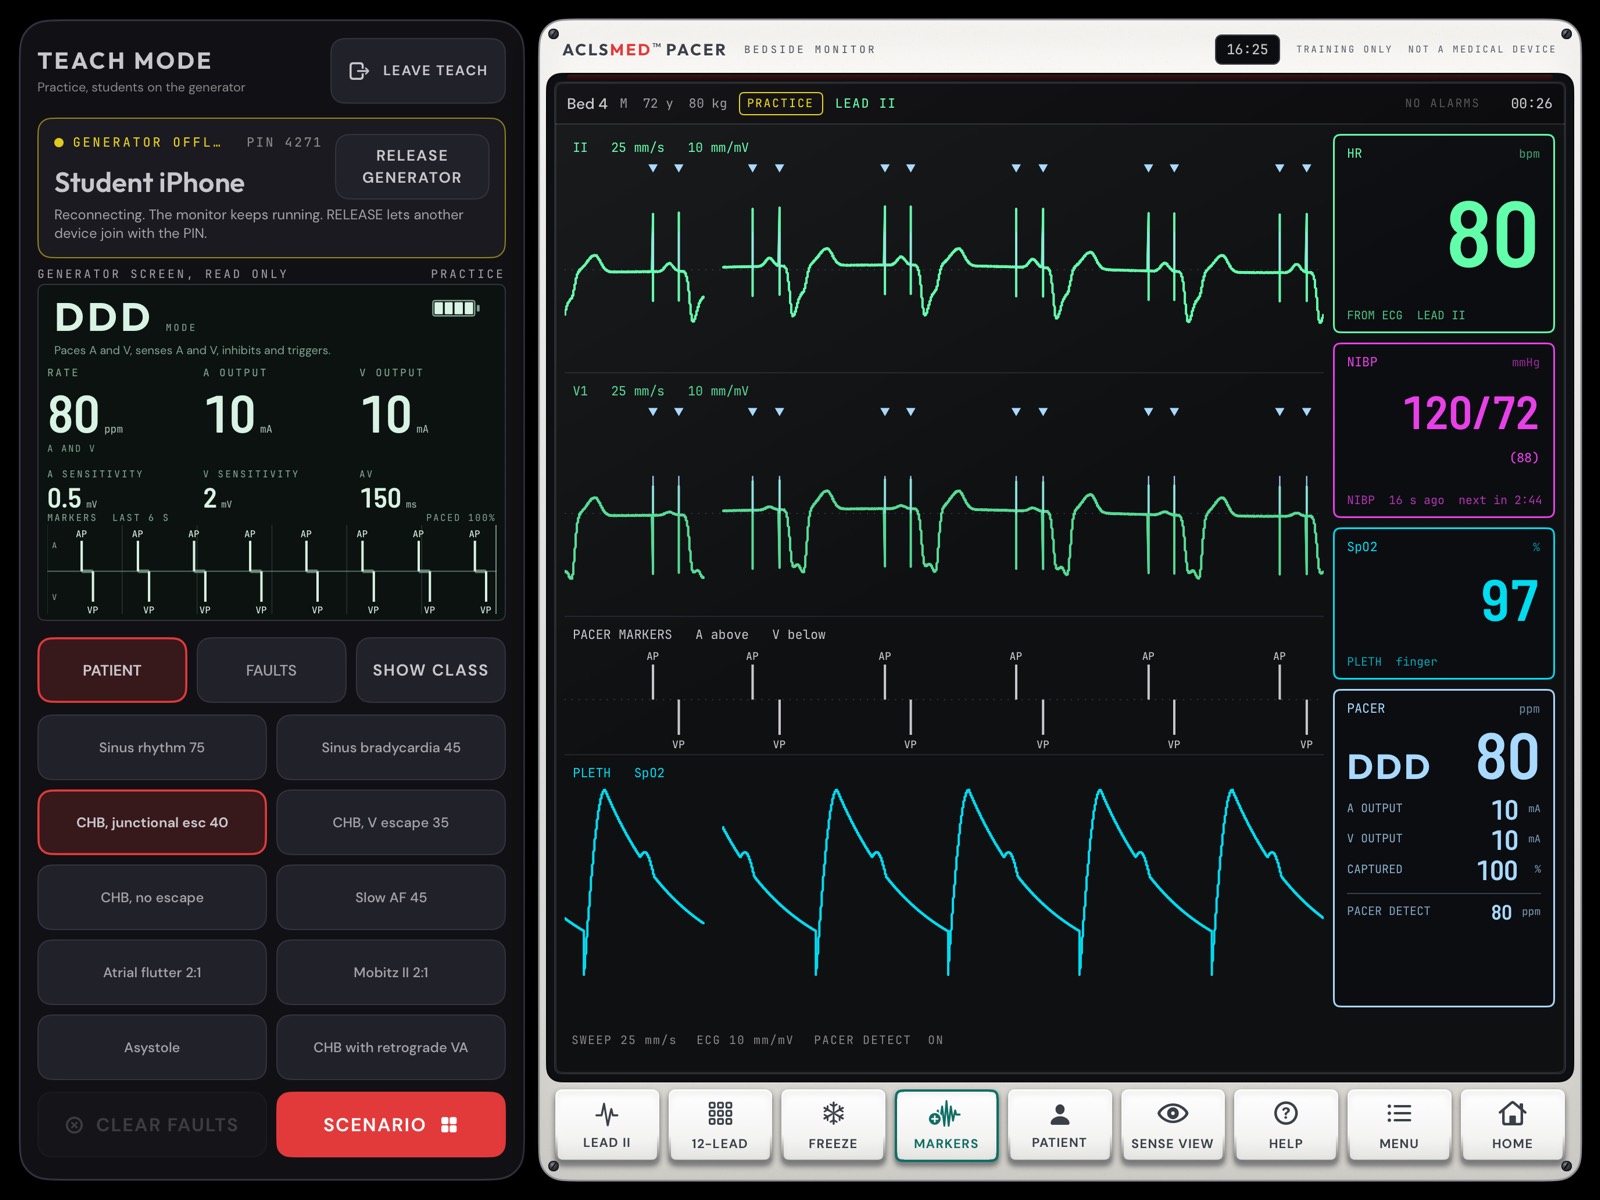
Link card: CONNECTED, the device's name, the round trip in ms, and RELEASE GENERATOR.
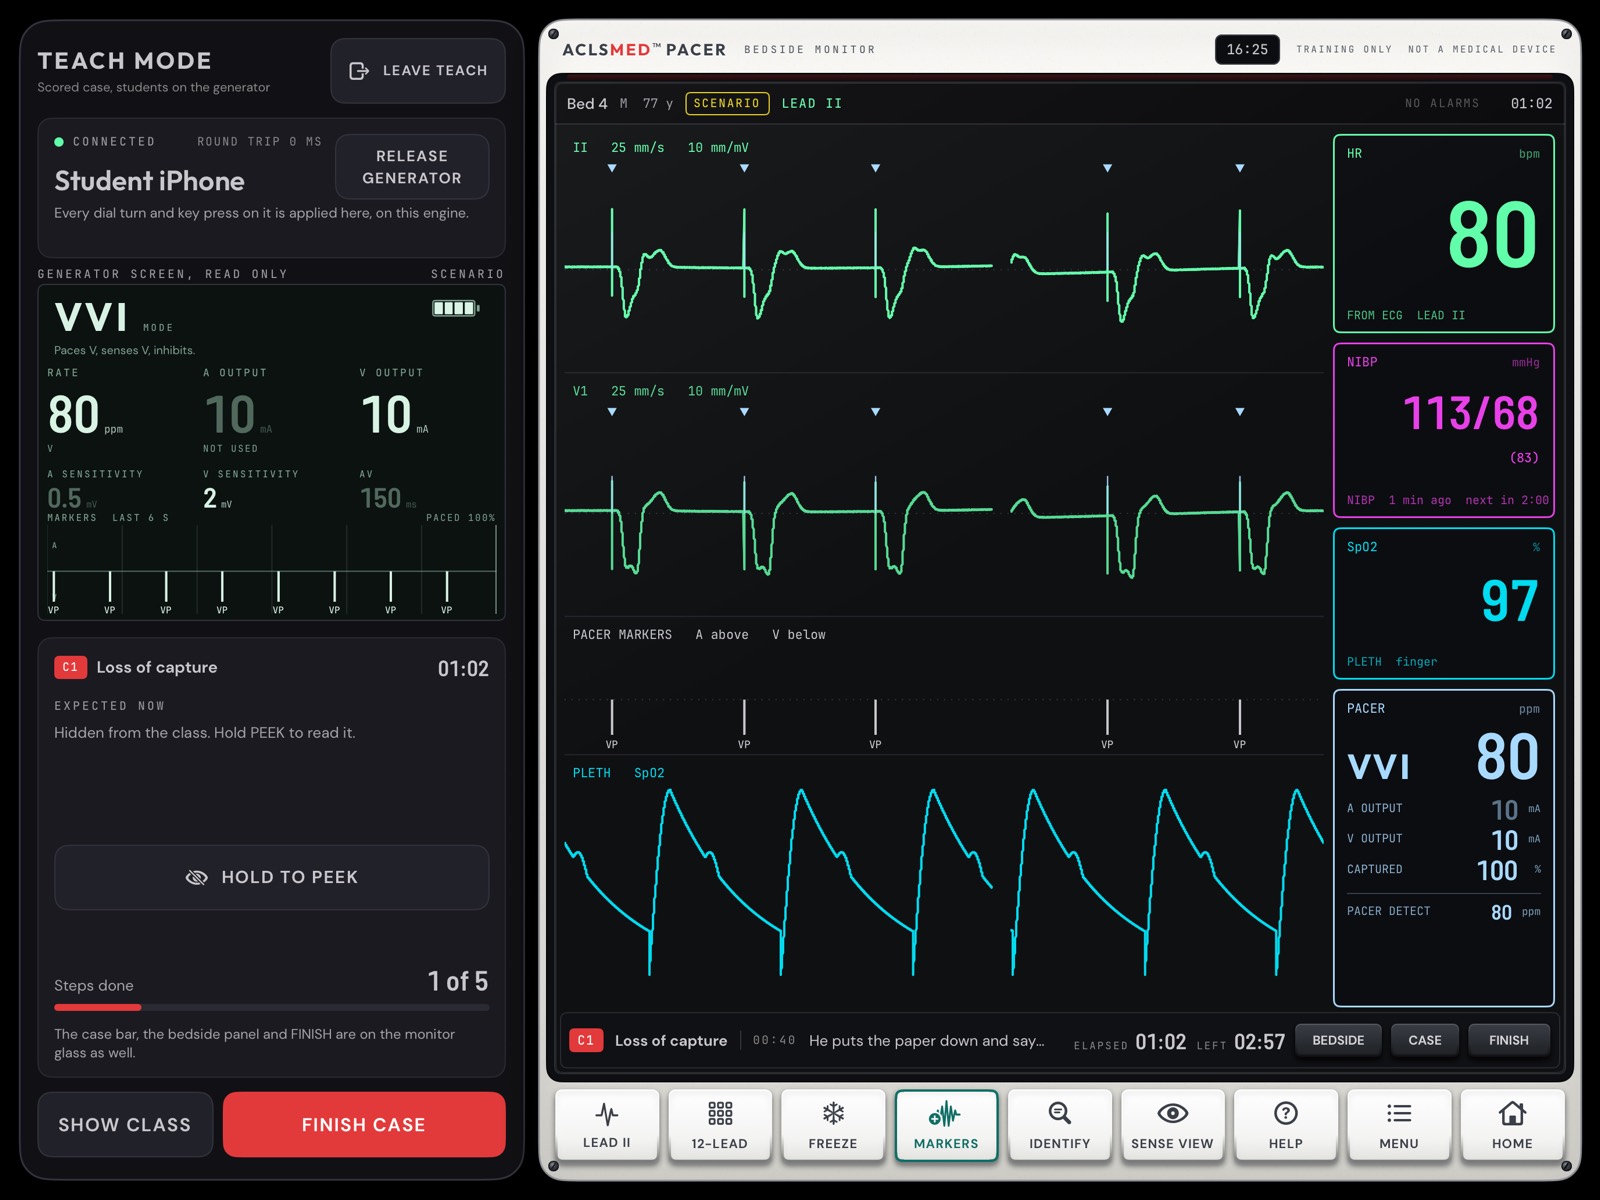
Generator screen, read only: a mirror of the students' top screen, so you see what they set.
PATIENT · FAULTS tabs and SHOW CLASS.
The grid: the ten patients, or the twelve faults.
CLEAR FAULTS and SCENARIO, which opens the case list.
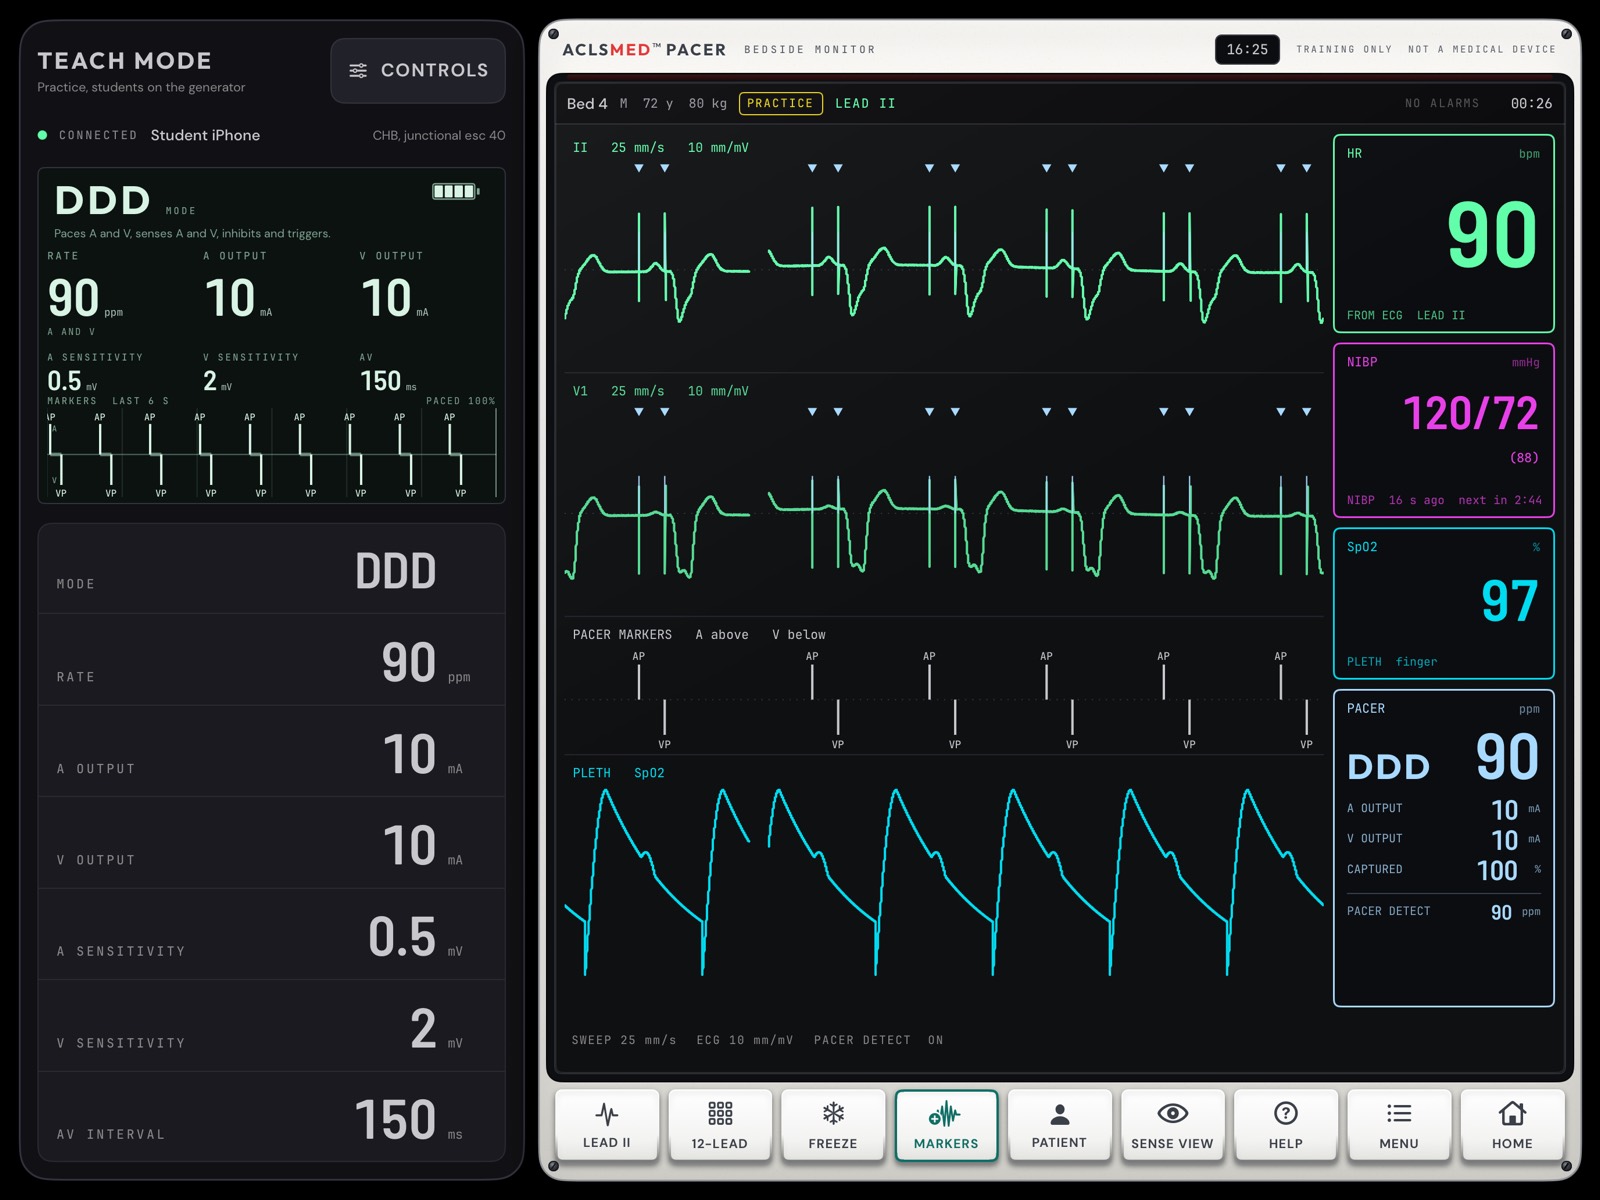
The monitor's own PATIENT key works too: tap for the patients, hold for the faults.
TEACH modeInstructor panel
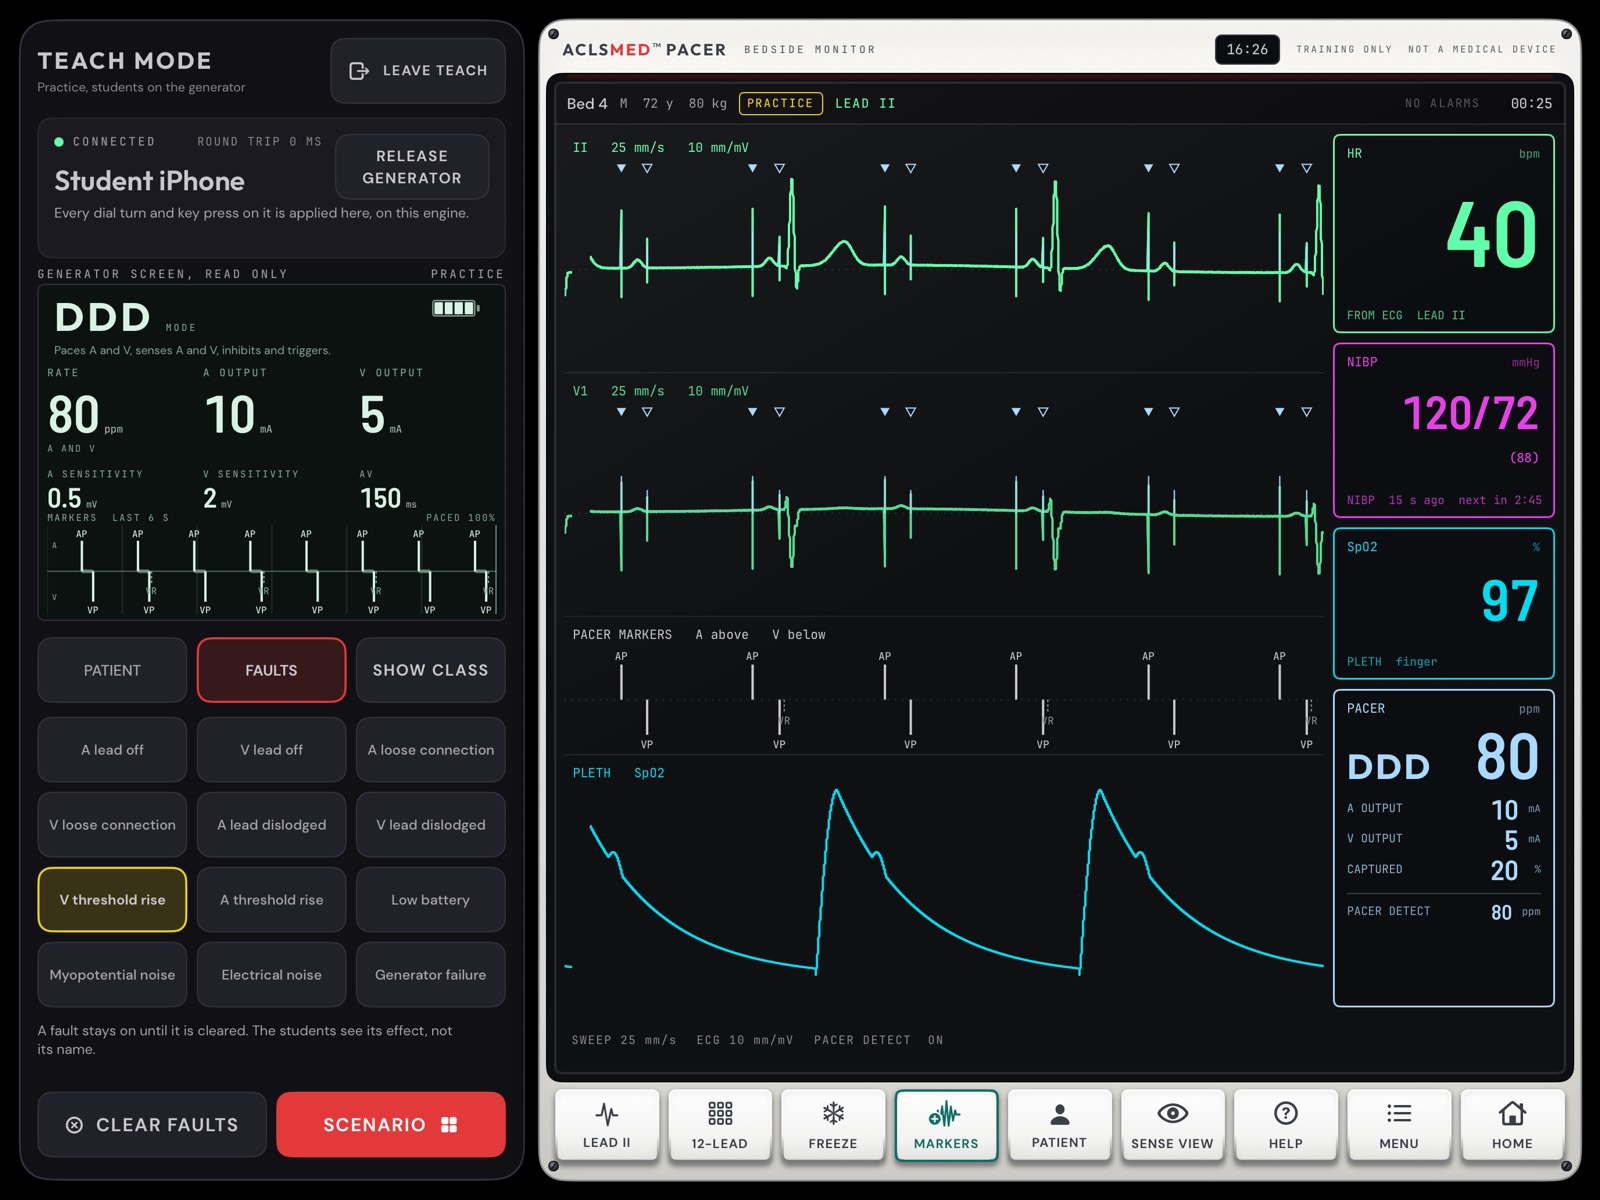
§ 08.06 — Faults and SHOW CLASS
They see the effect, not the name
FAULTS · V threshold rise onSHOW CLASS · settings in big type
A fault stays on until it is cleared. The students see its effect on the monitor, never its name, so they have to find it. SHOW CLASS fills the left third with the mirror and MODE, RATE, outputs, sensitivities and AV interval in big type for the back of the room; CONTROLS brings the panel back.
TEACH modeFaults · SHOW CLASS
§ 08.07 — A scored case in TEACH
The class scores as one learner
SCENARIO on the panel opens the case list. A locked case opens the paywall on the monitor.
The case bar and the bedside panel sit on the monitor glass, under your hand. The students hold the generator. The bar never shows a hint here.
The panel shows the case, the clock and EXPECTED NOW, hidden from the class. Hold HOLD TO PEEK to read it; let go to hide it.
Steps done and a progress bar show how the class is doing.
FINISH CASE ends it. The questions and the debrief come up on the monitor for the whole class.
TEACH modeScored case
§ 08.08 — When the link drops
The monitor keeps running
You see
What to do
GENERATOR OFFLINE
Nothing yet. The generator rejoins by itself with the same PIN when it comes back. Nothing on the monitor is lost.
RECONNECTING
On the phone: its controls are greyed until the link returns.
RELEASE GENERATOR
Frees the seat at once. A linked device is sent back to JOIN; an away one just loses the seat. A seat with no connection frees itself after 30 s.
Already has a generator
Another device holds the seat. Release it, or wait 30 s if it is offline.
Wrong PIN
Read the four digits on the monitor again.
5 wrong PINs
New joins are paused for 30 s and the panel says so. The device in the seat can still rejoin.
LINK FAILED
Check local network access in Settings, leave TEACH and start it again.
TEACH modeLink
§ 08.09 — Leaving TEACH
Leave from either end, on purpose
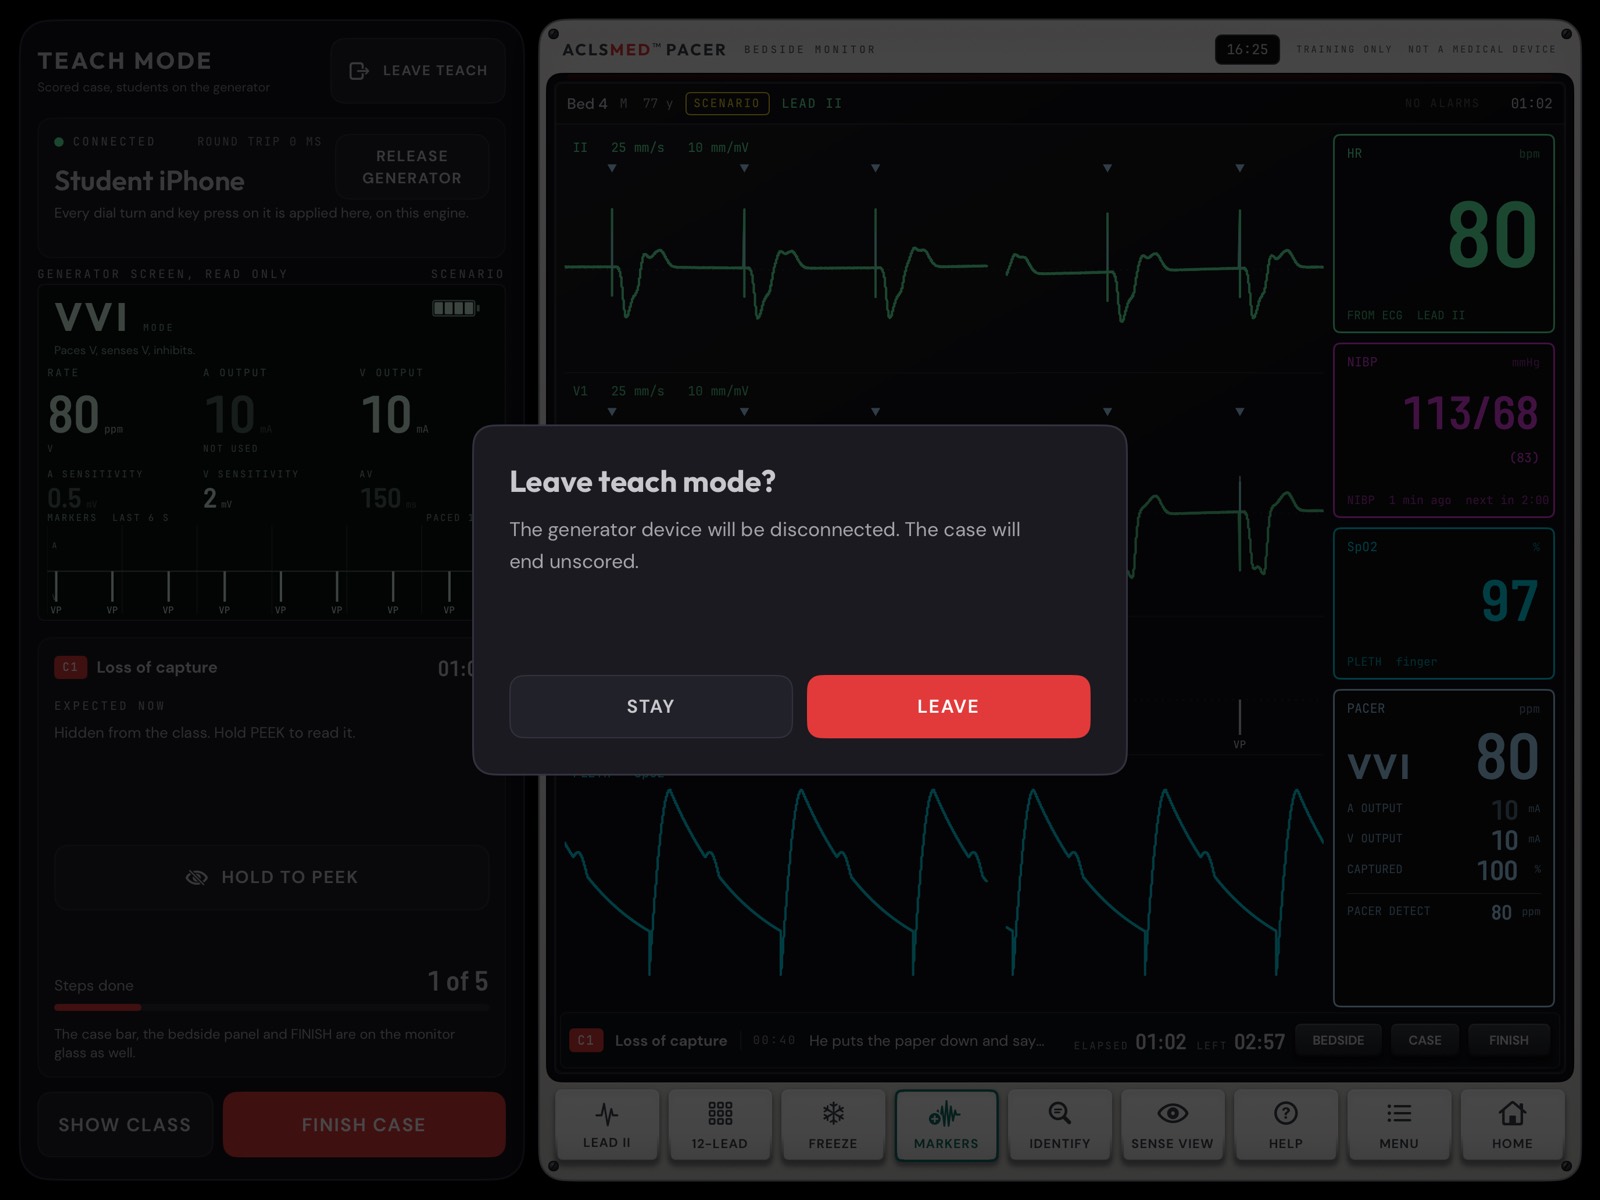
ON THE MONITOR
LEAVE TEACH on the panel, or HOME on the monitor, asks "Leave teach mode? The generator device will be disconnected." During a case it adds "The case will end unscored."
ON THE GENERATOR
Hold LEAVE for one second. A short tap only shows "HOLD LEAVE 1 S", so a student cannot leave by accident.
A SHORT APP SWITCH
A phone that locks or switches apps briefly says hello again on return and rejoins without the PIN.
TEACH modeLeaving
§ 09
Running a class
A checklist for the hour before, and one way to use the hour itself.
§ 09.01 — Before class
The ten-minute check
Charge both devices. Update both to the same version.
Open the app once on each and accept the training notice.
Start TEACH once on each and allow local network access, so the prompt never interrupts class.
iOS: both on the same Wi-Fi, or Bluetooth on. Android: both on the same Wi-Fi.
Join once to check the link, then leave.
Set Practice opens and the shell colour in Settings.
Set the sound: Beat beep and Spike click up for a room, or SILENT for a quiet one.
Pro on the monitor device if you will run cases beyond A1, A2, B1 and C1.
Take the console tour yourself.
Put the monitor where the class can see it, ideally mirrored to a projector.
Running a classChecklist
§ 09.02 — A session plan
One way to run an hour
Min
Activity
App
Arrival
Let the trainer run itself on the class screen
DEMO mode
0–10
Parts of the generator, the marker strip, capture
Lesson 1 or 2 on the class screen, a learner on the dials
10–25
Pass the generator. Each student turns one thing: rate, output to loss of capture and back, sensitivity, a mode
TEACH, Practice
25–35
Inject faults from the panel; the class finds them from the strip
TEACH, FAULTS tab
35–50
One scored case with the class on the generator, then the debrief on the big screen
TEACH, SCENARIO (C1 is free)
50–60
Questions; set the lessons and the drill for self-study
Learn, Strip drill
A suggestion, not a rule
Lessons run about six to eight minutes and cases four to six. Build your own plan around your unit's objectives and policy.
Running a classSession plan
§ 09.03 — Teaching tips
Make the room read the strip
ASK BEFORE THEY TURN
Before a student touches a dial, ask what the marker strip will show next. Then turn it and look.
USE FREEZE
Freeze the traces to point at a spike, its marker and the complex after it at the same moment.
SENSE VIEW FOR SENSING
Show the electrogram against the sensitivity line when the class argues about undersensing and oversensing.
HIDE THE ANSWER
Faults show their effect, not their name, and the expected step stays hidden until you PEEK. Let the class find it.
LISTEN FOR CAPTURE
Spike click and Beat beep together let the room hear a stimulus with no beat after it.
RELEASE, DON'T RESTART
To hand the generator role to another device, press RELEASE GENERATOR. The patient keeps running.
Running a classTips
§ 10
Reference
Troubleshooting, frequent questions, the generator's ranges, and a glossary.
§ 10.01 — Troubleshooting
If something looks wrong
Symptom
Likely cause
Fix
Dials and keys do nothing
LOCKED
Hold LOCK for 2 s
Dark generator, no pacing
Generator off, or Practice opens GENERATOR OFF
Hold ON / OFF for 2 s
No sound
SILENT on, a sound switched off, or device volume low
MENU or Settings > Sound; the volume buttons
No TRAINER page
A lesson, case or drill is running
TRAINER is in Practice only; in TEACH use the panel
An iPhone shows only TEACH
By design: a phone is the generator
Run the trainer on an iPad or open iPhone Duo
No monitor found
Different networks, or local network access denied
Same Wi-Fi; allow it in Settings > Privacy & Security
iPad cannot see an Android phone
By design: iOS pairs with iOS, Android with Android
Use two devices of the same platform
Join refused: versions
The two apps differ
Update both, then join again
A case is locked
Not in the free set
Pro, or Restore purchases on a new device
STRIP DRILL: free round used today
Free tier allows one a day
Tomorrow, or Pro
"Saved results could not be read"
The results file on the device could not be read
Progress starts again from there; the old file is kept on the device and nothing else changes
ReferenceTroubleshooting
§ 10.02 — Frequent questions
What instructors ask
Is it a real generator's interface?
No. It is a generic generator of our own design. Keys, menus, alarm names and numbers match no manufacturer's device. Teach your own unit's generator from its operator's manual.
Does it need the internet?
No. Everything runs on the device. TEACH uses the local network or Bluetooth between two devices in the room.
Do students need an account or Pro?
No account exists. A phone used as the generator needs nothing. Pro matters on the device that runs the cases.
Can two phones join one monitor?
No. One generator per monitor. Use RELEASE GENERATOR to hand the role to the next device.
Are lessons available in TEACH?
Not in this version. TEACH runs Practice and Scenarios. Lessons and the drill are single-device.
Is my class's work saved?
Best scores, drill rounds and lessons are saved on the device that ran them, only there. Nothing is uploaded.
Is Pro shared with ACLSMED™ SIM?
No. PACER Pro is a separate purchase inside this app.
Can it be used on a patient?
Never. It does not connect to any pacemaker, generator or patient. Training only.
ReferenceFAQ
§ 10.03 — Generator ranges
Every setting, its range and factory value
Setting
Range
Steps
Factory
MODE
AOO · AAI · VOO · VVI · DOO · DVI · DDI · DDD
—
DDD
RATE
30 to 200 ppm
1 · 2 above 100 · 5 above 170
80
A OUTPUT
0.1 to 20 mA
0.1 · 0.2 · 0.5 · 1
10
V OUTPUT
0.1 to 25 mA
0.1 · 0.2 · 0.5 · 1
10
A SENSITIVITY
0.4 to 10 mV, or ASYNC
0.1 · 0.2 · 0.5 · 1
0.5
V SENSITIVITY
0.8 to 20 mV, or ASYNC
0.2 · 0.5 · 1
2.0
AV INTERVAL
20 to 300 ms
10
150
UPPER RATE
80 to 230 ppm
5
110
PVARP
150 to 500 ms
10
300
A · V REFRACTORY
150 to 500 ms
10
250
V BLANKING
20 to 60 ms after an A pace
5
30
RAP RATE
80 to 800 ppm
10 · 20 above 200 · 50 above 400
300
Pulse width
1.0 ms, fixed
—
—
These are this trainer's teaching defaults, not any manufacturer's values. The 2:1 point the TIMING page shows is 60000 / (PVARP + AV interval).
ReferenceRanges
§ 10.04 — Glossary
The words, as the app uses them
ppm
Pulses per minute: the generator's set rate, and PACER DETECT.
bpm
The heart's rate on the ECG.
Pacing spike
The stimulus as the monitor draws it, a thin vertical line on every lead.
Capture
A stimulus that depolarizes its chamber. Loss of capture: a spike with no complex after it.
Capture threshold
The smallest output that captures every beat, in mA.
Sensing
The generator detecting the heart's own depolarization on its lead.
Sensitivity
The number in mV a signal must pass to be sensed. Smaller is more sensitive.
Inhibit · Trigger
A sensed beat stops the pace that was due. A sensed atrial beat starts the AV interval and a ventricular pace follows.
Asynchronous
Pacing at the set rate with no sensing (AOO, VOO, DOO, or ASYNC on a channel).
AV interval
Atrial event to ventricular pace, in ms.
PVARP
The atrial refractory period after a ventricular event, in ms.
Upper rate limit
The fastest tracked ventricular paced rate in DDD.
Fusion · Pseudofusion
A spike landing on a beat already starting; a spike on a complex it did nothing to.
Exit block
The threshold at the lead tip has risen above the output.
ReferenceGlossary
Fin
Now go turn the dial.
ACLSMED™ PACER is education software for a simulated patient. It is not a medical device, it does not connect to any pacemaker, generator or patient, and it must not be used for any decision about a real patient. The generator is a generic teaching generator; real generators differ, and your unit's policy and the operator's manual for your generator always come first. It does not give medical advice. In a real emergency, call your local emergency number.
 ACLSMED
Est. 2013